
Runtime Manipulation - DVIAv2 Part 3
Intro
In part 3 of this walkthrough series we will look at the runtime manipulation section of DVIAv2. If you load the application on your phone and go to this section, you will see that there are four challenges. There is two challenges for bypassing a login screen, one challenge for altering a URL and another challenge for bypassing a 6-digit pin number.
Login Method 1
If we enter any values in the login boxes and press on the Login Method 1 button, we will see a prompt saying Oops Incorrect Username or Password.
We can start to see the methods being used by the application by using Frida trace.
frida-trace -U -i "*login*" DVIA-v2
With this running go into the runtime manipulation app page and click on the Login Method 1 button. You should see the prompt and on the screen you should see a Swift function appear. You can do the same for the other login method as well. You will see the two functions below:
18737 ms  _T07DVIA_v240RuntimeManipulationDetailsViewControllerC18loginMethod1TappedyypF()
22787 ms  _T07DVIA_v240RuntimeManipulationDetailsViewControllerC18loginMethod2TappedyypF()
This gives us a good place to start reversing the function in Ghidra or Hopper. However, lets do this in a more dynamic method to save ourselves time and practice many methods.
Lets load Objection into DVIA-v2.
objection --gadget DVIA-v2 explore
Then lets search for classes that could be related. We know the Swift function names so lets search for something included in those, such as login.
ios hooking search classes login
This returned 30 classes for me. Looking through them the one that stands out to me is a class called LoginValidate. Lets watch that in Objection.
ios hooking watch class LoginValidate
We can now see that there are two methods within this class.
(agent) Watching method: + isLoginValidated
(agent) Watching method: + validateCode:viewController:
If we now press on the Login Method 1 button again, we will see output to console as below.
(agent) [442ynywbod3] Called: [LoginValidate isLoginValidated] (Kind: class) (Super: NSObject)
So now we know that when Login Method 1 is pressed, the method isLoginValidated from the class LoginValidate is called. So now lets watch the method and see what value is being returned.
ios hooking watch method "+[LoginValidate isLoginValidated]" --dump-args --dump-return
Press the button again and we will see the following output.
(agent) [p2itp5paimj] Called: +[LoginValidate isLoginValidated] 0 arguments(Kind: class) (Super: NSObject)
(agent) [p2itp5paimj] Return Value: 0x0
So when we are failing the login, the value of this method is 0. Lets hook it and set the return value to 1. Curiously, when I try to change it to 0x1 explicitly it fails, but if I use true instead of 0x1 in my Objection command it works. Not sure what causes that, but the Objection command to change it to true is below.
ios hooking set return_value "+[LoginValidate isLoginValidated]" true
Now if you click on the Login Method 1 button again, you will see that you get a message saying you have bypassed the login screen! You will also see the output in Objection showing its hooked and changed a value.
(agent) [p2itp5paimj] Called: +[LoginValidate isLoginValidated] 0 arguments(Kind: class) (Super: NSObject)
(agent) [p2itp5paimj] Return Value: 0x0
(agent) [3so3hzb0hbz] +[LoginValidate isLoginValidated] Return value was: 0x0, overriding to 0x1
LLDB
Let’s also do this with LLDB, which is essentially GDB but for Apple products. I will assume you have followed the setup steps on the setup page for getting LLDB sorted and getting the debug binary onto your phone.
SSH into the phone and launch the debug server.
./debugserver MAC_IP_ADDRESS:1234 --waitfor=DVIA-v2
You will need to get your mac IP address with something like ifconfig if you are unsure. Find the one that is in the same network as the iPhone if you are on an Ad Hoc network (if you are unsure then you are likely not).
This will wait for DVIA-v2 to run, so make sure its closed before running the above. After it’s running open DVIA-v2. It should pause on the loading screen. Then on another terminal session on your mac run:
lldb
Once you are in the lldb console run:
process connect connect://iPhone_IP_ADDRESS:1234
Placing your iPhone IP Address in the placeholder. Give it a second to run and when it should show you something like the below:
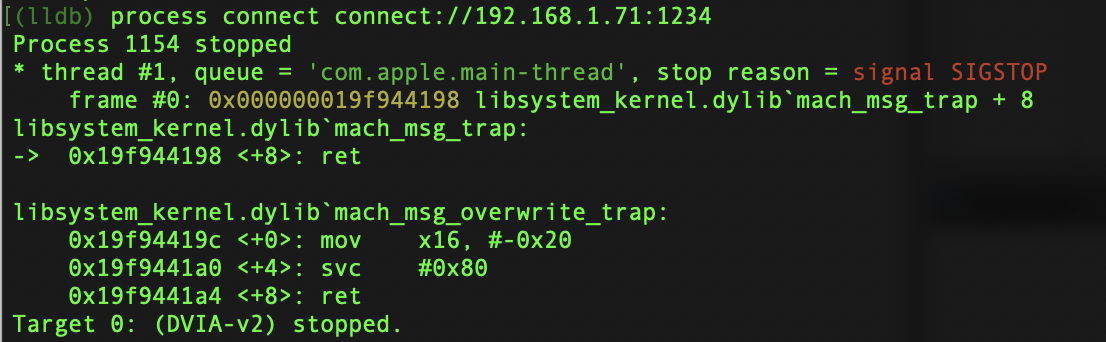
This can take a minute more than expected. You should still be on the load screen. In the LLDB console, now enter c and hit Enter. This will resume the flow of the application and DVIA-v2 should fully load.
To start with we need to calculate the ASLR offset. Since ASLR is applied, the addresses in memory will be random every time we start. So every time we restart DVIA-v2 we will need to repeat this. In LLDB dump the image sections.
image dump sections DVIA-v2
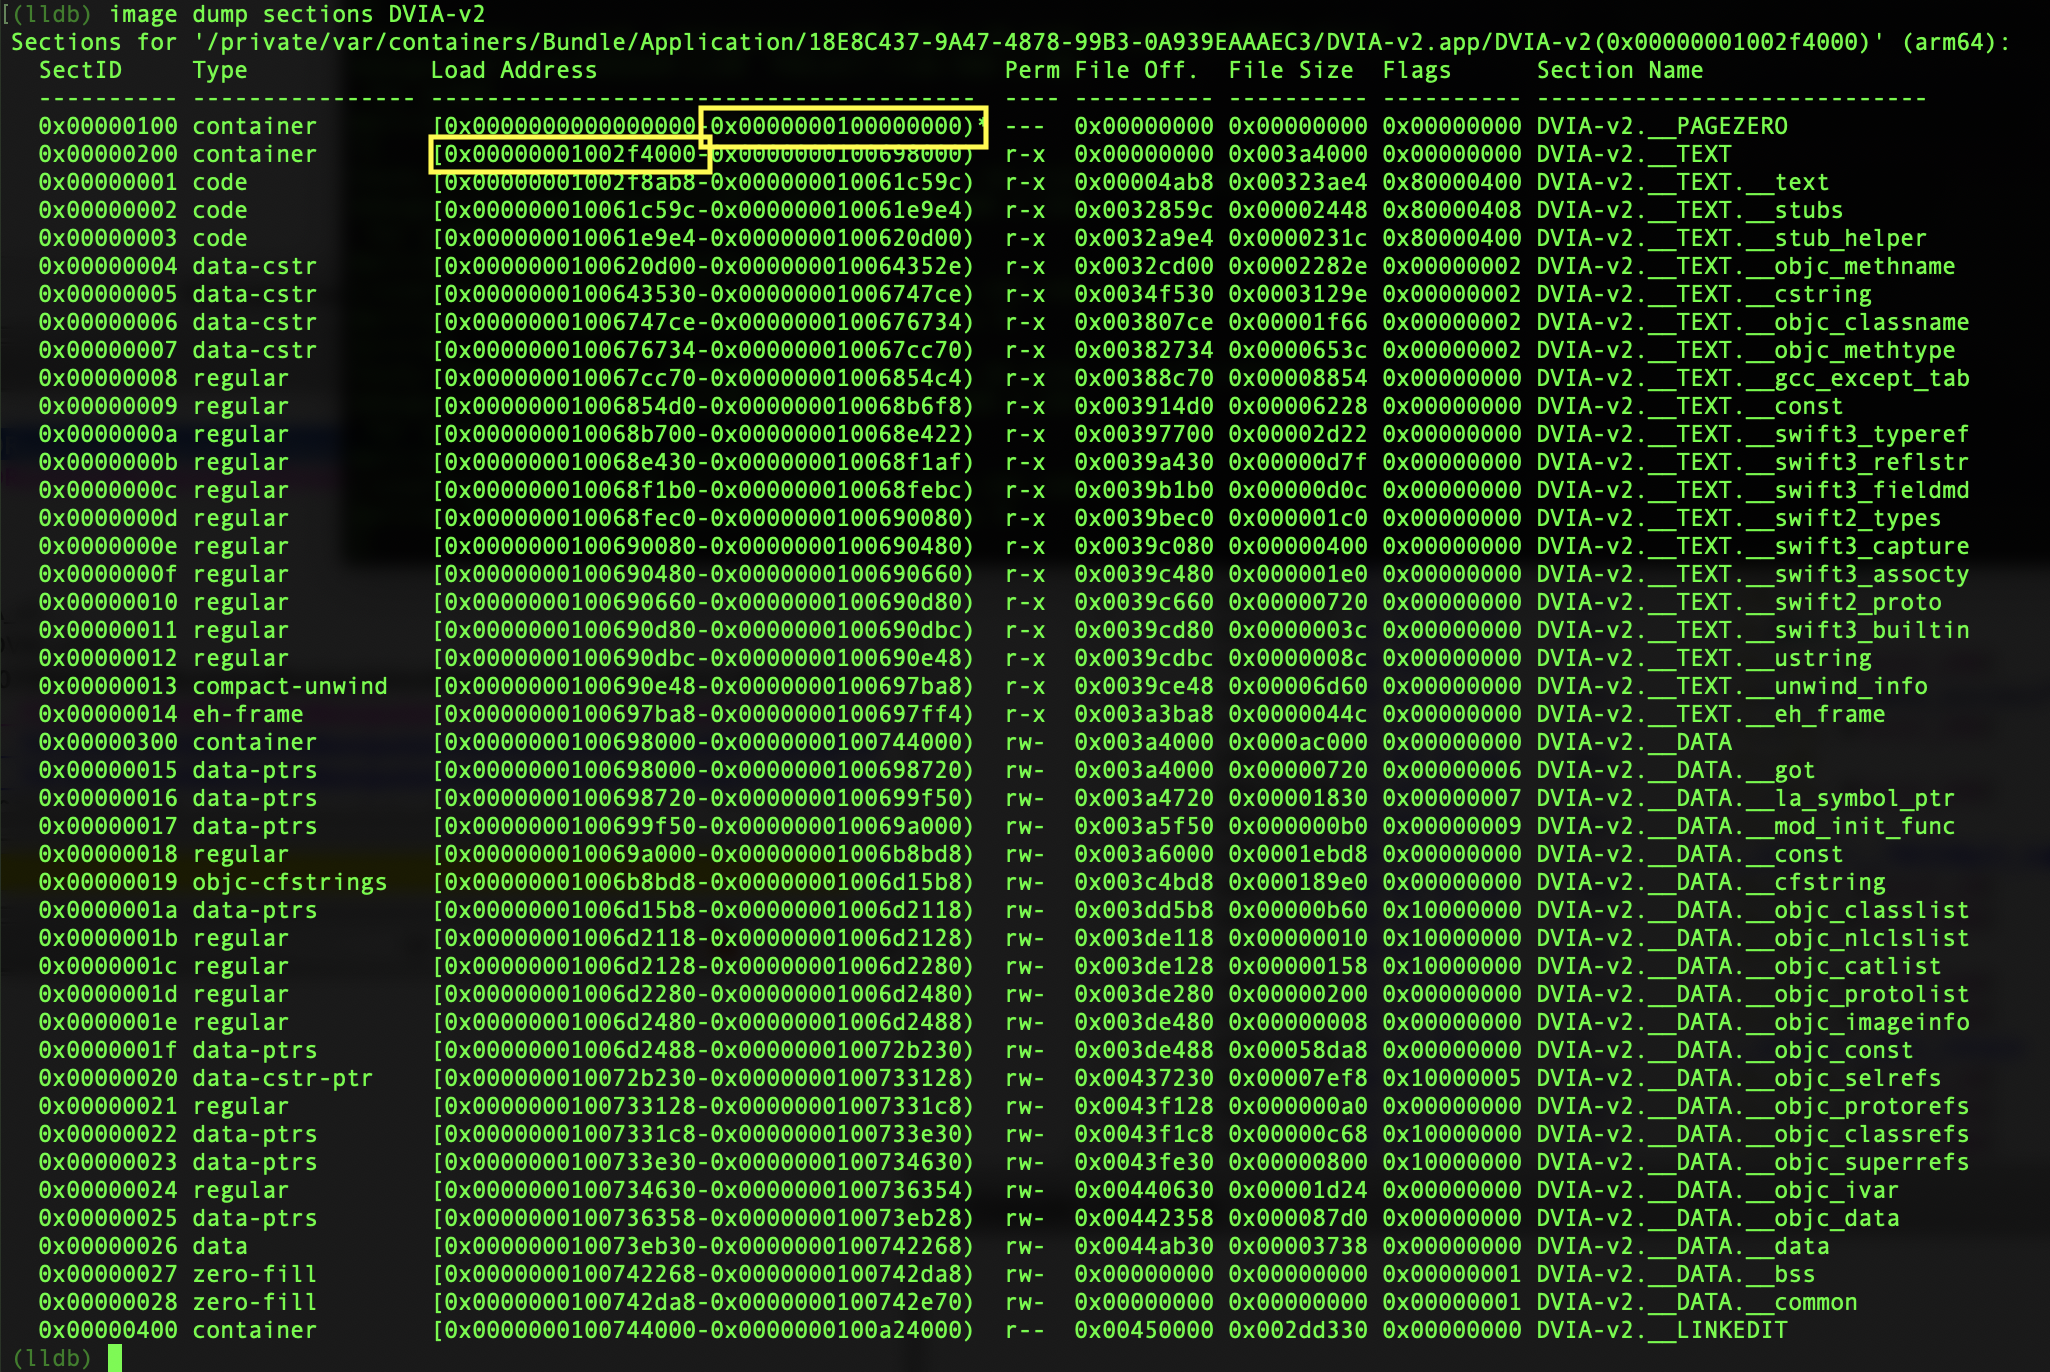
Now we can calculate the offset by subtracting the value in the box at the bottom by the value in the box above it. The places of these will be the same.
0x00000001002f4000 - 0000000100000000 = 0x2f4000
Now that we know the offset we can look at the function in Ghidra and find the comparison that we are interested in.
.png)
Then we can show it in the LLDB console using the ASLR offset calculated.
dis -s 0x2f4000+0x00000001001bd300

Now let’s set a breakpoint on the jump that we are interested in.
br set -a 0x1004b1314

Now type in some details for the login panel in the application and choose method 1. You should be paused. You should see the arrow pointing at the address we set the breakpoint.

Now if we look in the registers we will see the values being evaluated for the jump.
register read
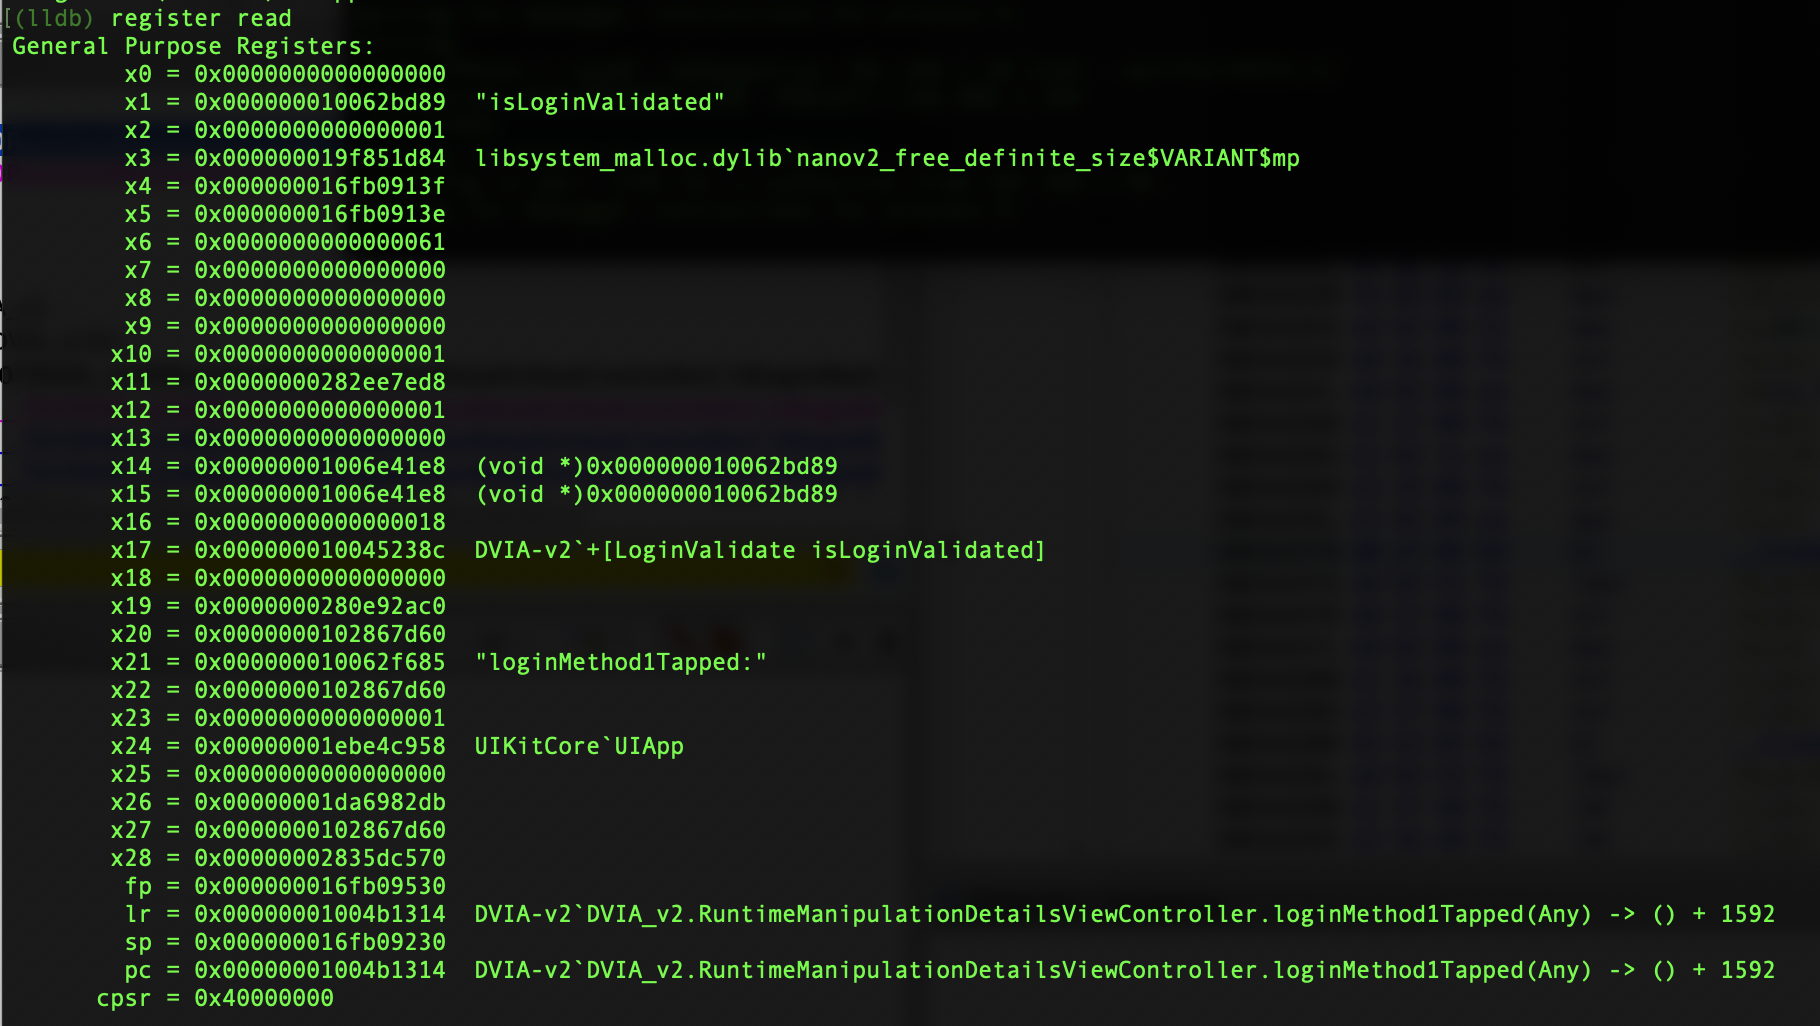
Given that we want to reverse the logic of the jump instruction, we need to look at the x0 register, as it compares x0 to 0x0 and if it is 0x0 then it will take the jump and send us to the failed message.
0x10484d314 <+1592>: tbz w0, #0x0, 0x10484d3d0
Looking at the registers we see that x0 is indeed 0x0 because we have the wrong credentials. Let’s change it to 0x1.
register write x0 0x1
You can then check it if you wish by reading the registers again. We can see that x0 has changed to 0x1.

Then resume execution using c in the lldb console and hitting enter.
On the application you should see the success message!
Login Method 2
I can’t see a class that I can use to hook into this one conveniently like the last one, so I will use a similar method to the jailbreaks and do it with static analysis.
We know the name of the function from the frida-trace, so we can find that within Ghidra and find the function for the Login Method 2 button being pressed.
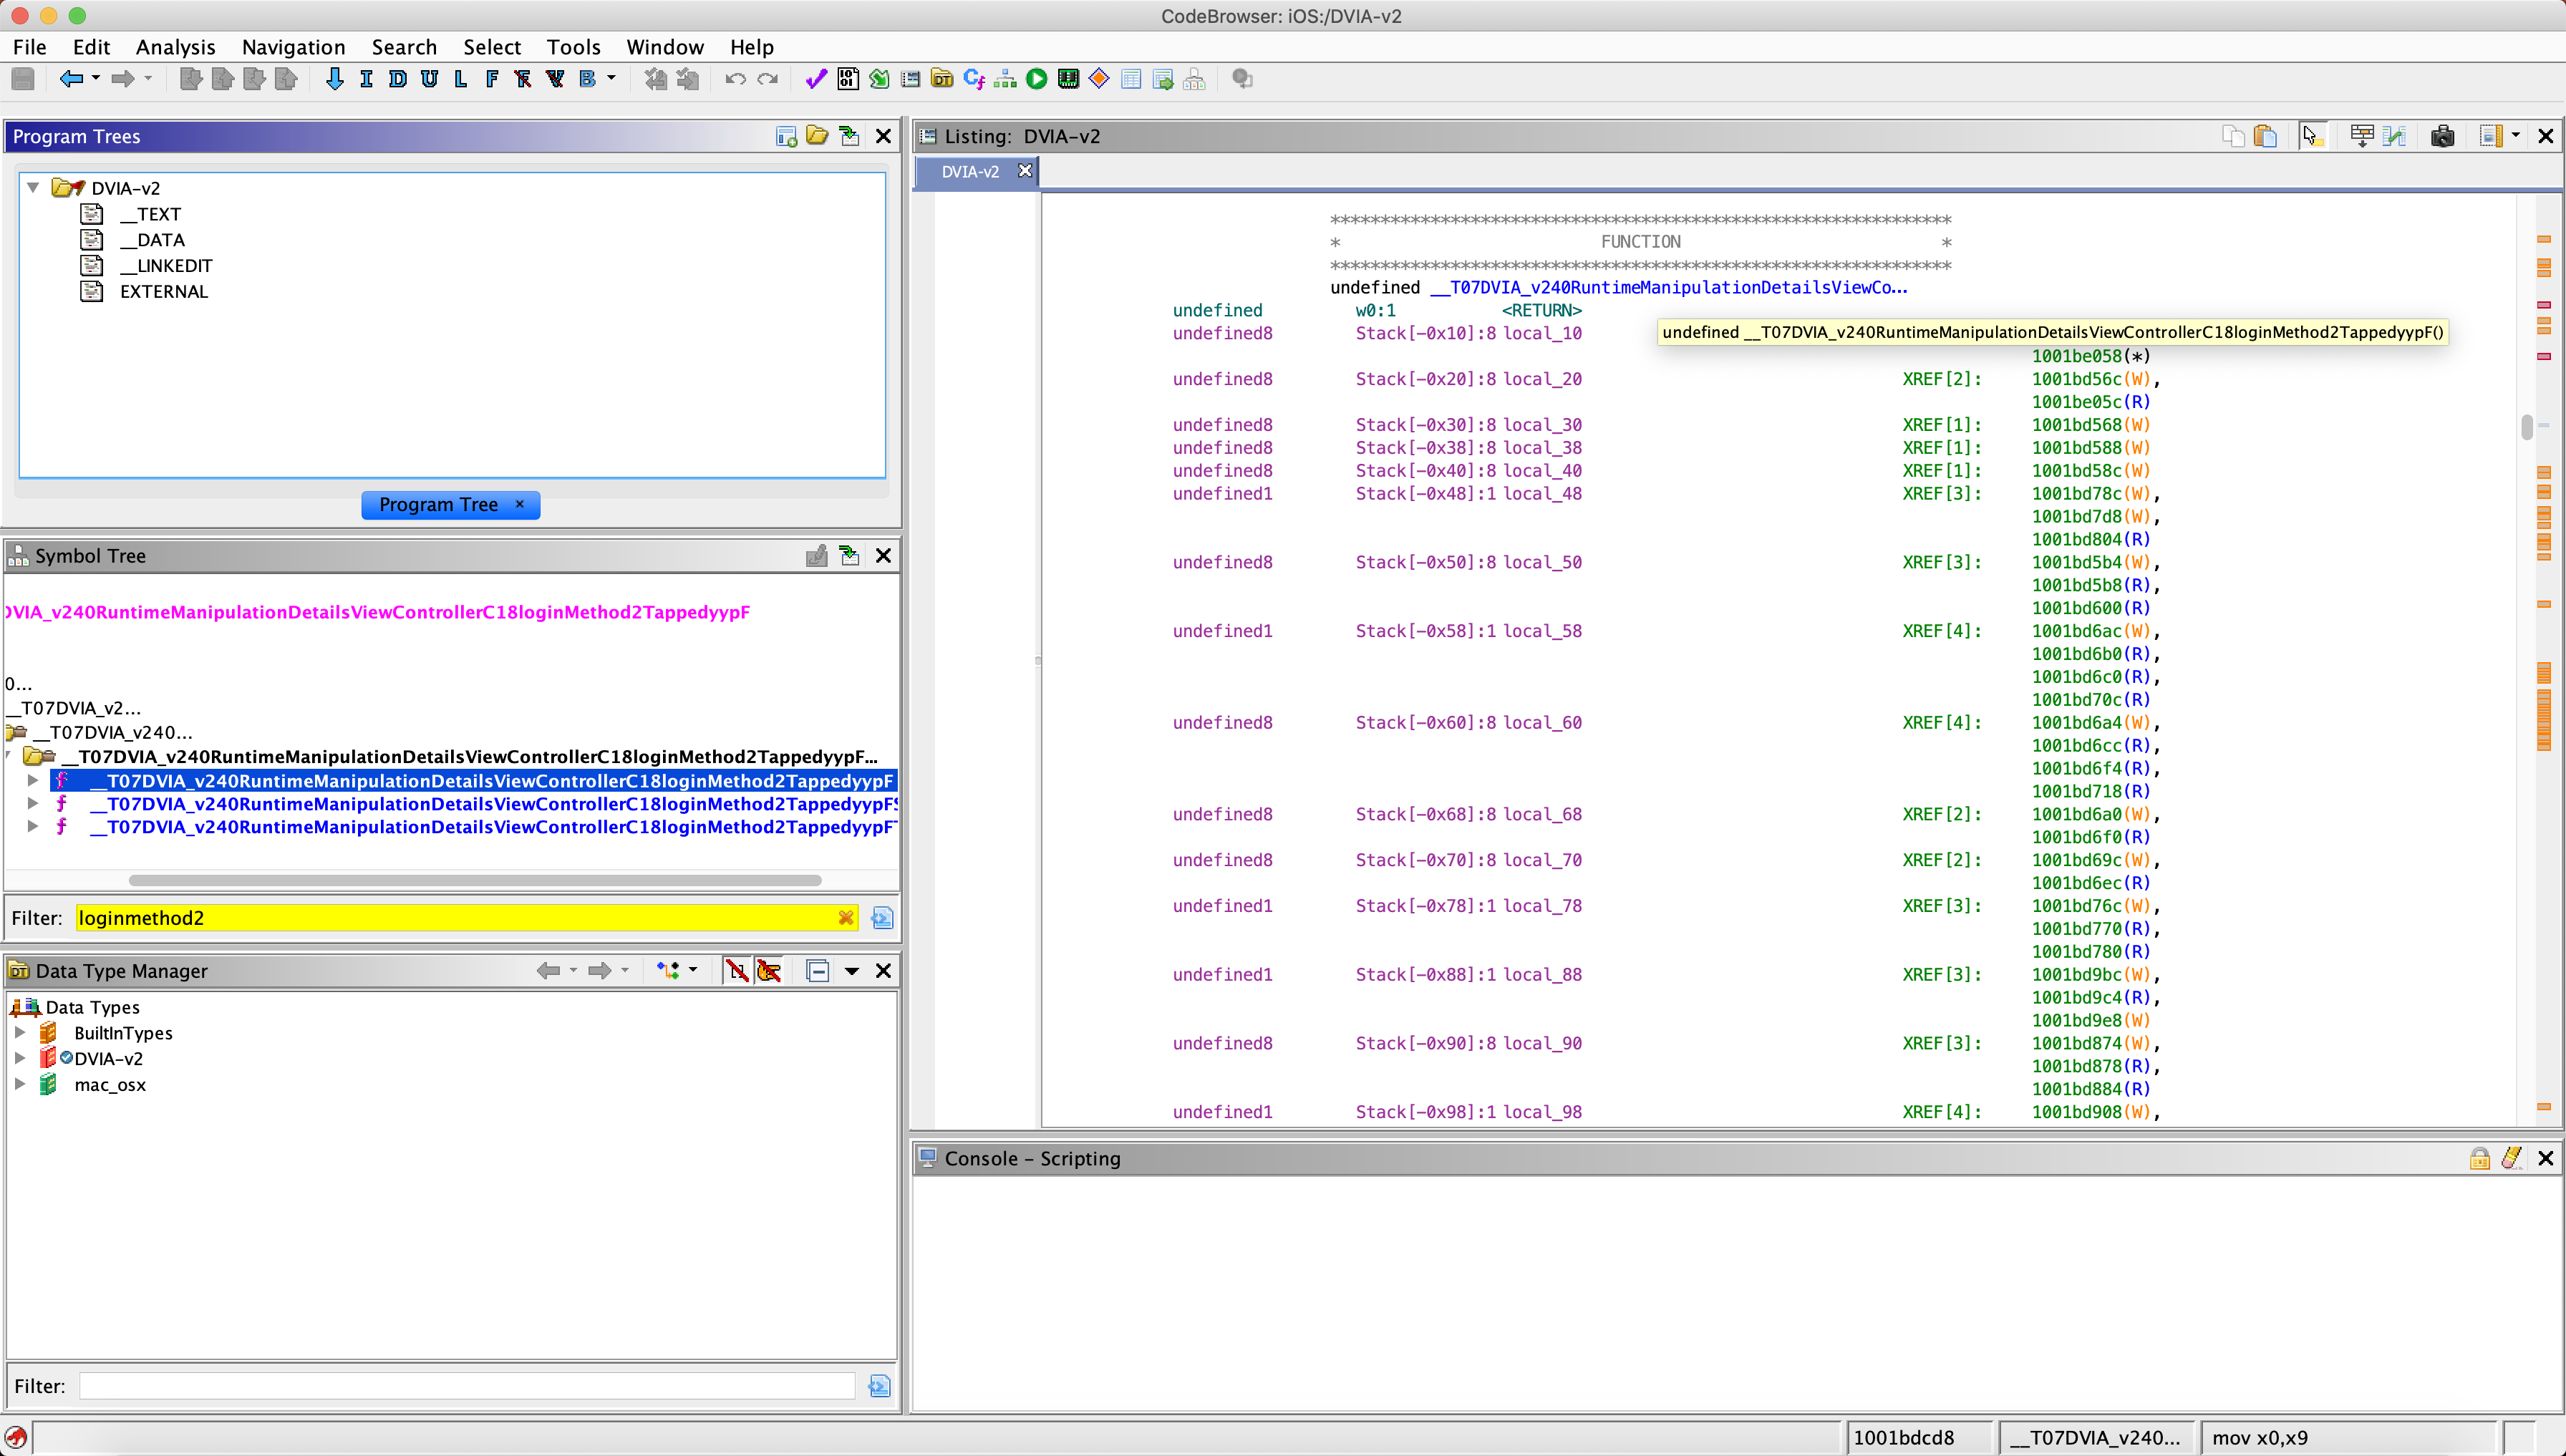
If we scroll down we will see that this is quite a large function compared to the jailbreak bypasses in part 2. To start with I will just scroll through and look at the strings on the right hand side to see what comes up. We should see our failure pop-up message that we see in the app when we are close to the end of where we are interested in.
Eventually we see the function below.

This contains a string admin13412 that seems to be doing an add instruction with this static string and some other value. This is very promising behaviour for it being something that we are interested in like a username or password.
If we continue scrolling through the application looking at strings we will come across this eventually.
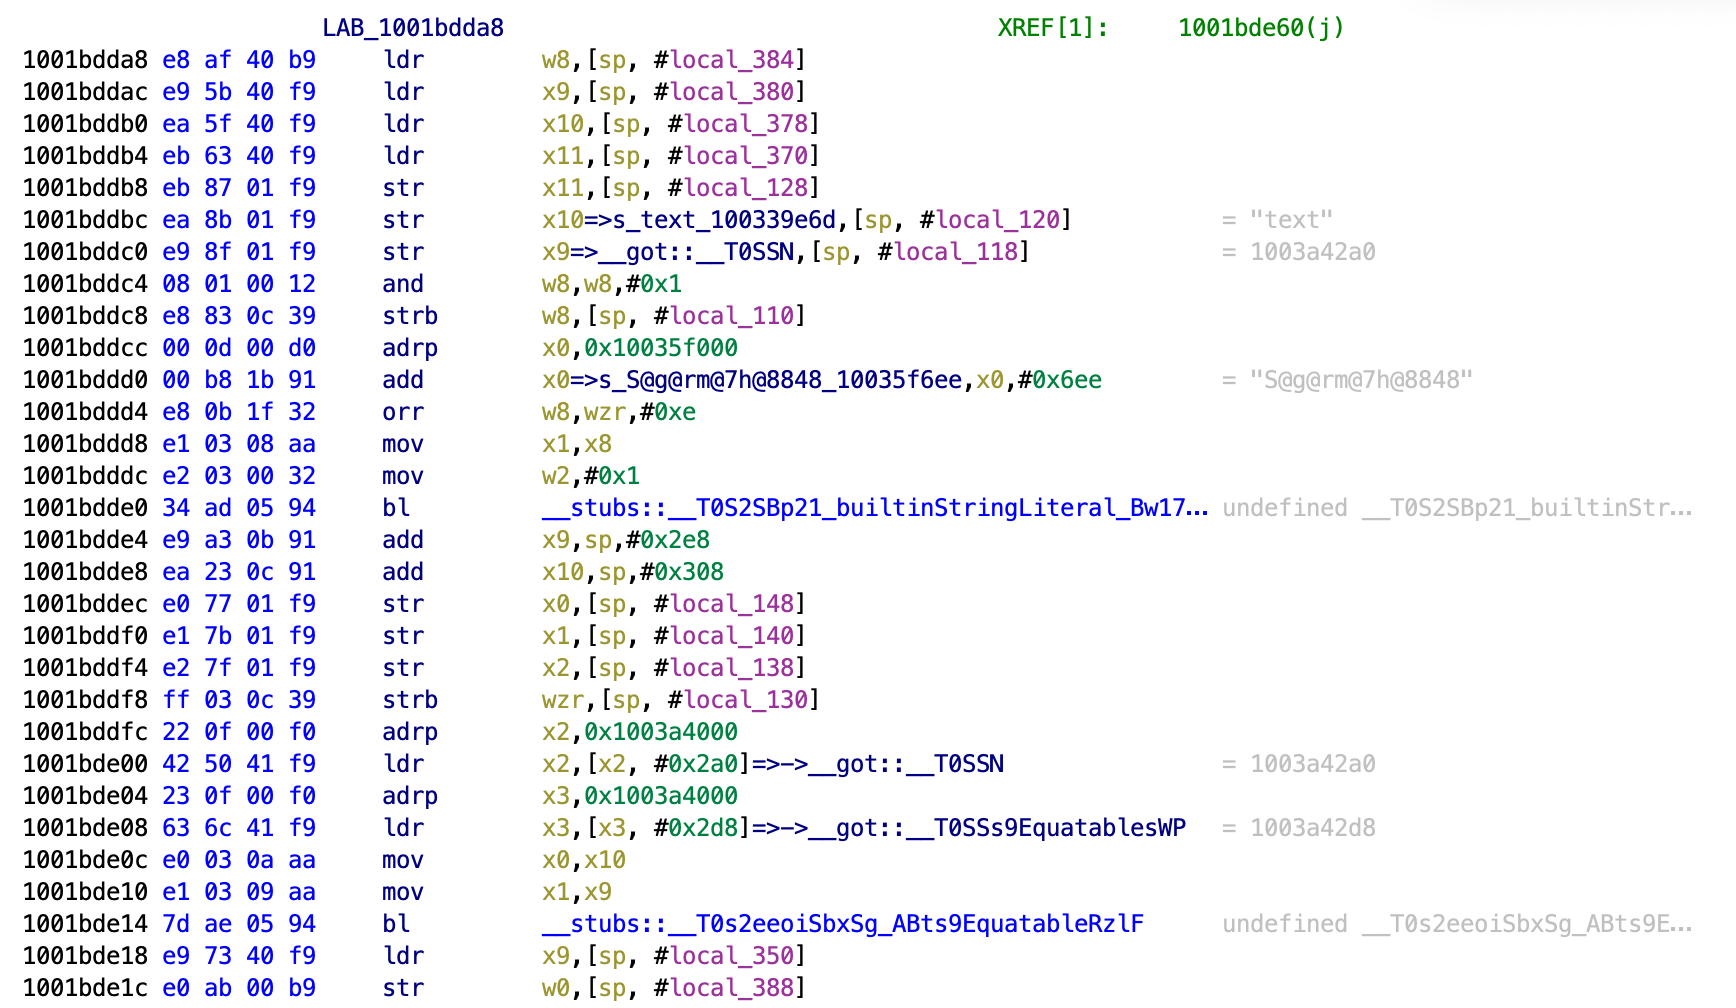
This shows another string S@g@rm@7h@8848 and another add instruction. This also looks much more password like.
Without doing any bypass, I entered these credentials into the login with admin13412 being the username and the password being S@g@rm@7h@8848 and then pressed Login Method 2 and it succeeded!
Given that this is called Runtime Manipulation, I feel like it is not the intended way forward… However, I am being blocked by my lack of ARM reversing skills and am having difficulty finding the memory address I need to change to get it to succeed.
I will likely come back to this to create some Frida script to do it. For now I will move on.
LLDB
We know where the function is in Ghidra. So let’s show it in LLDB.
dis -s 0x2f4000+0x00000001001bded4

This is the jump that will ultimately determine if we were successful or not. We can see that it is similar to Method 1, and we can see that the register x8 is being compared to 0x0. If it is 0x0 it will jump and fail us, if it’s not 0x0 then we will succeed.
0x1004b1ed4 <+2412>: tbz w8, #0x0, 0x1004b1f94
Lets set the breakpoint.
breakpoint set -a 0x1004b1ed4

Now go into the application and enter credentials and click on Login Method 2. It should pause.

Now in LLDB read the registers.
register read
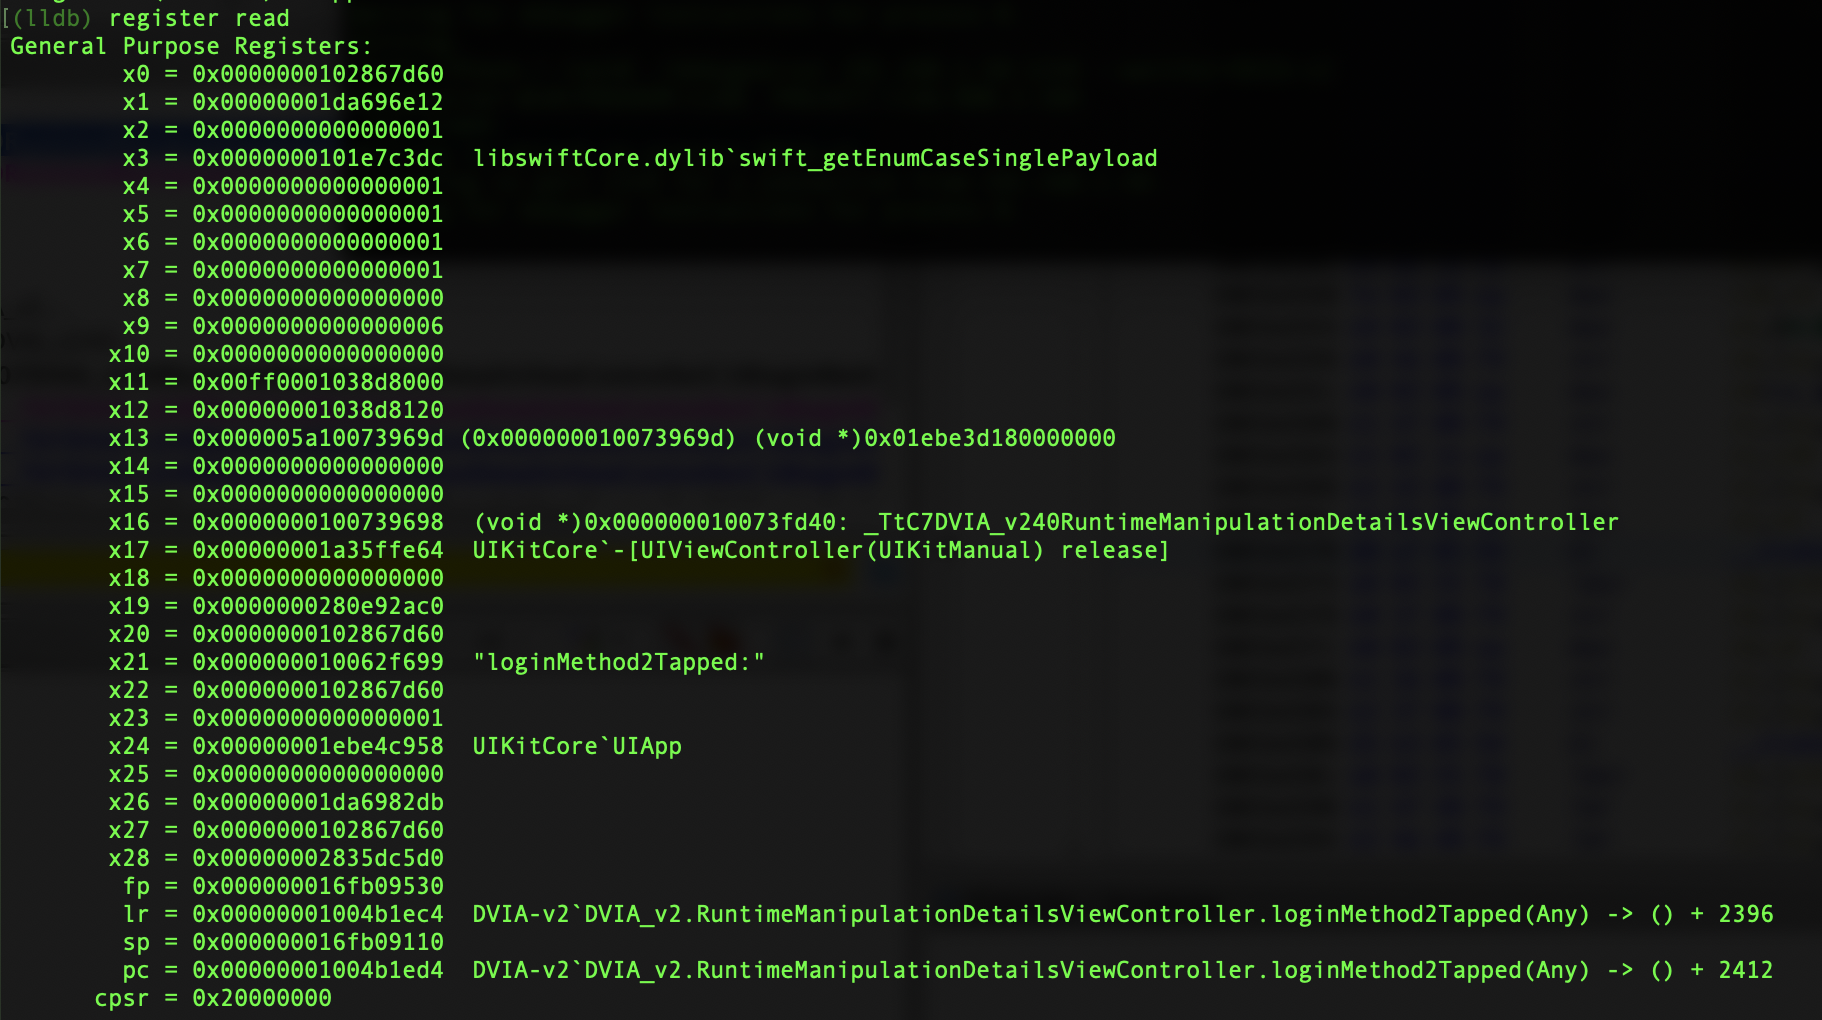
We can see x8 is 0x0 currently, so let’s change that.
register write x8 0x1
Now we can show the registers again to show that x8 has been changed.

Now continue execution with c.
We should now see the success message in the application!
Read Tutorial
In this challenge the application tells us that we need to use runtime manipulation techniques to load content from a different url instead. There is also a Read Tutorial button.
This challenge is very difficult. I have not found a way to do it yet. As I need to continue with preparing for a pentest I can’t spend too long on this issue, but I will come back and complete this soon!
Validate Code
This challenge tells us to brute force the pin with Cycript. I have seen that Cycript doesn’t work on iOS anymore, so I am not entirely sure how to go about this. I have got a solution but it certainly wasn’t the intended one.
If you enter any 4 digits and press the Validate code button you will likely see a message displaying your code and then stating it’s incorrect.
Let’s take a look at this function in Ghidra. To find it I searched for the string we are given when we fail. I then found references to this string and worked backwards from there. By seeing which jumps are taken etc, we end up at this snippet.
10015e3d8 08 52 84 d2     mov        x8,#0x2290
10015e3dc a9 83 5e f8     ldur       x9,[x29, #local_28]
10015e3e0 3f 01 08 eb     cmp        x9,x8
10015e3e4 81 08 00 54     b.ne       LAB_10015e4f4
That b.ne is a branch if not equal to instruction and the jump it takes sends us to the incorrect code message. If that jump is not taken then we end up getting the success message.
Just before the b.ne is a cmp instruction that compares the value of whatever is stored in x9 with whatever is stored in x8. The result of this will determine if we jump. If they are equal we will not jump and we will succeed. If they are not equal then it will jump and we will fail.
The ldur instruction moves a value into x9 from #local_28. We don’t know what this is but it is likely a value returned from some other function.
The mov instruction moves the hexadecimal value 0x2290 into the x8 register.
So now we know that this shows 0x2290 is in x8 and is being compared with some other value in x9 and then based on the result of that we will pass or fail. This means x9 is likely to be our code.
Since 0x2290 is hexadecimal and the value we put in is a decimal value, we need to convert it. This can be done with a calculator on your computer or just google to find a converter. You will find that 0x2290 is equal to the decimal value 8848.
Entering the code 8848 into the application and then validating it will return in a success, confirming our analysis!
Since this is Runtime Manipulation, lets create something to always validate our code (even though it’s not the brute force intended).
We can use the following Frida script to check the values in the x9 and x8 registers at this pointer to show us the values in real time and confirm what we expect x9 and x8 to be.
var targetModule = 'DVIA-v2';
var addr = ptr(0x15e3e0);
var moduleBase = Module.getBaseAddress(targetModule);
var targetAddress = moduleBase.add(addr);
   Interceptor.attach(targetAddress, {
        onEnter: function(args) {
                    console.log('At the address ' + addr + ' the value of x9 is currently ' + this.context.x9 + ' and the value of x8 is currently ' + this.context.x8);
        },
    });
Run this with (where returnmemvalue.js is the filename I have given it):
frida -U -l returnmemvalue.js DVIA-v2
Now enter any 4 digit code into the application and validate it. You will see output such as this:
[iPhone::DVIA-v2]-> At the address 0x15e3e0 the value of x9 is currently 0x457 and the value of x8 is currently 0x2290
No matter what you enter, x8 will remain the same and x9 will change. This proves that x9 is the input string.
So now we can create a frida script that will look at that address, then if the value of x9 isn’t 0x2290, it will hook it and change it so that it is 0x2290. This will mean no matter what code we enter it will succeed! The script is below.
var targetModule = 'DVIA-v2';
var addr = ptr(0x15e3e0);
var moduleBase = Module.getBaseAddress(targetModule);
var targetAddress = moduleBase.add(addr);
   Interceptor.attach(targetAddress, {
        onEnter: function(args) {
                if(this.context.x9 != 0x2290){
                    this.context.x9=0x2290
                    console.log("Bypass Code Validation");
            }
        },
    });
Run this in Frida as you would run any other script.
frida -U -l DVIA2codebypass.js DVIA-v2
Now enter any code you like on the application and succeed.