
Bypassing JailBreak Detection - DVIAv2 Part 2
Intro
When you subvert security controls on an iOS device to gain access as the root user, it is called Jailbreaking. This gives you a ‘jailbroken’ device. When this happens, the security is significantly weaker and essentially breaks the sandboxing between applications, allowing malicious apps to gain any data they want. This is useful for research, however is risky for end users.
Commonly applications such as banking applications will attempt to detect if your device is jailbroken and will stop working if it detects a jailbroken device. This is to stop the application from gathering data such as banking information on a device where the security is weaker and could be obtained by another malicious application.
However, since we are the root user, we can subvert these detection mechanisms. Largely this is done through hooking the application at run time using something like Frida, finding the functions that check the jailbreak, hooking them and then returning a false response. This can range from a simple boolean function to complex functions that require significant time to analyse and subvert.
DVIA has 5 levels of jailbreak detection. Level 2 you can do with the standard method of finding the Java class and the method, then hooking it with Frida or Objection to replace. However for the other levels this was not possible. This was due to DVIAv2 being written in Swift, and there is very little documentation on hooking Swift at runtime. I could find the methods with frida-trace, but had no meaningful way to interact with them.
Luckily this blog post was released recently here by Syrion. This post details how to hook a swift method and get it to return a different result. It’s not for DVIAv2, but the applications are very similar. Through his blog and some help from him through Twitter, I was able to get a working Frida script for all 5 levels of the jailbreaks! Huge thanks to him for helping me debug why my PoCs were initially failing.
The method essentially comes down to using Frida not to hook methods, but to hook specific memory addresses and alter the value of the registers at that address. This means its language independent and only relies on you being able to reverse engineer the application enough to be able to know where to inject the values.
Jailbreak Test 1
If you go into DVIA and click into the Jailbreak Detection panel you will see 5 different links. Each link will launch a test and each one is a different level. I actually bypassed test 2 first as it is the more standard way for hooking and bypassing. For Test 1,3,4,5 we are going to need to do some reverse engineering.
For this i’m going to use Ghidra and Frida, since Ghidra I am comfortable with and Frida fits in with the methodology I want to follow for mobile testing. It would also be possible to do it with debugging and changing registers in real time with LLDB. An example of that is here.
To load the application into Ghidra, you will need to remove the application from the phone (can be done with any file explorer), change the application extension to a .zip, then unzip it. Go into the Payloads folder within and you should see a file with the application name and the extension .app. This is what you will load into Ghidra or any other disassembler such as Hopper.
To start with, we are going to see what functions are used by the application, as they may not be conveniently named. So lets start a trace with the following:
frida-trace -U -i "*jail*" DVIA-v2
Note: Your test device should be plugged in over USB and DVIA-v2 should be running.
Now go within the application and go to the jailbreak section. Now click on all of the buttons. You should see the following:
Started tracing 7 functions. Press Ctrl+C to stop.
           /* TID 0x403 */
  8219 ms  _T07DVIA_v232JailbreakDetectionViewControllerC20jailbreakTest1TappedyypF()
  9668 ms  _T07DVIA_v232JailbreakDetectionViewControllerC20jailbreakTest2TappedyypF()
 10966 ms  _T07DVIA_v232JailbreakDetectionViewControllerC20jailbreakTest3TappedyypF()
 10966 ms     | _T07DVIA_v232JailbreakDetectionViewControllerC14jailbreakTest3yyF()
 12501 ms  _T07DVIA_v232JailbreakDetectionViewControllerC20jailbreakTest4TappedyypF()
 13601 ms  _T07DVIA_v232JailbreakDetectionViewControllerC20jailbreakTest5TappedyypF()
Process terminated
Each function is called as we click on the button. So we can see when we click on the Test 1 button the first function (_T07DVIA_v232…jailbreakTest1TappedyypF) is called. This is a Swift function and we can tell that by the _T at the start. If this was an Objective-C function then we could hook it with Objection. We can’t do the same with Swift though.
We can also see that Test 3 has two functions. It has the one for it being tapped like all the others, then it has one that has jailbreakTest3 in it, so we can assume that is where the main bulk of the Test will be done.
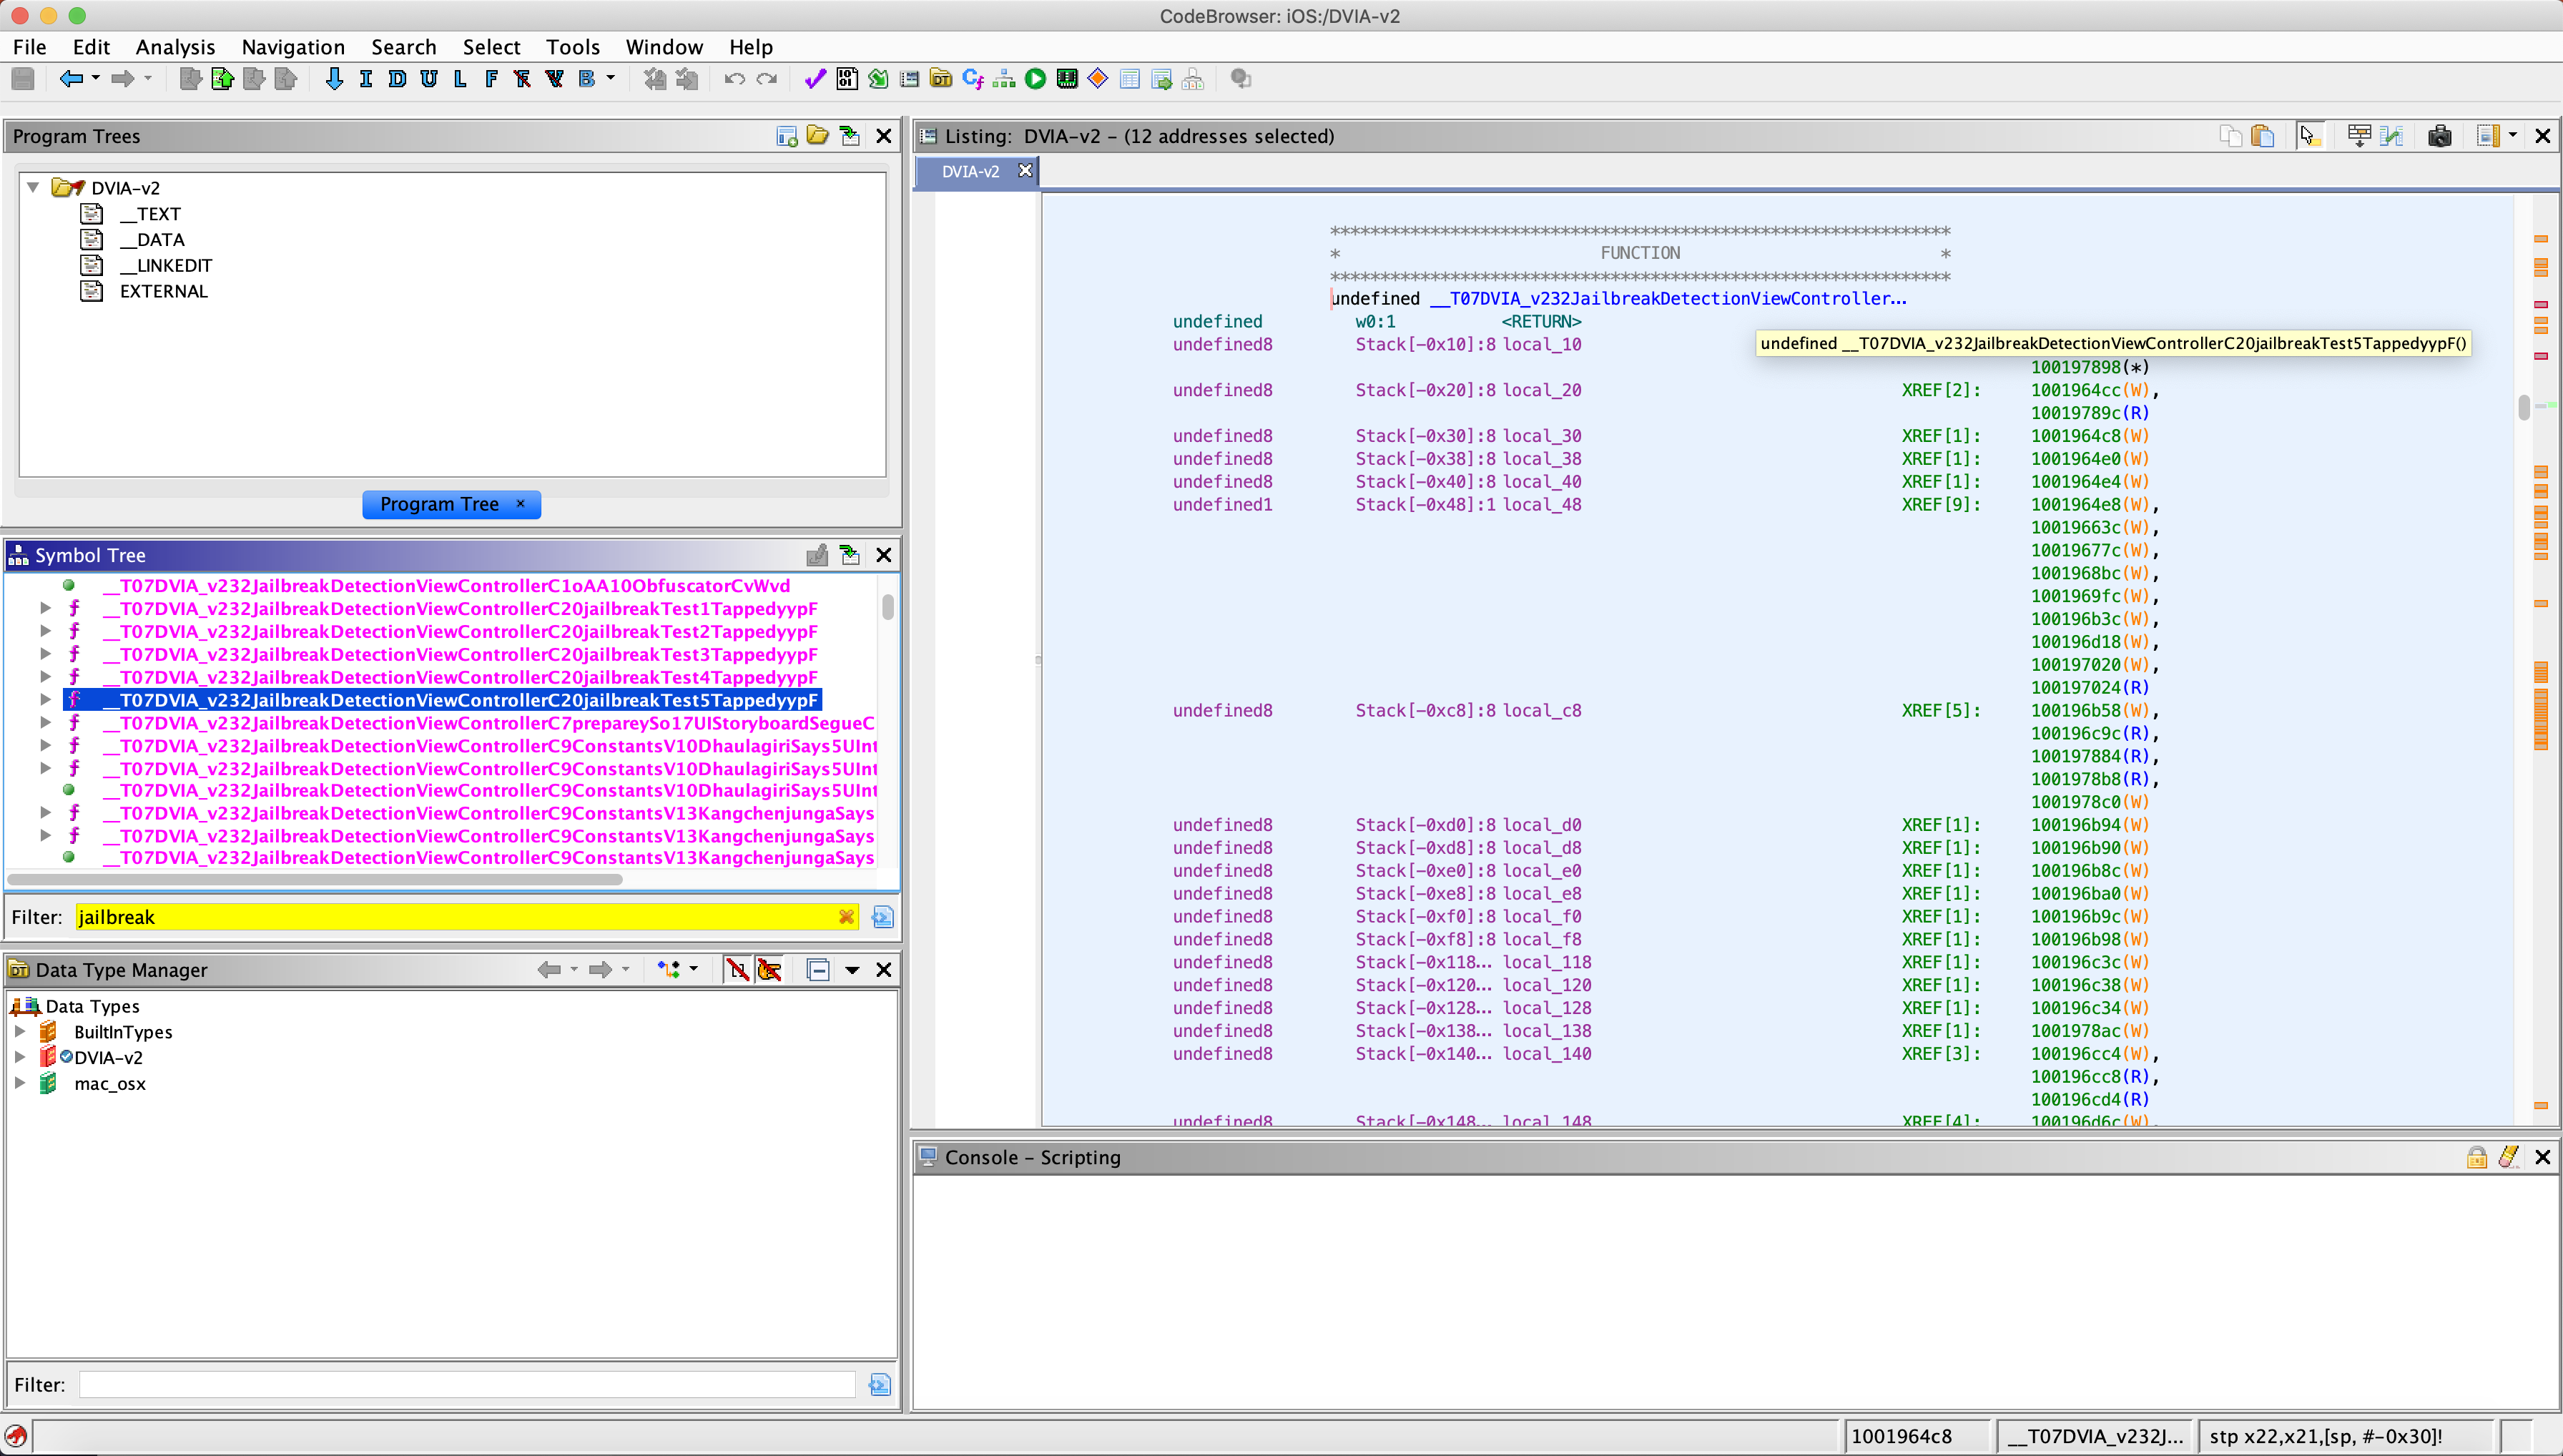
Load the application into the disassembler and now search for the first function for Test 1. Now go to it and you should see something like the below.

Now we need to analyse what the function actually does. The whole function is below.
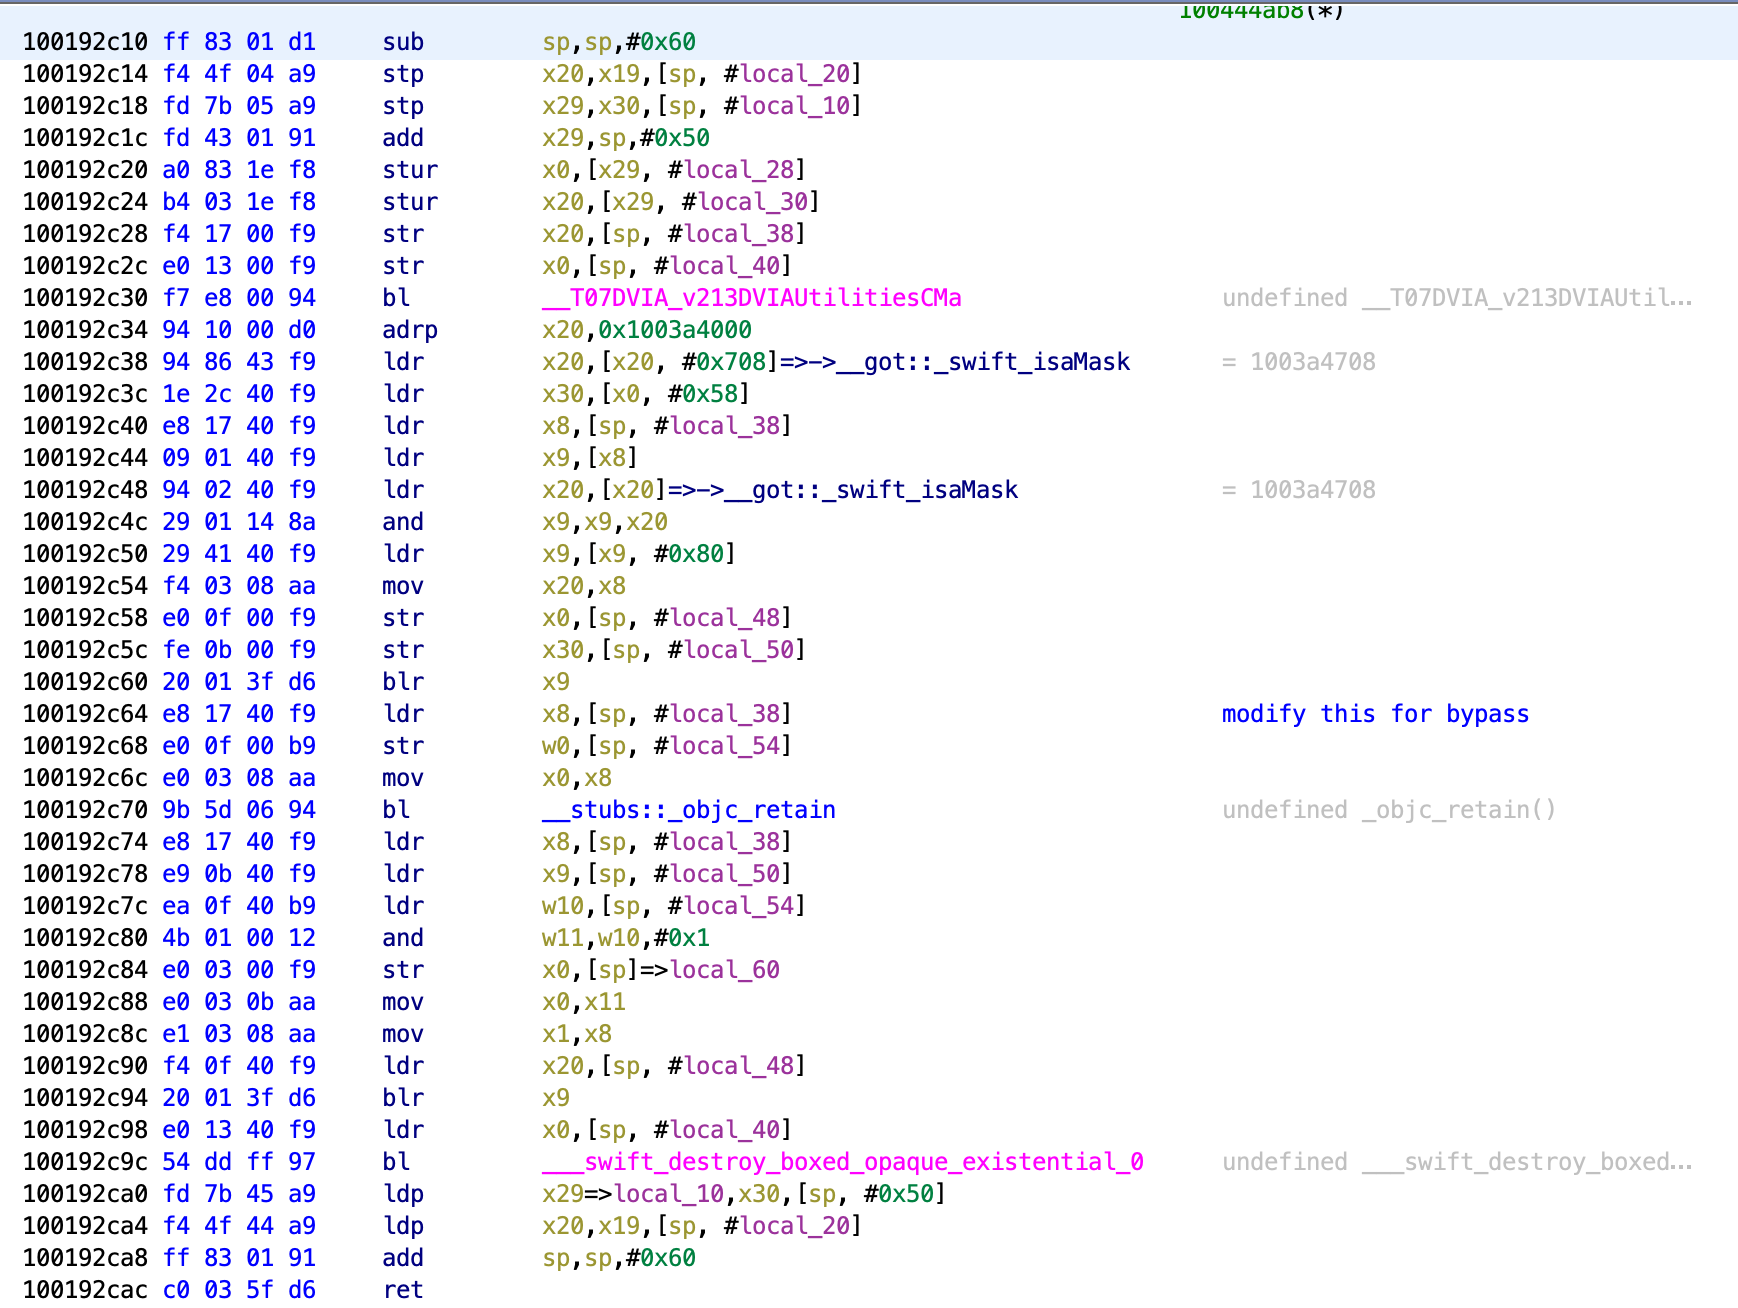
We can see that the function goes through and then calls another function with the bl (branch link) instruction. This is basically a jmp instruction equivalent. If you hover over the call to the function __T07DVIA_v213DVIAUtilitiesCMa we can see that assembly for that as well. You can also my own notes on which instruction to bypass.
The instruction that is called out has the following sequence:
100192c64 e8 17 40 f9     ldr        x8,[sp, #local_38]
100192c68 e0 0f 00 b9     str        w0,[sp, #local_54]
100192c6c e0 03 08 aa     mov        x0,x8
100192c70 9b 5d 06 94     bl         __stubs::_objc_retain                  undefined _objc_retain()
The first instruction is loading a value within the sp register that is being referenced as #local_38. This is being loaded into the x8 register. A value is then being writen into the x0 register (perhaps clearing it). The mov instruction then moves the value from x8 to x0. There is then a bl instruction to a different function. After that it closes. So we can assume x0 holds the value we are interested in at this address.
If you are familiar with crack-mes at all, you will know that loading a value, comparing them, then jumping is a key component of checking if we are correct or not. To locate the correct one in the function could be a case of just trying all the different ones with our technique that I will show shortly. It takes time but it is made quicker with there only being a few places where a logic like this happens.
Now when we first move onto Frida for this, lets load a script to do some sanity checking and just make sure that the instruction we are looking to hook is actually being called. Make a file called checkmeminuse.js and enter the following code:
var targetModule = 'DVIA-v2';
var addr = ptr(0x192c64);
var moduleBase = Module.getBaseAddress(targetModule);
var targetAddress = moduleBase.add(addr);
   Interceptor.attach(targetAddress, {
        onEnter: function(args) {
                    console.log('Address Entered');
        },
    });
The target module will need to be changed for the application you are looking at. The address pointer we change to the address we want to analyse. It is currently on the ldr instruction. The modulebase is static and will get Frida to calculate the offset for us which is very nice. It will then intercept when a call is made to that memory address and it will just put Entered in the console.
Run the above with the following:
frida -U -l checkmeminuse.js DVIA-v2
Now click on the Jailbreak Test 1 button within the DVIA-v2 application. You will see the popup and you should see the following in your console.
[iPhone::DVIA-v2]-> Address Entered
So now we know that the memory address is in use when we are pressing Test 1. We can also press the others and see that nothing is printed. This shows us we are in the right place roughly. Now we want to know what the value is that is being loaded into the x8 register. So lets use the code below:
var targetModule = 'DVIA-v2';
var addr = ptr(0x192c64);
var moduleBase = Module.getBaseAddress(targetModule);
var targetAddress = moduleBase.add(addr);
   Interceptor.attach(targetAddress, {
        onEnter: function(args) {
                    console.log('At the address ' + addr + ' the value is currently ' + this.context.x0);
        },
    });
This is the same as the last script, just with a change in the console.log function to print the address we are looking at and the value that is being returned within the x0 register. Run it with:
frida -U -l returnmemvalue.js DVIA-v2
Now lets run the Jailbreak Test 1 within the application again. We should now see the output of the script.
[iPhone::DVIA-v2]-> At the address 0x192c64 the value is currently 0x1
So we know that the address is being hit and that the value in the x0 register is 1. Now for this function we don’t actually know what this is yet, but lets try changing it to 0 and assume its some boolean (true or false) result. This will assume that the first function called performed some check, the return result comes back as either 1 for jailbroken or 0 for not jailbroken. This then gets loaded into x8 for comparison to evaluate which popup should come up.
Lets create a DVIA2bypassjailbreak1.js file and put the following code in:
var targetModule = 'DVIA-v2';
var addr = ptr(0x192c64);
var moduleBase = Module.getBaseAddress(targetModule);
var targetAddress = moduleBase.add(addr);
   Interceptor.attach(targetAddress, {
        onEnter: function(args) {
                if(this.context.x0 == 0x01){
                    this.context.x0=0x00
                    console.log("Bypass Test1");
            }
        },
    });
This is the same code for the start, then it is intercepting the memory address, checking if the value of the x0 register is 0x01 and if it is, then to change it to 0x0 and to print the console so that we know it has fired.
Note: To bypass we need to change the value in the x0 register, not in the x8 register!
Now run this script with the below command, then run the Test and you should see that it’s now not Jailbroken!
frida -U -l DVIA2bypassjailbreak1.js DVIA-v2
Jailbreak Test 2
Frida
When I was doing this I actually assumed this was number 1, so I did this one first. This jailbreak relies on a boolean check being done. I don’t know what it’s checking exactly, but as it returns a boolean value, we can just make it false and pass the test.
We can do this through the Frida console, but it would mean writing all the javascript inline which sucks, so separate scripts seems the best way forward.
We can check Frida is able to see the application with:
frida-ps -U
You should see a list of applications and somewhere on there should be DVIA-v2. You may need to start it on the device first. (The device should be plugged in over USB).
We can then attach Frida to DVIA-v2 with the following:
frida -U DVIA-v2
For this I needed to open DVIA-v2 on the device for it to attach. You should then see the frida console. This is where you can write in-line javascript, but for now we will leave with exit then create some scripts to run.
The first thing we want to do is identify the Classes within DVIA-v2 that are responsible for Jailbreak detection. Lets create a script named classes.js and put in the following.
for (var className in ObjC.classes){
    if (ObjC.classes.hasOwnProperty(className))
        {console.log(className);} }
We can then execute this on the device by using frida.
frida -U -l classes.js DVIA-v2
Note: you will need to be in the same directory as the classes.js file. This will return a huge number of classes, so lets limit it down a bit.
frida -U -l classes.js DVIA-v2 | grep Jailbreak
You should see the following:
JailbreakDetection
DVIA_v2.JailbreakDetectionViewController
So we have the app (DVIA-v2) and a class that is likely responsible for detection Jailbreaks (JailbreakDetection). This script then hung for me and I needed to open a new window. This might be something I fix later on but it works for now. Might be just because of the grep.
Now we need to enumerate the methods of this class. Lets create a new file and call it classmethods.js and put the following inside:
console.log("[*] Started: Find All Methods of a Specific Class");
if (ObjC.available) {
    try {
        var className = "JailbreakDetection";
        var methods = eval('ObjC.classes.' + className + '.$methods');
        for (var i = 0; i < methods.length; i++) {
            try { console.log("[-] "+methods[i]); }
            catch(err) { console.log("[!] Exception1: " + err.message); }
            } }
        catch(err) { console.log("[!] Exception2: " + err.message); } }
else { console.log("Objective-C Runtime is not available!"); }
console.log("[*] Completed: Find All Methods of a Specific Class");
Note: We have put in the JailbreakDetection class manually, so this will need to be changed based on application. It will only need to be changed in the one variable though. Lets run this.
frida -U -l classmethods.js DVIA-v2 | grep -i 'jailbreak\|jailbroken'
This will run our script and will grep it for names like jailbreak or jailbroken. The backslash is just to escape the pipe. When I run this I see the following:
[-] + isJailbroken
So we have the application, the class and the method. Now we can start to see what is being sent to this method, but we will need to hook it and get it to display what’s being returned.
Lets create a new file and call it returnvalue.js and put the following inside.
if (ObjC.available) {

try { var className = "JailbreakDetection";
var funcName = "+ isJailbroken";
var hook = eval('ObjC.classes.' + className + '["' + funcName + '"]');

Interceptor.attach(hook.implementation, {
    onLeave: function(retval) { console.log("[*] Class Name: " + className);
    console.log("[*] Method Name: " + funcName);
    console.log("\t[-] Type of return value: " + typeof retval);
    console.log("\t[-] Return Value: " + retval); } }); }
catch(err) { console.log("[!] Exception2: " + err.message); } }

else { console.log("Objective-C Runtime is not available!"); }
Note: We have manually put in the name of the class (JailbreakDetection) and the value of the method (+ isJailbroken). You will need to change this between applications or if you got different results.
Now lets run this.
frida -U -l returnvalue.js DVIA-v2
You should see the Frida console now and no output from the script yet. Now click on the Jailbreak Test 2 in the application. You should see the popup in the app and also now see the return value in the Frida console.
Philip.Keeble@Mac frida % frida -U -l returnvalue.js DVIA-v2
     ____
    / _  |   Frida 12.10.4 - A world-class dynamic instrumentation toolkit
   | (_| |
    > _  |   Commands:
   /_/ |_|       help      -> Displays the help system
   . . . .       object?   -> Display information about 'object'
   . . . .       exit/quit -> Exit
   . . . .
   . . . .   More info at https://www.frida.re/docs/home/

[iPhone::DVIA-v2]-> [*] Class Name: JailbreakDetection
[*] Method Name: + isJailbroken
	[-] Type of return value: object
	[-] Return Value: 0x1
Now press enter and it will return to the console. Then we can leave with exit. Now we know that when we hit Jailbreak Test 2, a boolean value of 1 is being returned to the method + isJailbroken. So now lets hook it and change it.
Lets create a file called overwrite.js and put the following code in.
if (ObjC.available) {

try {
var className = "JailbreakDetection";
var funcName = "+ isJailbroken";
var hook = eval('ObjC.classes.' + className + '["' + funcName + '"]');
var newretval = ptr("0x0");

Interceptor.attach(hook.implementation, {
    onLeave: function(retval) { console.log("[*] Class Name: " + className);
    console.log("[*] Method Name: " + funcName);
    console.log("\t[-] Type of return value: " + typeof retval);
    console.log("\t[-] Original Return Value: " + retval);
    retval.replace(newretval)
    console.log("\t[-] New Return Value: " + newretval) } }); }
catch(err) { console.log("[!] Exception2: " + err.message); } }

else { console.log("Objective-C Runtime is not available!"); }
With this code we need to define the class, the method and the new value to be returned. Since we saw 0x1 before, the opposite in a boolean would be 0x0. So the return value (newretval) is specified as 0x0.
Now run this code.
frida -U -l overwrite.js DVIA-v2
After the console is open tap on the Jailbreak Test 2 again. You should now see the popup saying Device is Not Jailbroken!! The following should be seen in the Frida console:
Philip.Keeble@Mac frida % frida -U -l overwrite.js DVIA-v2
     ____
    / _  |   Frida 12.10.4 - A world-class dynamic instrumentation toolkit
   | (_| |
    > _  |   Commands:
   /_/ |_|       help      -> Displays the help system
   . . . .       object?   -> Display information about 'object'
   . . . .       exit/quit -> Exit
   . . . .
   . . . .   More info at https://www.frida.re/docs/home/

[iPhone::DVIA-v2]-> [*] Class Name: JailbreakDetection
[*] Method Name: + isJailbroken
	[-] Type of return value: object
	[-] Original Return Value: 0x1
	[-] New Return Value: 0x0
We can see in the console that it hooked the original return of 0x1 and replaced it with 0x0, so the app thinks that whatever it checked came back as false.
Objection
Objection is a framework that leverages Frida, but is a significantly easier console to use. It is very powerful and is essentially just a collection of Frida scripts.
Lets launch it and get it into our process with the following (again device connected over USB):
objection --gadget DVIA-v2 explore
An interesting feature is the following command that we can use in the objection console:
ios jailbreak disable
Now if we select the options in the Jailbreak menu, we will start to see some information on the console. This always seems to suggest its checking for Cydia.app being present, but doesn’t show much more. I will look into this more, but could be a useful way to start tracing what is going on.
So lets start by finding the classes of the application that could link to jailbreak detection with the following:
ios hooking search classes jailbreak
You should see something like this:
....highaltitudehacks.DVIAswiftv2 on (iPhone: 13.5.1) [usb] # ios hooking search classes jailbreak
JailbreakDetection
DVIA_v2.JailbreakDetectionViewController

Found 2 classes
Now we need to find the methods of that class that could be relevant. We will find them with the following command:
ios hooking watch class JailbreakDetection
My output is below.
....highaltitudehacks.DVIAswiftv2 on (iPhone: 13.5.1) [usb] # ios hooking watch class JailbreakDetection
(agent) Watching method: + isJailbroken
(agent) Registering job lulrfq9kqe. Type: watch-class-methods for: JailbreakDetection
We can see that it has already located the method + isJailbroken. This is far far simpler than with Frida and manual JavaScript files!
Now if you hit all the Jailbreak tests, you should see that when you press 2 the following line returns:
....highaltitudehacks.DVIAswiftv2 on (iPhone: 13.5.1) [usb] # (agent) [dtjaysemqfb] Called: [JailbreakDetection isJailbroken] (Kind: class) (Super: NSObject)
Now we know that Test 2 is using this method of this class. By expanding the command we can get it to dump the value that it sees.
ios hooking watch method "+[JailbreakDetection isJailbroken]" --dump-return
Above we are telling it to watch the method. The syntax is as above. The + or - may change based on application and then within the square brackets it’s just the classname followed by the methodname.
Now if you hit the Jailbreak Test 2 you should see the following:
....highaltitudehacks.DVIAswiftv2 on (iPhone: 13.5.1) [usb] # (agent) [dtjaysemqfb] Called: [JailbreakDetection isJailbroken] (Kind: class) (Super: NSObject)
(agent) [btvrisymuik] Called: +[JailbreakDetection isJailbroken] 0 arguments(Kind: class) (Super: NSObject)
(agent) [btvrisymuik] Return Value: 0x1
We can see that it has hooked it and we can see the 0x1 being returned by the application. Now lets get it to replace the value with the following command:
ios hooking set return_value "+[JailbreakDetection isJailbroken]" 0x0
This will change the return value to 0x0, as we did with the Frida scripts. Now if you click on the Jailbreak Test 2 you should see the popup saying Device is Not Jailbroken! In the Objection console we should see the following:
....highaltitudehacks.DVIAswiftv2 on (iPhone: 13.5.1) [usb] # (agent) [dtjaysemqfb] Called: [JailbreakDetection isJailbroken] (Kind: class) (Super: NSObject)
(agent) [btvrisymuik] Called: +[JailbreakDetection isJailbroken] 0 arguments(Kind: class) (Super: NSObject)
(agent) [btvrisymuik] Return Value: 0x1
(agent) [p7itn26umjk] +[JailbreakDetection isJailbroken] Return value was: 0x1, overriding to 0x0
This shows us the return value and the replaced value.
We have now successfully beaten Test 2 with both Frida and Objection, which gives a good understanding of what is happening. Objection seemed far easier to use, so I imagine Objection should be used until you need to do something manual and need to create a new script, where Frida will be more useful.
Jailbreak Test 3
For Test 3 we will continue with the method that we used in Test 1. We know from the frida-trace output that two functions were called for Test 3.
10966 ms  _T07DVIA_v232JailbreakDetectionViewControllerC20jailbreakTest3TappedyypF()
 10966 ms     | _T07DVIA_v232JailbreakDetectionViewControllerC14jailbreakTest3yyF()
Now we can assume that the Test3Tapped function essentially just calls the jailbreakTest3 function. So let’s find this. If you just scroll through the code you won’t see it where you see all the other functions for this part. That is because this is an export. To find it you can just search for the function name as a string and you should find the place where its located.
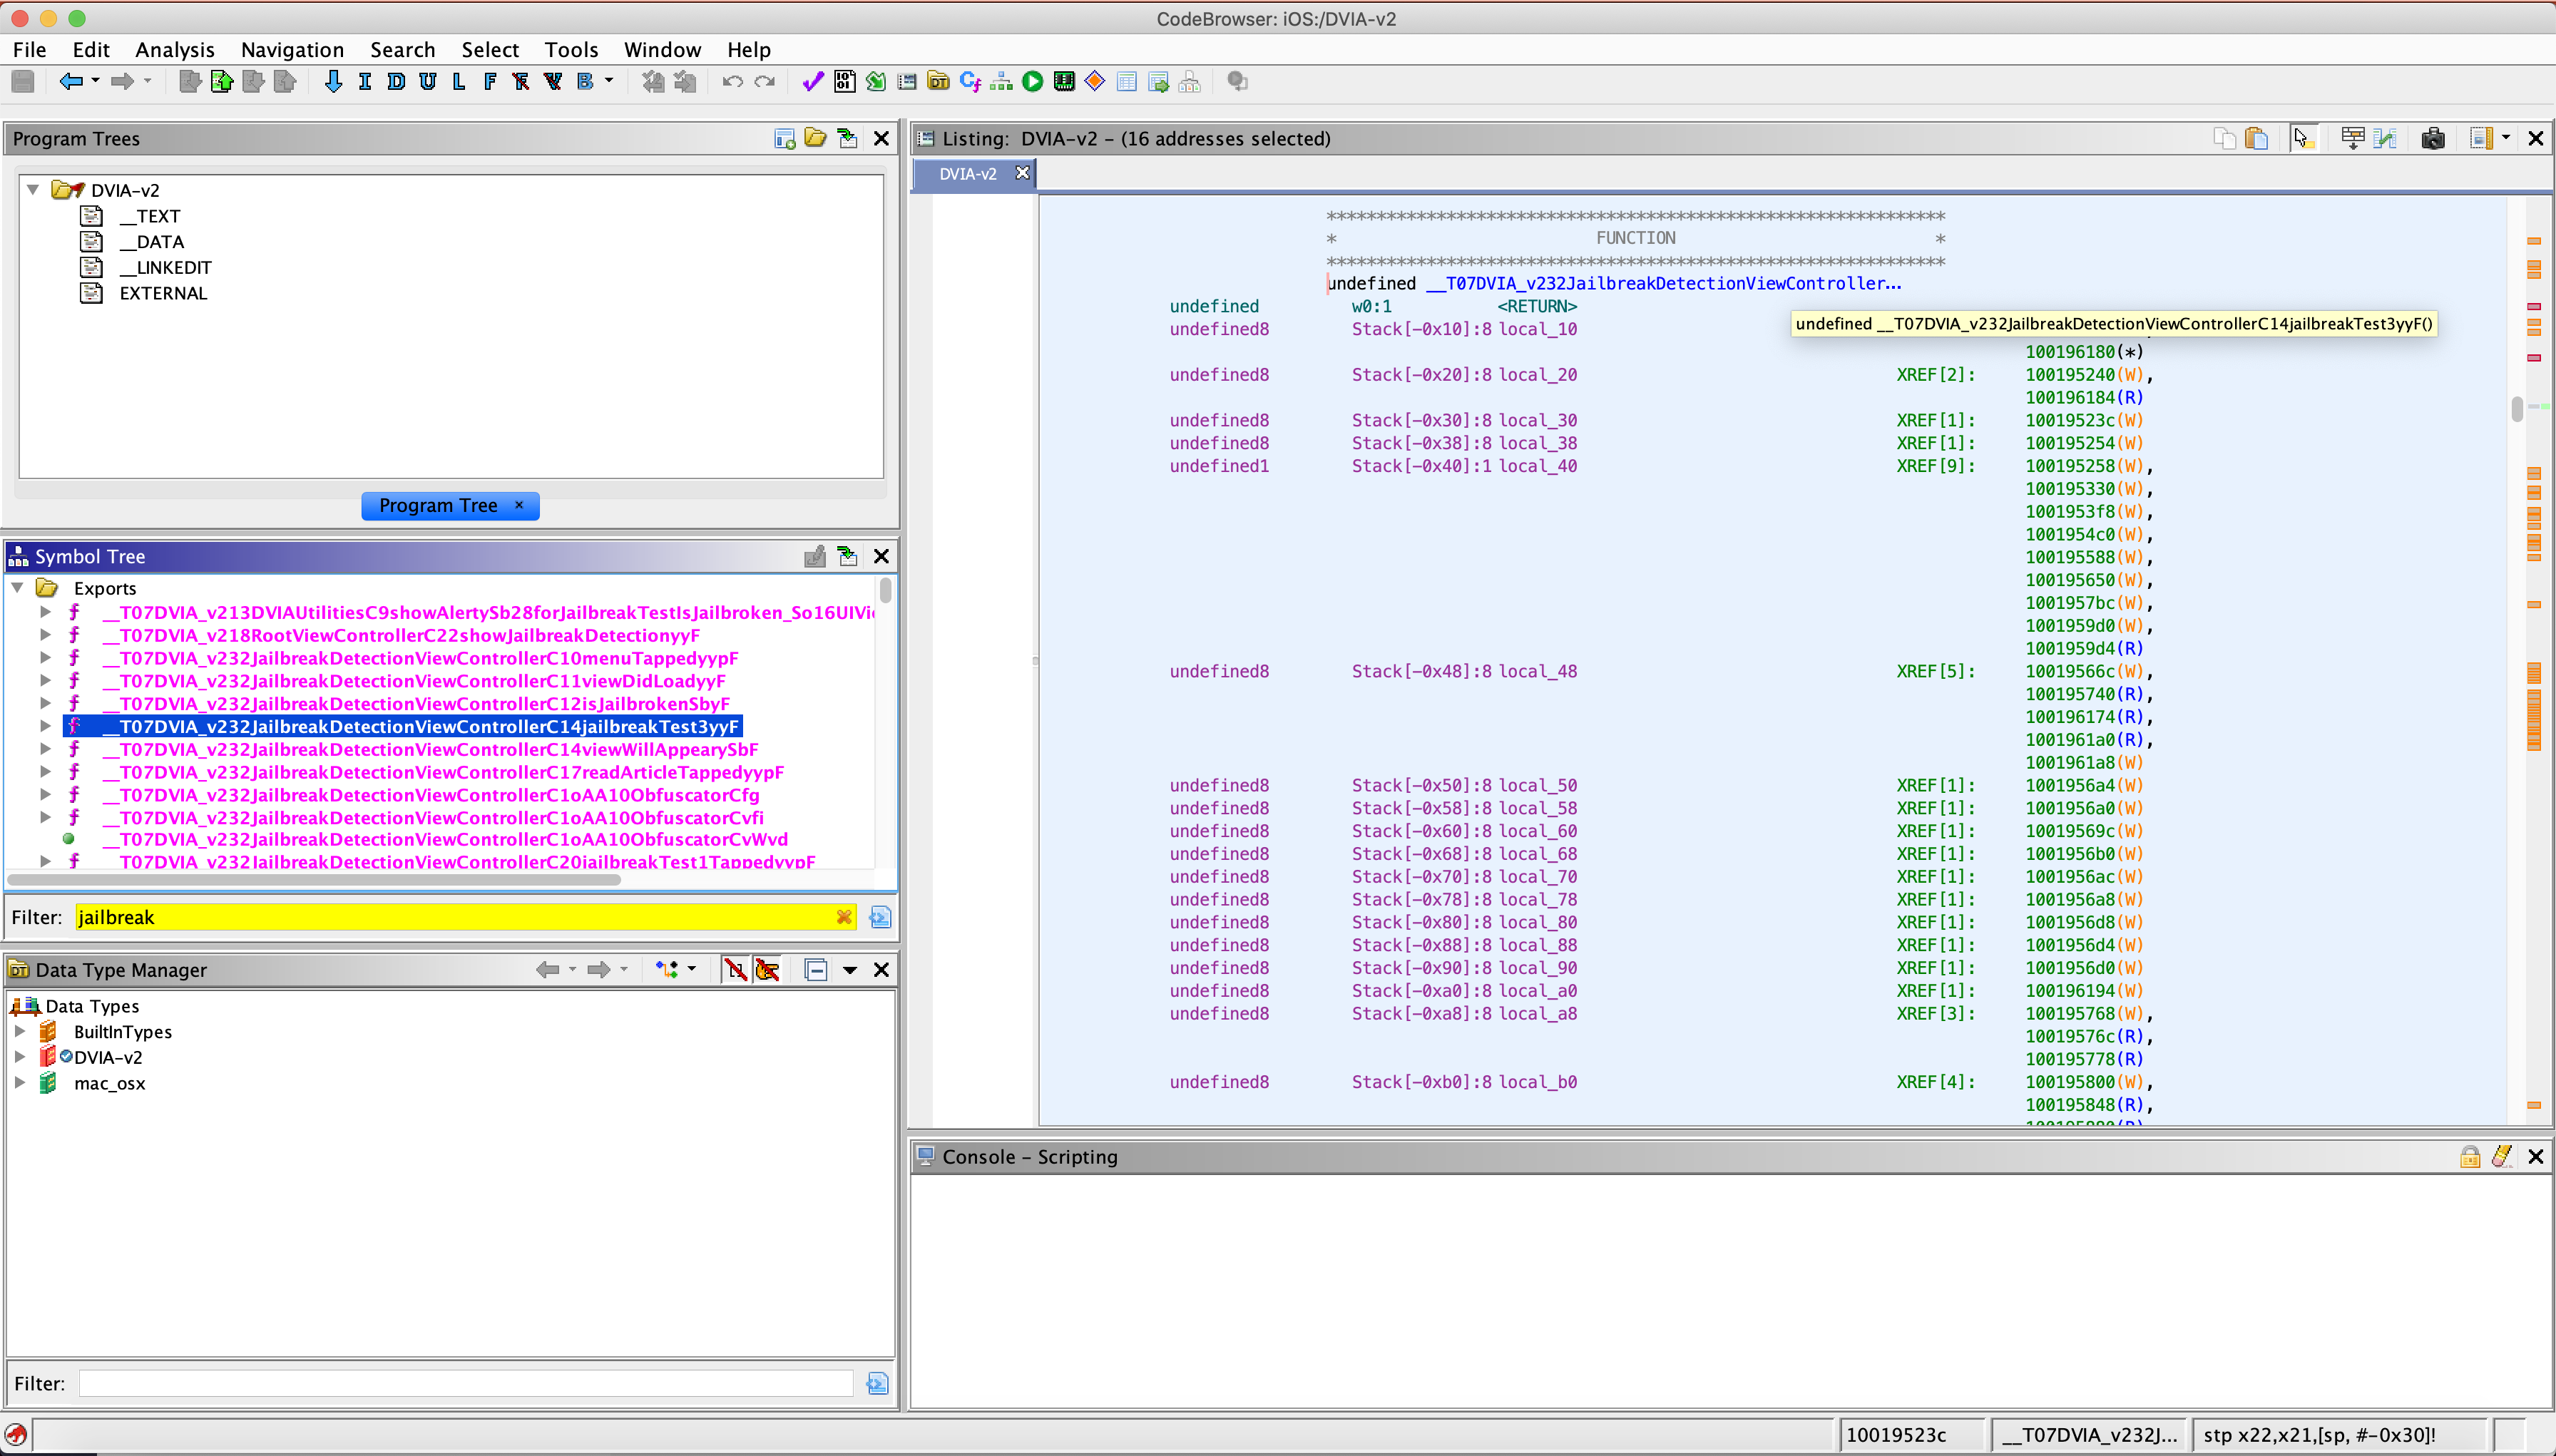
This function is much larger than the ones we have looked at so far. Scroll down through it and look at the strings and we will see a rough idea of what it is checking. First we see that it is checking whether the application Cydia exists, since this is a common application installed with jailbreaks by default.
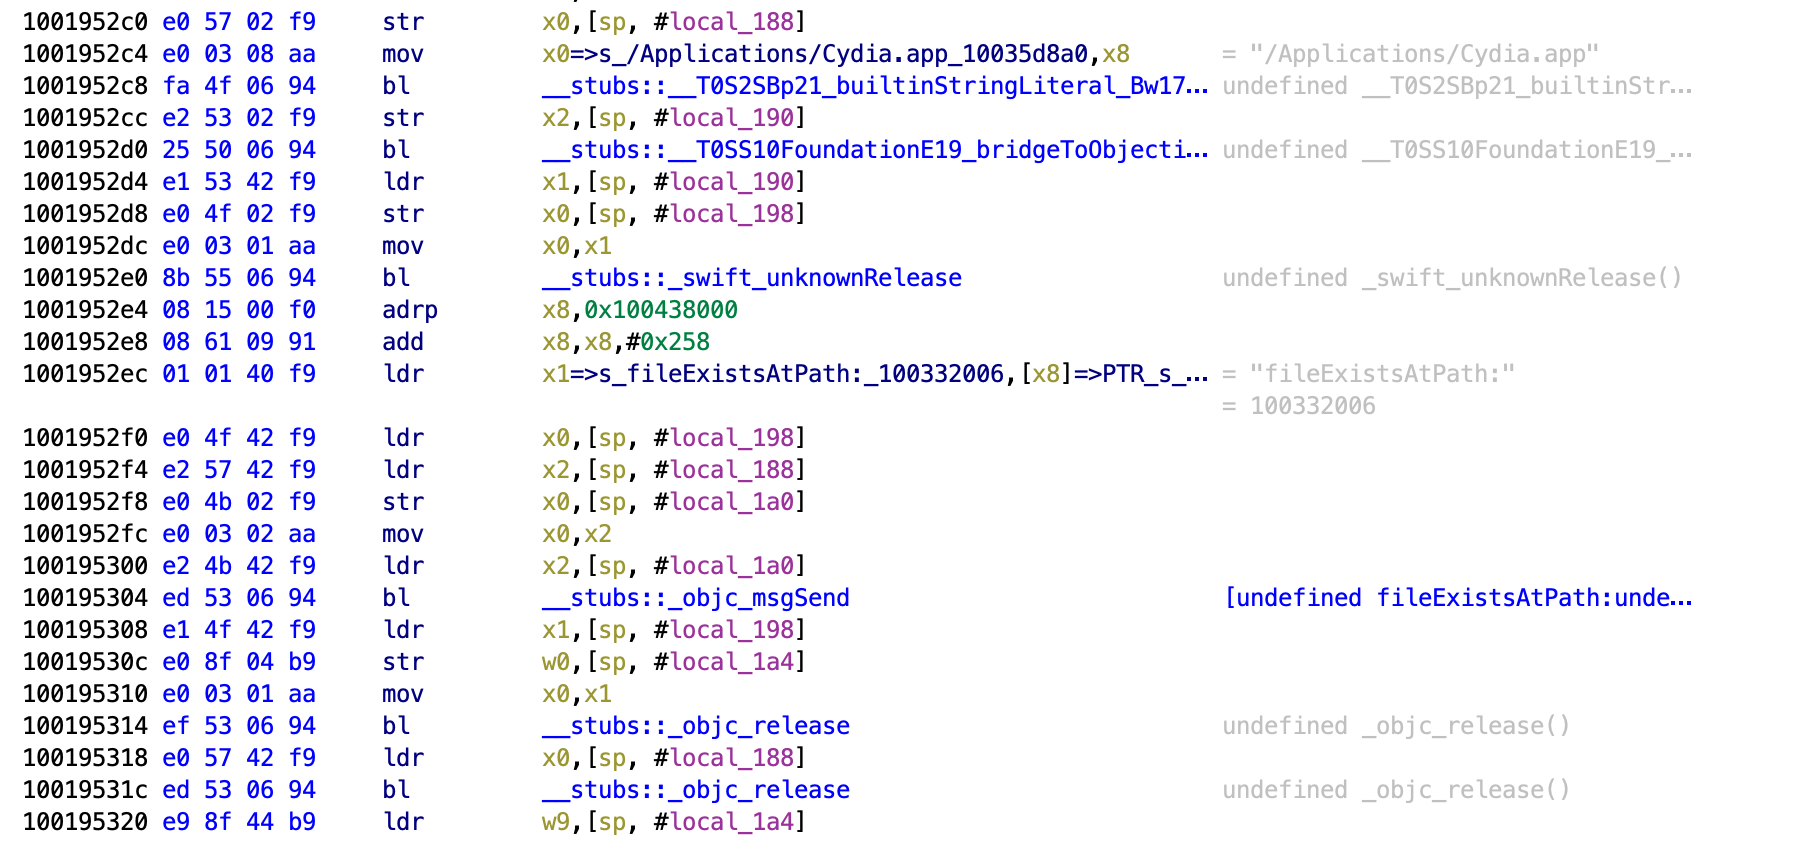
Next it checks for a file for the MobileSubstrate. I don’t know what this does but may relate to Cydia Substrate which is also common with jailbreaks.
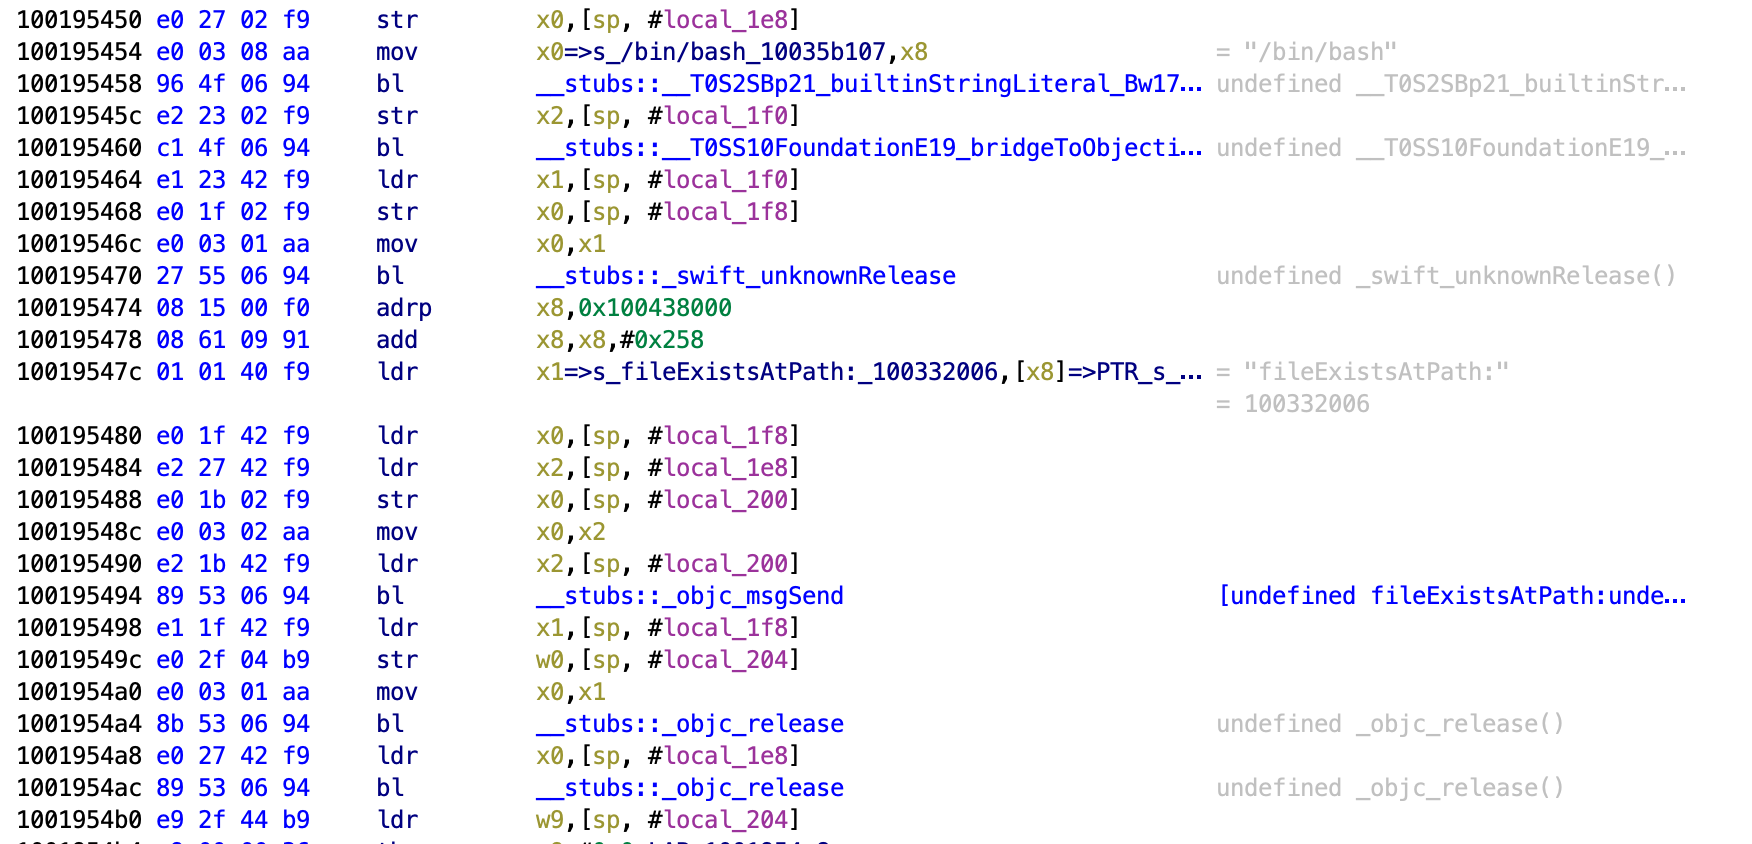
Next it checks for bash being present on the phone. This is something commonly installed by users with jailbroken phones.
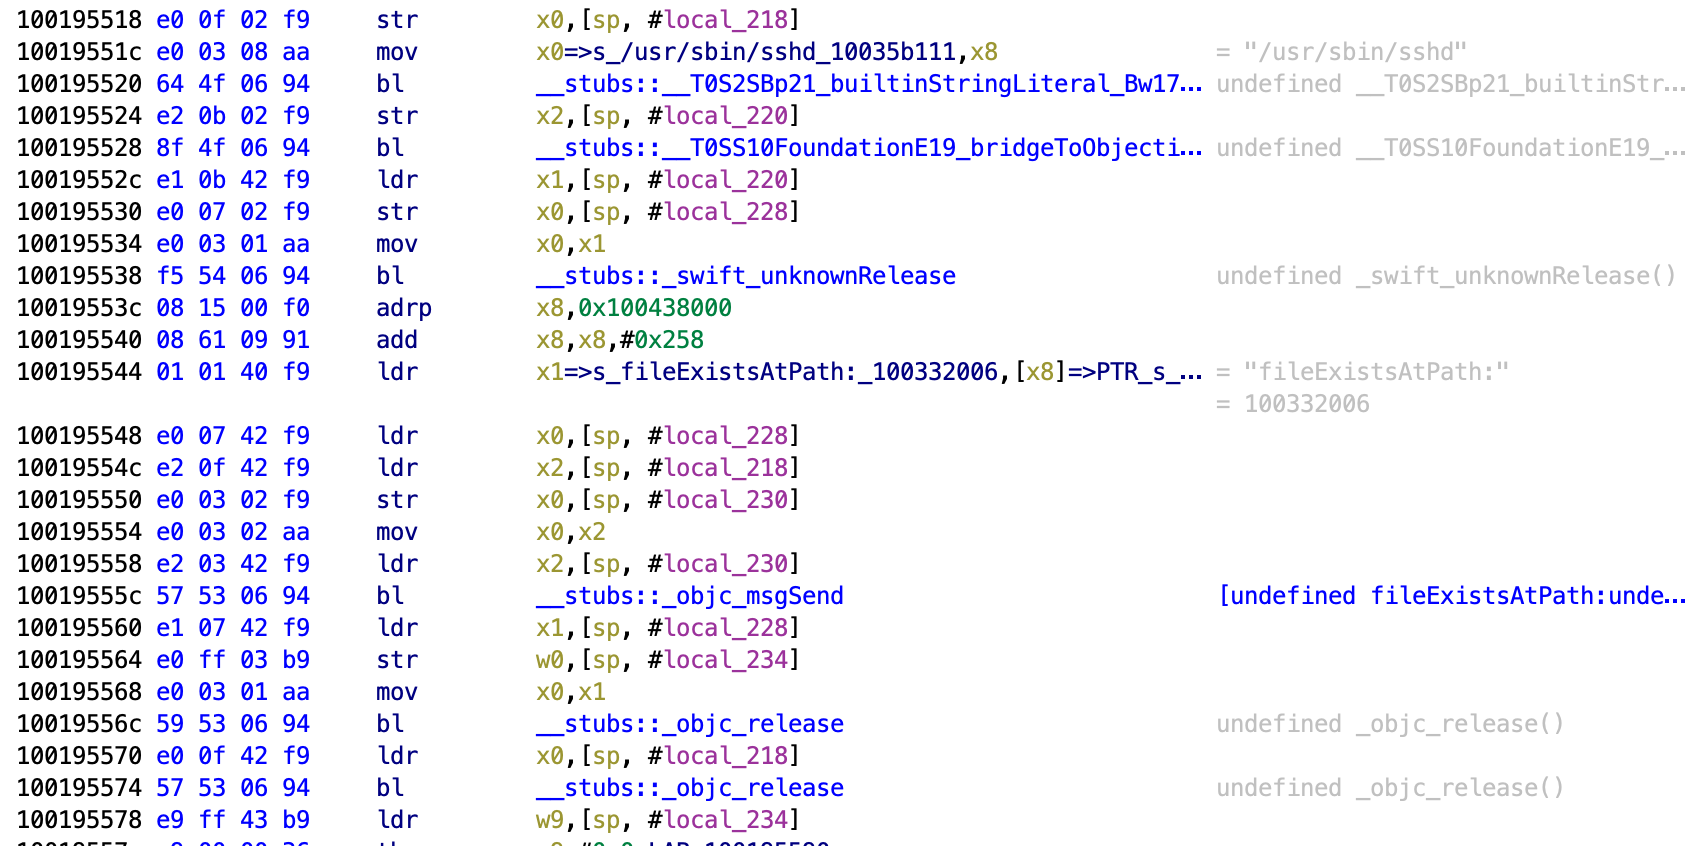
Next it checks for SSH being present.
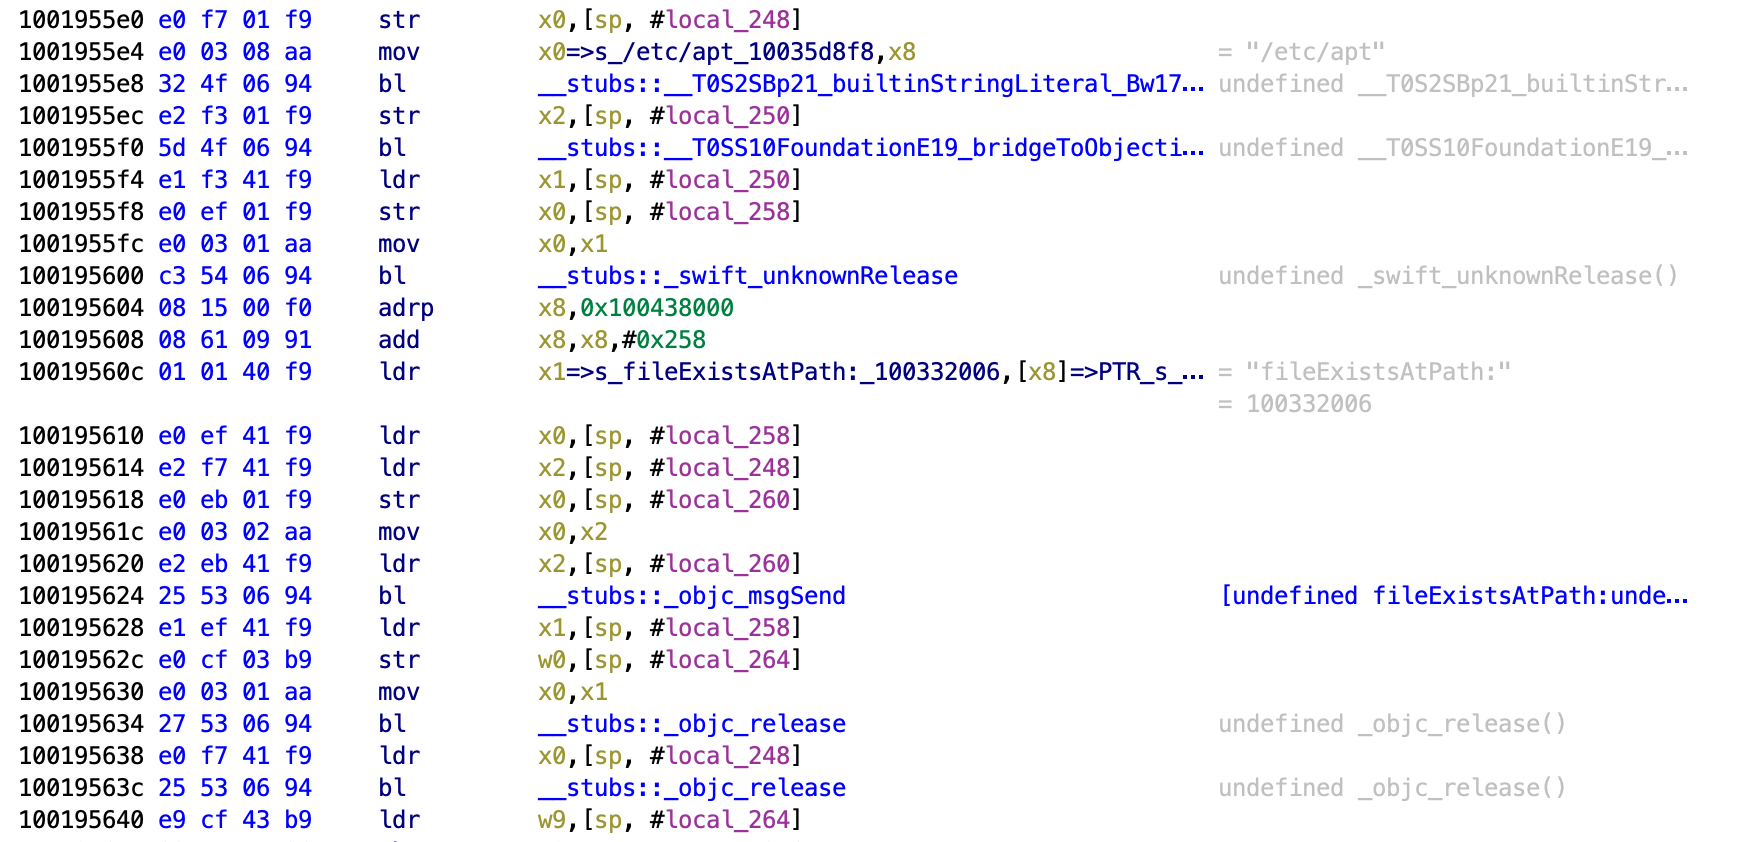
Then it checks for /etc/apt being present.
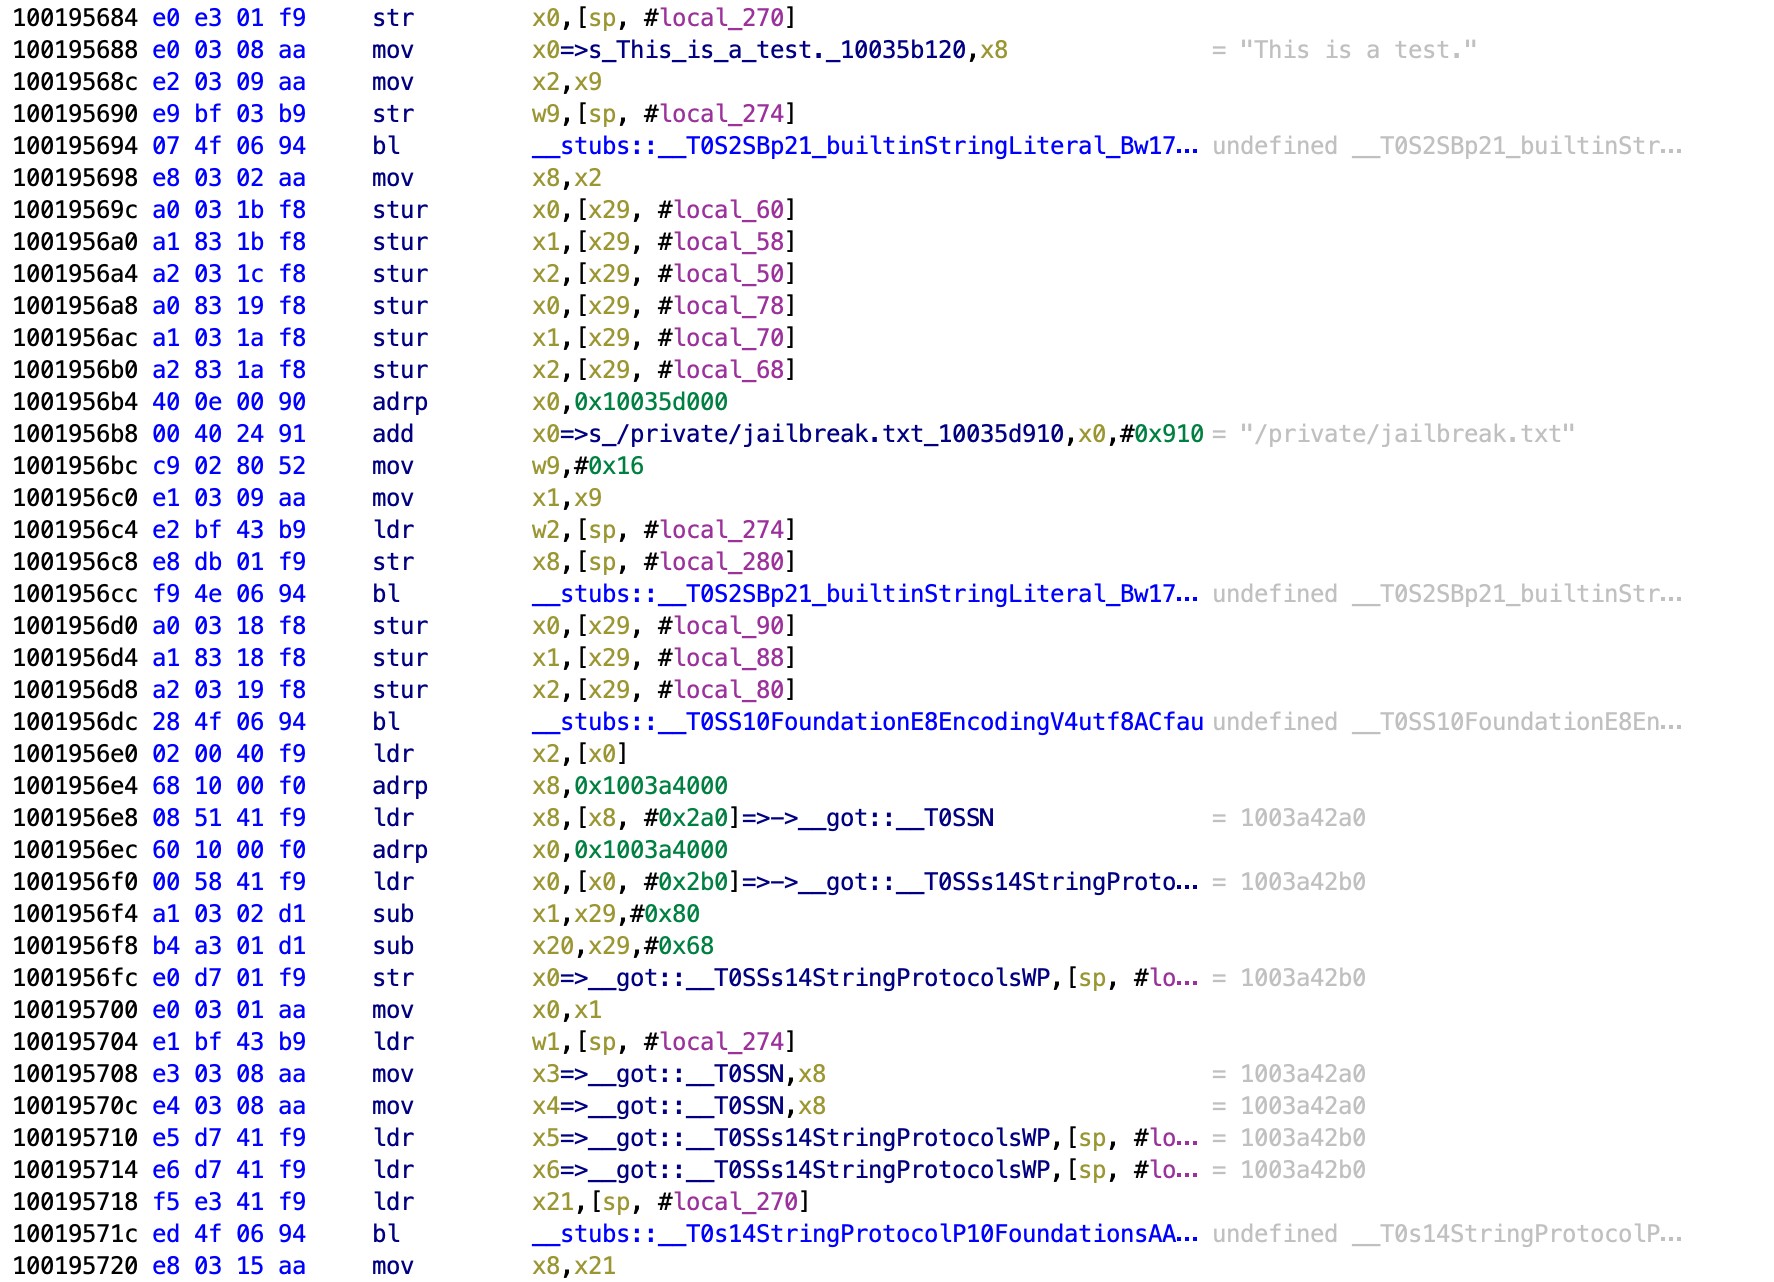
It then writes “This is a test” and tries to put it in a file at /private/jailbreak.txt. This is testing whether the application can interact with files outside of the application sandbox, which is not possible on a non-jailbroken device.
It then checks to see if the URL Schema cydia:// returns anything. Even if the location of Cydia is moved, if it is on the device then the URL schema will be present and can be checked.

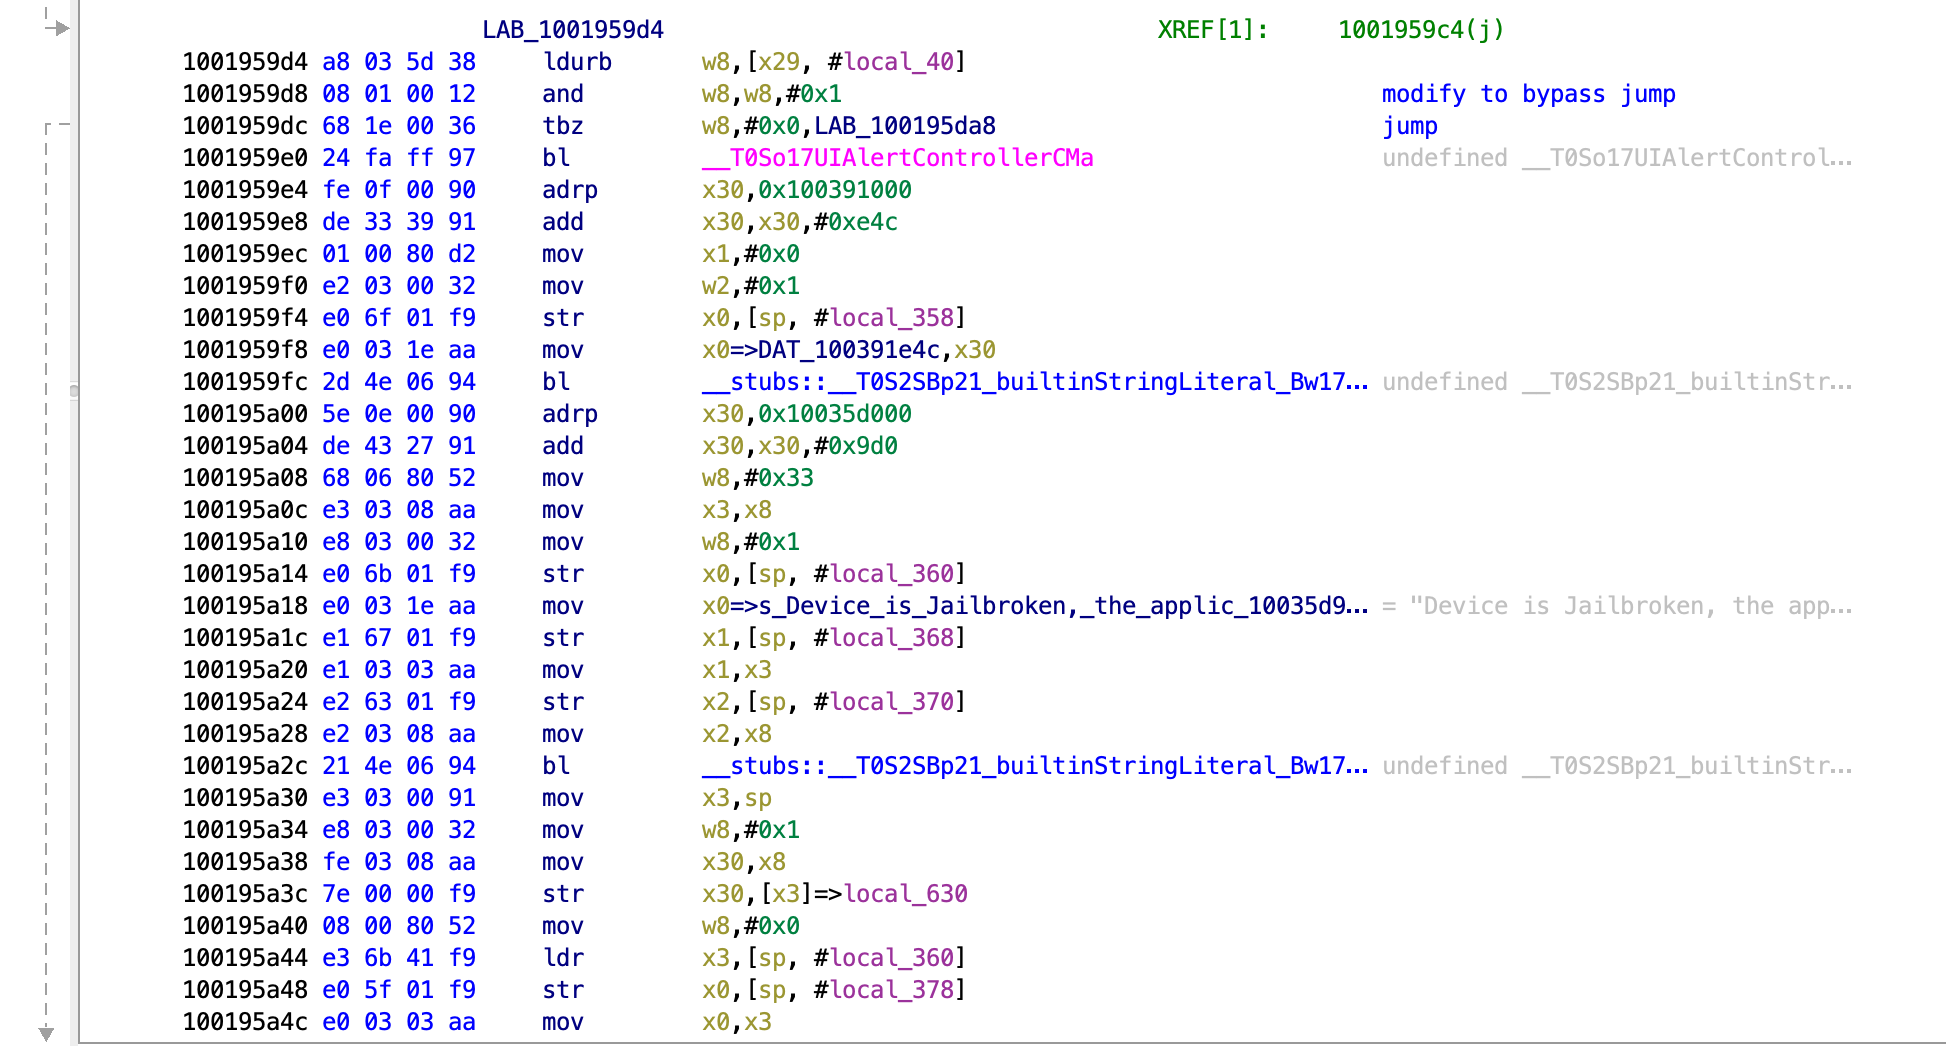
Next we see the function that does the actual comparison and we can see the failure message within the popup as a string. We can also see that there is a jump before the failure that goes past it.
The jump goes to this function, showing the success message.
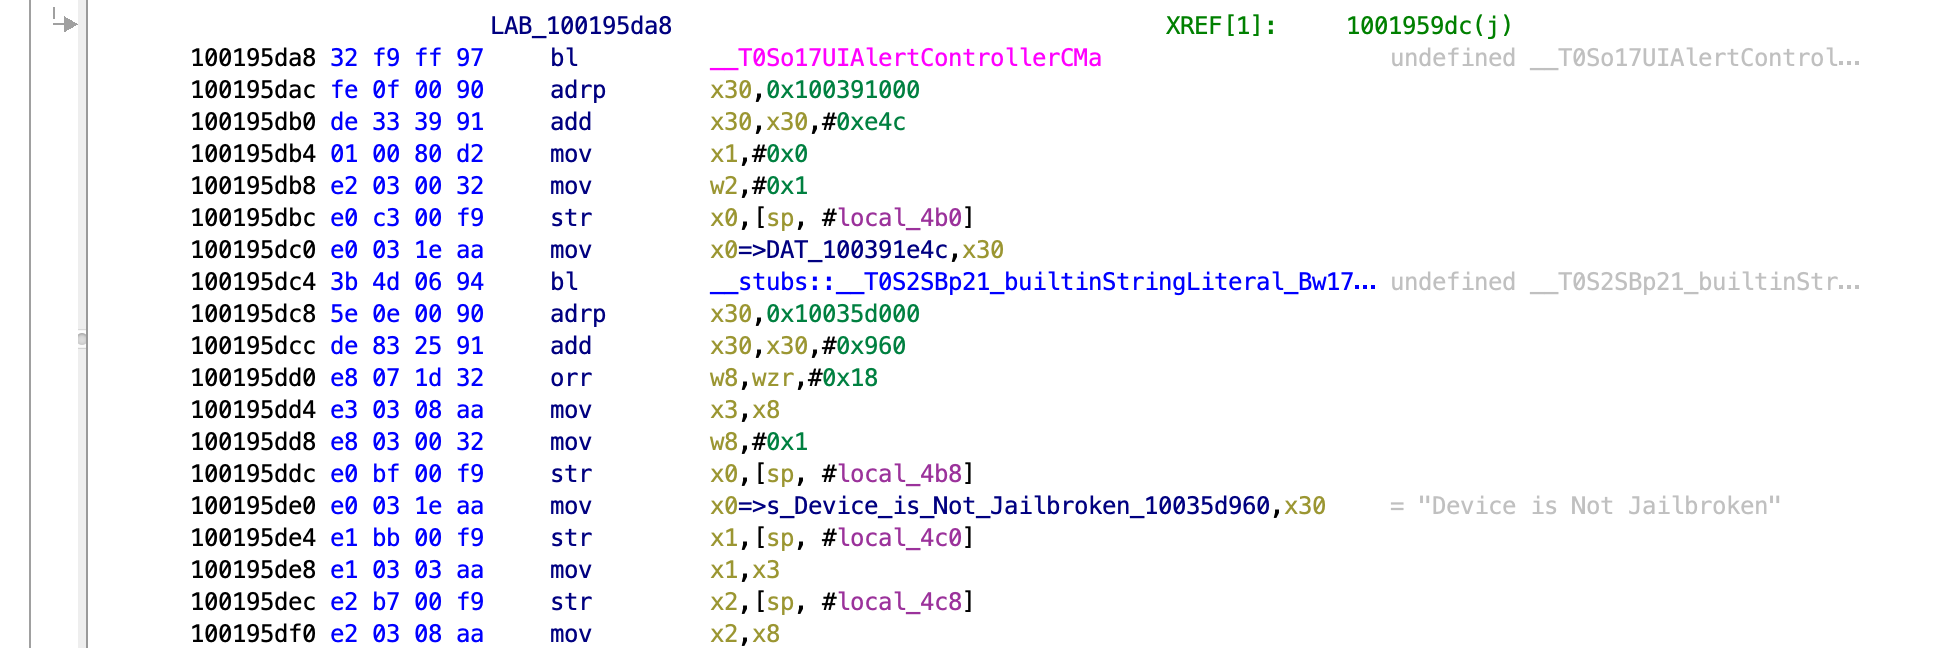
So now we have a rough idea of how this function works. It performs each of these checks and must store the result, then when it gets to the end it assesses all the results and then decides whether or not the device is jailbroken.
We could use the method from Test 1 to change the result of each individual check. However, we don’t have to do that here because there is only one jump. If after each check it jumped if it failed, then we would need to modify them all. So knowing that we only need to find one thing to modify, lets take a look at the jump.
                        LAB_1001959d4                                   XREF[1]:     1001959c4(j)
1001959d4 a8 03 5d 38     ldurb      w8,[x29, #local_40]
1001959d8 08 01 00 12     and        w8,w8,#0x1                                       modify to bypass jump
1001959dc 68 1e 00 36     tbz        w8,#0x0,LAB_100195da8                            jump
Here we can see what happens just before the jump. We can see that the key instruction is the and operation for the w8 register.
At the and instruction, its performing an AND operation on register 8 and the value 0x1. The tbz instruction is defined as Test bit and branch if zero. So the tbz instruction is testing if register 8 is 0x0 or 0x1. If it is 0x0 then it will branch (jump). That means if we can make register 8 have the value 0x0, then it will jump to the success function.
We can do some sanity checking of this with our scripts from Test 1 to make sure that this is being called and to make sure that this value is currently 0x1. Note that to do this you will need to change the register, because we are no longer looking at register 0 like we were for Test 1. The script below would print the value of this instruction.
var targetModule = 'DVIA-v2';
var addr = ptr(0x1959d8);
var moduleBase = Module.getBaseAddress(targetModule);
var targetAddress = moduleBase.add(addr);
   Interceptor.attach(targetAddress, {
        onEnter: function(args) {
                    console.log('At the address ' + addr + ' the value is currently ' + this.context.x8);
        },
    });
Run that with Frida and run the application Test 3 and you should see the value 0x1 get printed. Now lets hook it!
var targetModule = 'DVIA-v2';
var addr = ptr(0x1959d8);
var moduleBase = Module.getBaseAddress(targetModule);
var targetAddress = moduleBase.add(addr);
   Interceptor.attach(targetAddress, {
        onEnter: function(args) {
                if(this.context.x8 == 0x01){
                    this.context.x8=0x00
                    console.log("Bypass Test3");
            }
        },
    });
I named this file DVIA2bypassjailbreak3.js. You can see that it is the same as Test 1, just with a different pointer and a different register. Now run it with Frida.
frida -U -l DVIA2bypassjailbreak3.js DVIA-v2
Now hit the Test 3 in the application and you should see the successful pop up saying we aren’t jailbroken!
Jailbreak Test 4
Now we can go to the Test 4 function in Ghidra.

We can see as we scroll through this that it is the same as Test 3. It performs the same jailbreak tests and then has the same test and jump logic at the end like 3 did. This means that we can scroll down until we see the failure message, then find the jump and then modify the value in the register.
The failure message and jump are shown below:

We can see the same logic for the jump.
                     LAB_1001936dc
1001936dc a8 83 5c 38     ldurb      w8,[x29, #local_48]
1001936e0 08 01 00 12     and        w8,w8,#0x1
1001936e4 68 24 00 36     tbz        w8,#0x0,LAB_100193b70
Since it is another and operation followed by a tbz, then we know we can alter the value of the register to be 0 and take the jump, leading to success. The code for this is shown below:
var targetModule = 'DVIA-v2';
var addr = ptr(0x1936e0);
var moduleBase = Module.getBaseAddress(targetModule);
var targetAddress = moduleBase.add(addr);
   Interceptor.attach(targetAddress, {
        onEnter: function(args) {
                if(this.context.x8 == 0x01){
                    this.context.x8=0x00
                    console.log("Bypass Test4");
            }
        },
    });
We are looking at the x8 register again so that stays the same as Test 3. Now when you run this with Frida and hit the button in the application you should see a success message!
frida -U -l DVIA2bypassjailbreak4.js DVIA-v2
Jailbreak Test 5
Start out the same as the others, finding the function in Ghidra.
Scroll down and we will see a slight difference. Now instead of being strings that we can read to see what it is checking, it makes calls out to other functions and seems to be obfuscated in some way.
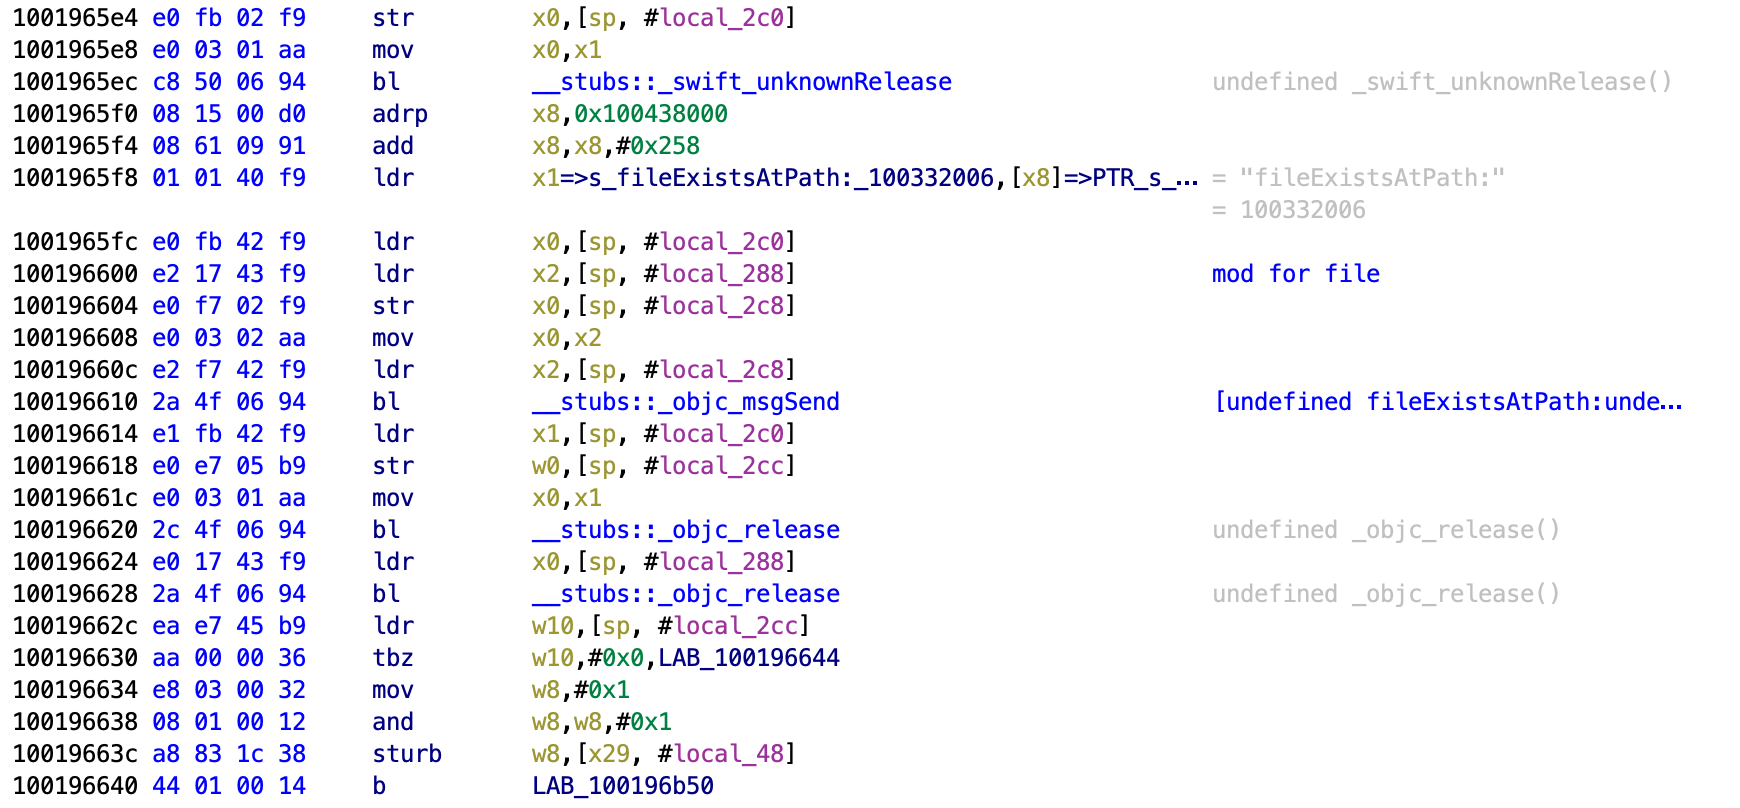
We can see that the same logic is happening of a check and then it reporting that a file exists, but we don’t know what file exactly. We could do some digging around (and would have to if it jumped after each fail), but if we keep on scrolling we will actually see that the end logic is similar.

This shows that it is the same, where a jump is taken to get to the success message, so lets see where the jump happens as it is not as clear as the others. Click on the arrow to highlight it and make it persist.
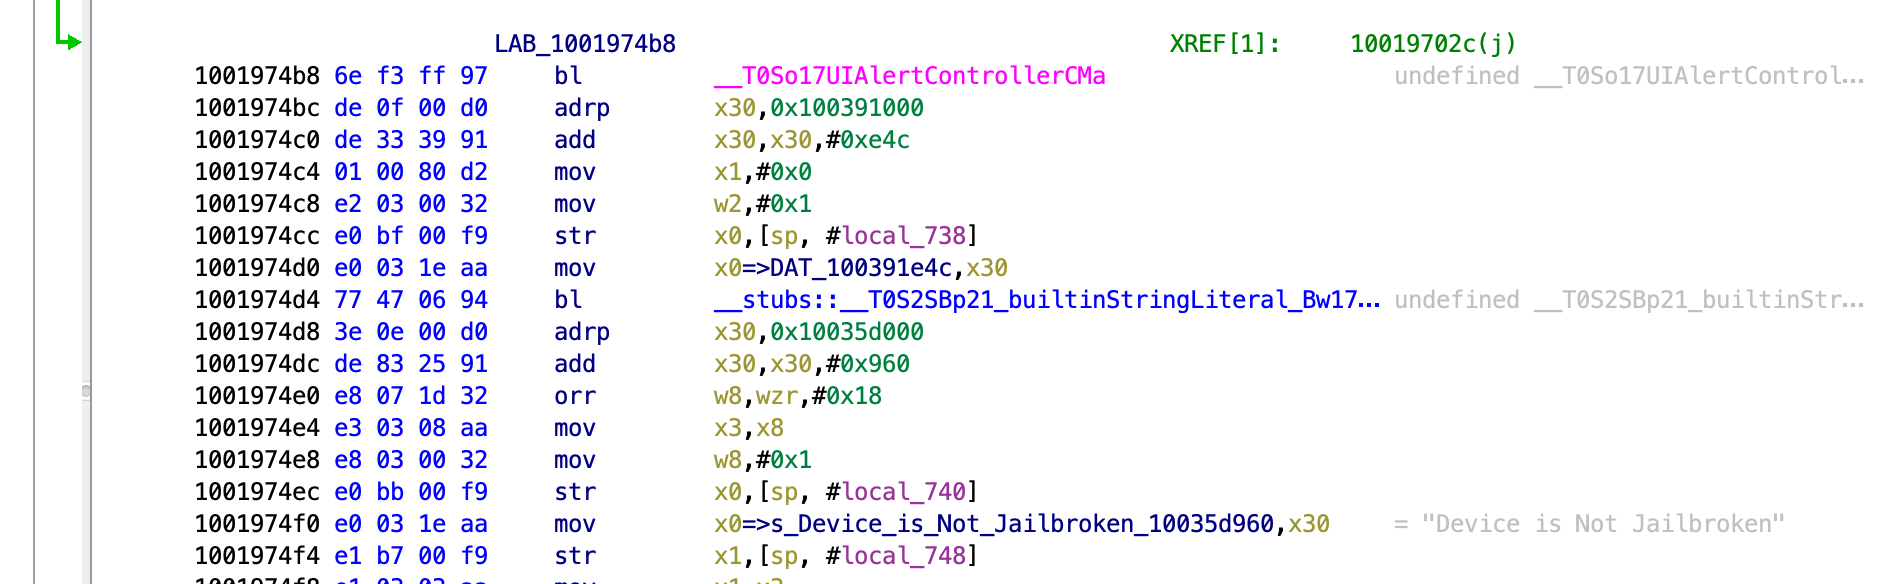
Now it is highlighted it will persist on our screen until we find the entry point. If we don’t highlight then it will drop off and it becomes hard to follow. If we scroll up to see where this jump starts, we will see the following function.

Here we can see a similar function to before.
                        LAB_100197024                                   XREF[1]:     100197014(j)
100197024 a8 83 5c 38     ldurb      w8,[x29, #local_48]
100197028 08 01 00 12     and        w8,w8,#0x1                                       modify to bypass
10019702c 68 24 00 36     tbz        w8,#0x0,LAB_1001974b8                            jump that passes fail message
This is now very familiar. We can see that its the same logic and we can apply the same hook to bypass it as before.
var targetModule = 'DVIA-v2';
var addr = ptr(0x197028);
var moduleBase = Module.getBaseAddress(targetModule);
var targetAddress = moduleBase.add(addr);
   Interceptor.attach(targetAddress, {
        onEnter: function(args) {
                if(this.context.x8 == 0x01){
                    this.context.x8=0x00
                    console.log("Bypass Test5");
            }
        },
    });
Now execute with Frida.
frida -U -l DVIA2bypassjailbreak5.js DVIA-v2
Then go into the application and click on the Test 5 button and you will see the success message! We have now bypassed all of the checks!
The Ultimate DVIA-v2 Jailbreak Bypass
If we take all the methods from before, we can combine them into one file and then run that through Frida to bypass all 5 levels with one script! This could be useful to know if there were several checks that we needed to individually bypass prior to the application running.
For this to work we needed to convert our method for Test 2 into one that matches the others. It follows the same process and I advise you do it yourself and check with the below to make sure you are correct.
var targetModule = 'DVIA-v2';
var addr = ptr(0x192c64);
var moduleBase = Module.getBaseAddress(targetModule);
var targetAddress = moduleBase.add(addr);
   Interceptor.attach(targetAddress, {
        onEnter: function(args) {
                if(this.context.x0 == 0x01){
                    this.context.x0=0x00
                    console.log("Bypass Test1");
            }
        },
    });

var addr = ptr(0x192d80);
var moduleBase = Module.getBaseAddress(targetModule);
var targetAddress = moduleBase.add(addr);
   Interceptor.attach(targetAddress, {
        onEnter: function(args) {
                if(this.context.x0 == 0x01){
                    this.context.x0=0x00
                    console.log("Bypass Test2");
            }
        },
    });

var addr = ptr(0x1959d8);
var moduleBase = Module.getBaseAddress(targetModule);
var targetAddress = moduleBase.add(addr);
   Interceptor.attach(targetAddress, {
        onEnter: function(args) {
                if(this.context.x8 == 0x01){
                    this.context.x8=0x00
                    console.log("Bypass Test3");
            }
        },
    });

var addr = ptr(0x1936e0);
var moduleBase = Module.getBaseAddress(targetModule);
var targetAddress = moduleBase.add(addr);
   Interceptor.attach(targetAddress, {
        onEnter: function(args) {
                if(this.context.x8 == 0x01){
                    this.context.x8=0x00
                    console.log("Bypass Test4");
            }
        },
    });

var addr = ptr(0x197028);
var moduleBase = Module.getBaseAddress(targetModule);
var targetAddress = moduleBase.add(addr);
   Interceptor.attach(targetAddress, {
        onEnter: function(args) {
                if(this.context.x8 == 0x01){
                    this.context.x8=0x00
                    console.log("Bypass Test5");
            }
        },
    });
Note that the code is the same for them all, but the variable for the application name is only set once as it is not needed for all of them.
Load this file into frida (I saved the file as DVIA2bypassjailbreakall.js).
frida -U -l DVIA2bypassjailbreakall.js DVIA-v2
Now in the iOS application run all 5 jailbreak tests and they should all succeed!! We can now say we have definitely bypassed jailbreak detection in DVIAv2!
Limitations
Whilst this method does work for the Swift methods and seems to be the best out there for hooking swift values, there are some limitations. In code that is heavily obfuscated or complex it could be very difficult to find the instructions reliable.
If strings were not there it would be very hard to find, if the function names were obfuscated then we would have had trouble finding them. Ultimately, we have control of the device and it would only be a matter of time, however it should be noted that there could be some limitations of this method based on your own reversing skills.
For more complex cases I would advise dynamic analysis rather than static analysis as it is easier to find the direct locations that change before the popup appears. Using dynamic analysis through LLDB you could find these locations even in more complex applications (assuming you could debug it).
I hope you enjoyed though and find it useful, as I haven’t seen any DVIA-v2 walkthroughs for this section that complete it with Frida.
References
Template for the Frida code: https://syrion.me/blog/ios-swift-antijailbreak-bypass-frida/
Solution with LLDB: https://www.citadel.sh/blog/dvia-v2-jailbreak-detection-solutions